server


How to monitor all outgoing requests/connections from your GNU/Linux machine

netstat -nputw;

The “netstat” command is a network utility tool used to display information about active network connections, including the protocol used (TCP or UDP), the local and remote addresses and port numbers, and the current state of the connection.

The options used in this command are as follows:

  • “n” displays addresses and port numbers in numerical form rather than converting them to hostnames and service names.
  • “p” shows the process ID (PID) and program name using the connection.
  • “u” displays UDP connections.
  • “t” displays TCP connections.
  • “w” displays raw sockets.
  • “;” separates the command from other commands that may follow.

Therefore, the command netstat -nputw; will display all current network connections on the machine, including the corresponding processes and raw socket connections, in a numerical format without resolving hostnames and service names.


Ubuntu Pi-hole DNS Fix: Pi-hole could not start DNS service after upgrading Ubuntu

Ubuntu is a widespread Linux distribution that has gained popularity over the years. One of the advantages of Ubuntu is its Long-Term Support (LTS) releases, which have been supported for several years and receive regular updates and security patches. Upgrading from one LTS release to another is a common task for Ubuntu users. However, sometimes things don’t go as planned, and some services may fail to start after the upgrade. In this blog post, we will explore one issue that Ubuntu users may encounter when upgrading from 18.04LTS to 20.04LTS or 22.04LTS and how to fix it.

The problem we will discuss is related to Pi-hole, a popular network-level advertisement and Internet tracker blocking application. Pi-hole uses DNS (Domain Name System) to stop unwanted traffic on your network. After upgrading from Ubuntu 18.04LTS to 20.04LTS or 22.04LTS, some users may encounter an issue where the DNS service for Pi-hole fails to start. The reason behind this is a broken symbolic link at /etc/dnsmasq.d/lxd.

LXD is a system container manager that allows users to run multiple isolated Linux systems (containers) on a single host. During the upgrade process, the symbolic link for LXD may become broken, causing the DNS service for Pi-hole to fail to start. Fortunately, the solution to this problem is simple. Users can remove the broken symbolic link by running the following command in the terminal:

sudo rm /etc/dnsmasq.d/lxd;

Once the broken symbolic link is removed, users can restart the DNS service for Pi-hole by running the following command:

pihole restartdns;

This command will restart the Pi-hole FTL (Faster Than Light) daemon, which handles DNS requests and blocks unwanted traffic.

In conclusion, upgrading from one LTS release to another is a common task for Ubuntu users. However, sometimes things may not go as planned, and some services may fail to start after the upgrade. One such issue that users may encounter is related to Pi-hole, where the DNS service fails to start due to a broken symbolic link at /etc/dnsmasq.d/lxd. Fortunately, the solution to this problem is simple, and users can fix it by removing the broken symbolic link and restarting the Pi-hole FTL daemon.


Rough notes on setting up an Ubuntu 22.04LTS server with docker and snap 1

IP allocations

First, we set up a static IP on the network device that would handle all external traffic and a DHCP on the network device that would access the management network, which is connected for maintenance.

To do so, we created the following file:

/etc/netplan/01-netcfg.yaml

using the following command:

sudo nano /etc/netplan/01-netcfg.yaml;

and added the following content to it:

# This file describes the network interfaces available on your system
# For more information, see netplan(5).
network:
  version: 2
  renderer: networkd
  ethernets:
    eth0:
      dhcp4: no
      addresses: [192.168.45.13/24]
      gateway4: 192.168.45.1
      nameservers:
          addresses: [1.1.1.1,8.8.8.8]
    eth1:
      dhcp4: yes

To apply the changes, we executed the following:

sudo netplan apply;

Update everything (the operating system and all packages)

Usually, it is a good idea to update your system before making significant changes to it:

sudo apt update -y; sudo apt upgrade -y; sudo apt autoremove -y;

Install docker via snap

In this setup, we did not use the docker version available on the Ubuntu repositories, we went for the ones from the snap. To install it, we used the following commands:

sudo apt install snapd;
sudo snap install docker;

Increase network pool for docker daemon

To handle the following problem:

ERROR: could not find an available, non-overlapping IPv4 address pool among the defaults to assign to the network

We modified the following file

/var/snap/docker/current/config/daemon.json

using the command:

sudo nano /var/snap/docker/current/config/daemon.json;

and set the content to be as follows:

{
    "log-level":        "error",
    "storage-driver":   "overlay2",
    "default-address-pools": [
        {
            "base": "172.80.0.0/16",
            "size": 24
        },
        {
            "base": "172.90.0.0/16",
            "size": 24
        }
    ]
}

We executed the following command to restart the docker daemon and get the network changes applied:

sudo snap disable docker;
sudo snap enable docker;

Gave access to our user to manage the docker

We added our user to the docker group so that we could manage the docker daemon without sudo rights.

sudo addgroup --system docker;
sudo adduser $USER docker;
newgrp docker;
sudo snap disable docker;
sudo snap enable docker;

After that, we made sure that the access rights to the volumes were correct:

sudo chown -R www-data:www-data /volumes/*
sudo chown -R tux:tux /volumes/letsencrypt/ /volumes/reverse/private/

Deploying

After we copied everything in place, we executed the following command to create our containers and start them with the appropriate networks and volumes:

export COMPOSE_HTTP_TIMEOUT=600;
docker-compose up -d --remove-orphans;

We had to increase the timeout as we were getting the following error:

ERROR: for container_a  UnixHTTPConnectionPool(host='localhost', port=None): Read timed out. (read timeout=60)
ERROR: An HTTP request took too long to complete. Retry with --verbose to obtain debug information.
If you encounter this issue regularly because of slow network conditions, consider setting COMPOSE_HTTP_TIMEOUT to a higher value (current value: 60).

Updating the databases and performing any repairs

First, we connected to a terminal of the database container using the following command:

docker exec -it mariadb_c1 /bin/bash;

From there, we executed the following commands:

mysql_upgrade --user=root --password;
mysqlcheck -p -o --all-databases;

Bulk / Batch stopping docker containers

The following commands will help you stop many docker containers simultaneously. Of course, you can change the command stop to another, for example rm or whatever suits your needs.

You need to keep in mind that if you have dependencies between containers, you might need to execute the commands below more than once.

Stop all docker containers.

docker container stop $(docker container ls -q);
#This command creates a list of all containers.
#Using the -q parameter, we only get back the container ID and not all information about them.
#Then it will stop each container one by one.

Stop specific docker containers using a filter on their name.

docker container stop $(docker container ls -q --filter name=_web);
#This command finds all containers that their name contains _web.
#Using the -q parameter, we only get back the container ID and not all information about them.
#Then it will stop each container one by one.

A personal note

Check the system for things you might need to configure, like a crontab or other services.

A script that handles privileges on the docker volumes

To avoid access problems with the various external volumes we created the mysql user and group on the host machine as follows:

sudo groupadd -g 999 mysql;
sudo useradd -u 999 mysql -g mysql;

Then we execute the following to repair ownership issues with our containers. Please note that this script is custom to a particular installation and might not meet your needs.

#!/bin/bash

sudo chown -R www-data:www-data ~/volumes/*;
sudo chown -R bob:bob ~/volumes/letsencrypt/ ~/volumes/reverse/private/;
find ~/volumes/ -maxdepth 2 -type d -name mysql -exec sudo chown -R mysql:mysql '{}' \;;

Cloudflare certificate on tomcat windows server

Use Keytool to Create a New Keystore at your Windows Server

Step 1

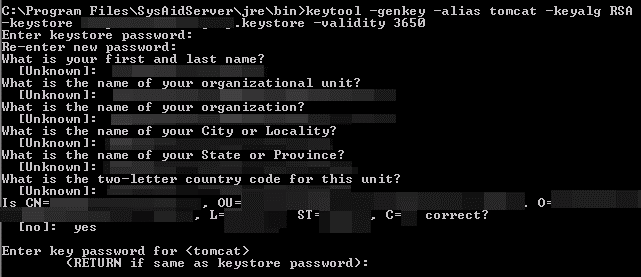
At your server, generate the Keystore file using keytool command at your command line window with the following command:

keytool -genkey -alias tomcat -keyalg RSA -keystore your_site_name.keystore -validity 3650

In the command above, your_site_name should be the name of the domain you want to secure with this SSL/TLS certificate.
When prompted for the first and last name, type the Fully Qualified Domain Name (FQDN) for the site you are securing with this certificate (e.g., www.yourdomain.com, mail.yourdomain.com).

Step 2

Generate a Certificate Signing Request (CSR) from your New Keystore using the keytool command:

keytool -certreq -alias tomcat -file certreq.csr -keystore your_site_name.keystore -keysize 2048

When prompted, enter the password you created earlier (when you created your new Keystore).
In your current directory, certreq.csr now contains your CSR.

Create the certificate from Cloudflare using the certificate request that you created from your Windows Server

Step 3

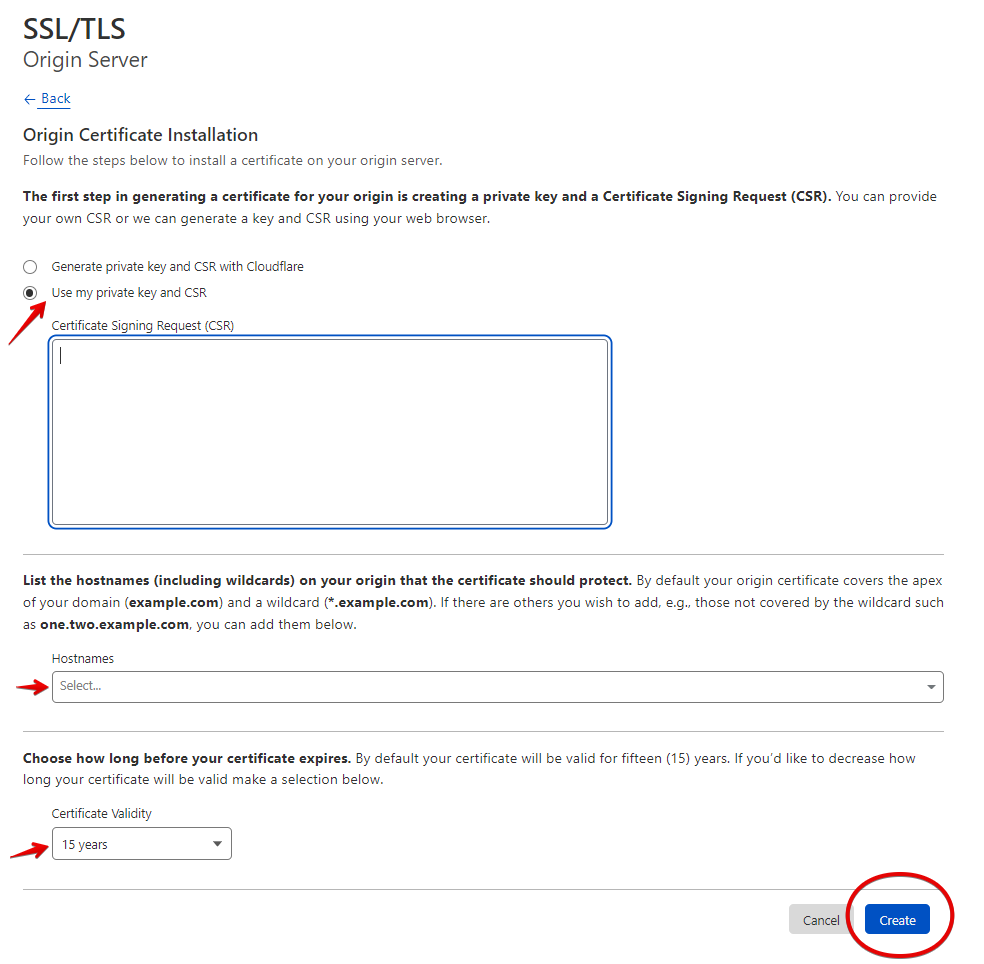
Open your Cloudflare account, select your domain, open the SSL/TLS tab and click on Origin Server to create the certificate

Step 4

Select the option I have my own private key and CSR where you will Copy-Paste the certificate you saved on the txt file from your Windows Server (certreq.csr), fill in the hostnames, select the expiration years, and press Create

Step 5

Copy-Paste in PKCS#7 key format the certificate in a text file and save the file

Import Cloudflare Origin CA root certificate at your Windows server

Step 6

Copy the Cloudflare Origin CA — RSA Root certificate from the Cloudflare website, save to a file and transfer it to your Windows Server.
[https://developers.cloudflare.com/ssl/origin-configuration/origin-ca/#4-required-for-some-add-cloudflare-origin-ca-root-certificates]
Filename: origin_ca_rsa_root.pem

Step 7

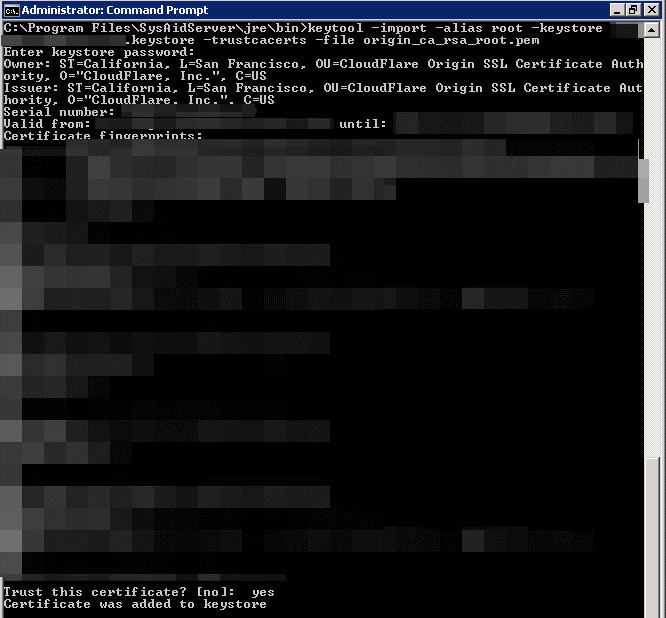
Import the root certificate into your Keystore file.

keytool -import -alias root -keystore your_site_name.keystore -trustcacerts -file origin_ca_rsa_root.pem

Add the public certificate from Cloudflare to your Windows Server

Step 8

Copy the file with the PKCS#7 certificate from Cloudflare at your Windows Server

Step 9

Run the following command to import the public certificate at your Keystore

keytool -import -alias tomcat -keystore your_site_name.keystore -file your_site_name.p7b

You should get a confirmation that the “Certificate reply was installed in Keystore.”

Use the newly created server origin certificate from Cloudflare for your website.

Step 10

Find your Tomcat server configuration (server.xml file), make the following changes at your Connector, and save the file.

<Connector executor="tomcatThreadPool" port="443" protocol="HTTP/1.1" SSLEnabled="true"
maxThreads="150" scheme="https" secure="true"
clientAuth="false" sslProtocol="TLS" keystoreFile="C:\Program Files\SysAidServer\ keystore your_site_name.keystore" keystorePass="XXXXXXXXXXXXXX" />

Step 11

Restart the Tomcat service