
Installing Oracle SQL*Loader on CentOS without full server installation
Assuming you do not want to install the full Oracle suite on the current machine, the following guide will show you how we installed Oracle SQL*Loader on CentOS release 6.7 (Final) using specific packages only. For this tutorial to be successful though, you need to have somewhere the full installation somewhere else as we need to to copy two files from there (the sqlldr executable and the binary file ulus.msb).
On the machine that has the full Oracle suite installation
Execute locate sqlldr to find the location of sqlldr binary file. If it does not return a result use the following:
find / -name "sqlldr" 2>/dev/null
The above command will search for sqlldr in the whole filesystem and it will redirect all errors to /dev/null so that you will not get spammed by access right issues etc.
After you found the file, copy it to the machine you want to use it from, the exact location will be given below.
Then, you need to find ulus.msb using the following command
find / -name "ulus.msb" 2>/dev/null
Copy that file to the machine you want to use sqlldr from as well, the exact location will be given below.
On the machine you want to execute sqlldr from and does not have the full Oracle suite installed
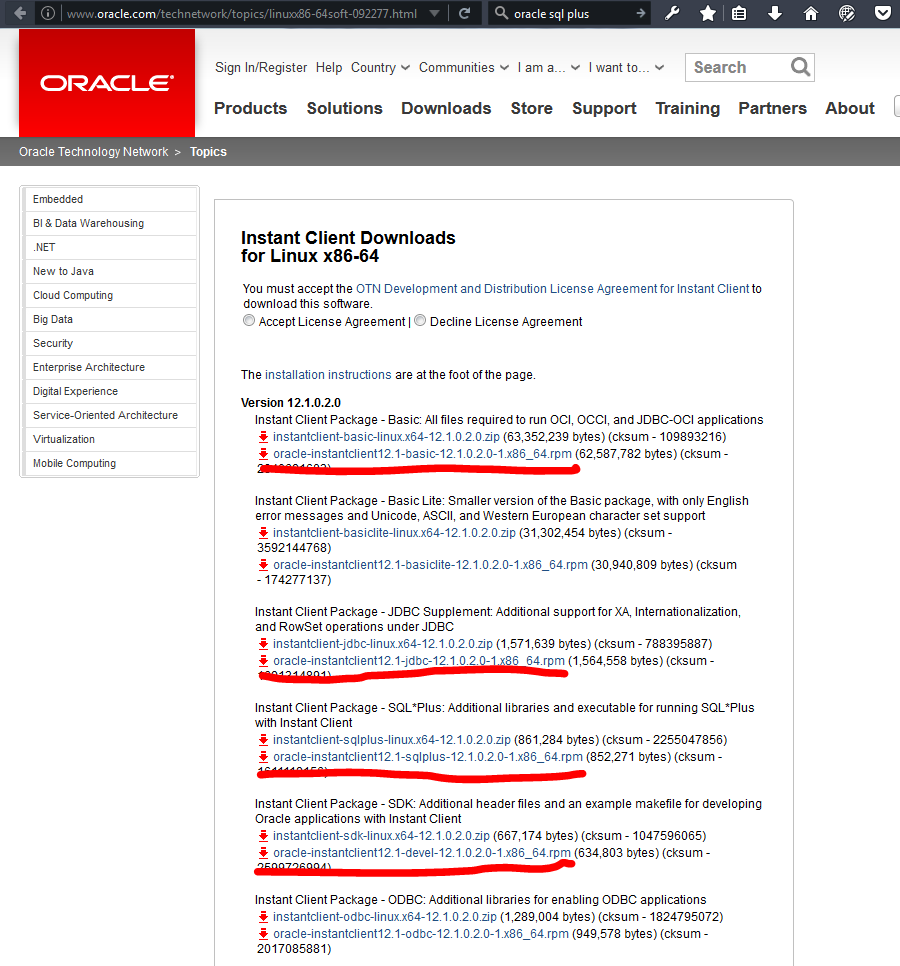
After we get the above files, we need to download the appropriate files from http://www.oracle.com/technetwork/topics/linuxx86-64soft-092277.html.
To access the files you need to click the Accept License Agreement radio button which means you agree to the ‘OTN Development and Distribution License Agreement for Instant Client‘ and finally you need to be logged in.
To login visit this page https://login.oracle.com/mysso/signon.jsp. If you are not registered yet, you need to create an account with a valid email from here https://profile.oracle.com/myprofile/account/create-account.jspx.
Once you are done with these steps, you need to download two rpm files for the client:
- oracle-instantclientRELEASE-basic-VERSION.x86_64.rpm
- oracle-instantclientRELEASE-sqlplus-VERSION.x86_64.rpm
- oracle-instantclientRELEASE-jdbc-VERSION.x86_64.rpm
- oracle-instantclientRELEASE-devel-VERSION.x86_64.rpm
The latest version at the time this document was written was version 12.1.0.2.0 and so we downloaded the following files:
- oracle-instantclient12.1-basic-12.1.0.2.0-1.x86_64.rpm
- oracle-instantclient12.1-sqlplus-12.1.0.2.0-1.x86_64.rpm
- oracle-instantclient12.1-jdbc-12.1.0.2.0-1.x86_64.rpm
- oracle-instantclient12.1-devel-12.1.0.1.0-1.x86_64.rpm
The files were then moved to the server that was to be installed and using an account with administration rights, they were installed using the the rpm -ivh command:
rpm -ivh oracle-instantclient12.1-basic-12.1.0.2.0-1.x86_64.rpm
rpm -ivh oracle-instantclient12.1-sqlplus-12.1.0.2.0-1.x86_64.rpm
rpm -ivh oracle-instantclient12.1-jdbc-12.1.0.2.0-1.x86_64.rpm
rpm -ivh oracle-instantclient12.1-devel-12.1.0.1.0-1.x86_64.rpm
In case you placed the two rpm files in a folder by themselves you can install both at the same time using the following command which is version independent:
rpm -ivh oracle-instantclient*
The packages will be installed in /usr/lib/oracle/RELEASE. Use ls /usr/lib/oracle/ to find the RELEASE number of your installation (in case you are not sure) and copy the path to client64 folder. In our case it was /usr/lib/oracle/12.1/client64. We will use this path as the ORACLE_HOME variable later on.
Following, you need to setup the environment variables for bash.
If you want to set the environment variables in your account only, add the following in your ~/.bash_profile:
ORACLE_HOME=/usr/lib/oracle/12.1/client64
PATH=$ORACLE_HOME/bin:$PATH
LD_LIBRARY_PATH=$ORACLE_HOME/lib
export ORACLE_HOME
export LD_LIBRARY_PATH
export PATH
And execute source ~/.bash_profile to reload your .bash_profile (alternatively, logout and login again).
If you want to set the environment variables for all users, create a .sh file in /etc/profile.d/ (e.g. oracle.sh) and add the content above in that file.
Installing SQL*Loader
Copy the sqlldr executable we got from the other machine to $ORACLE_HOME/bin/ (/usr/lib/oracle/RELEASE/client64/bin/). In our case it was /usr/lib/oracle/12.1/client64/bin/.
Then, copy the ulus.msb binary file to $ORACLE_HOME/rdbms/mesg/ (/usr/lib/oracle/RELEASE/client64/rdbms/mesg/). In our case it was /usr/lib/oracle/12.1/client64/rdbms/mesg/. If the folder does not exist, create it.
Finally, create a text file named tnsnames.ora in $ORACLE_HOME/network/admin/ (/usr/lib/oracle/RELEASE/client64/network/admin/). In our case it was /usr/lib/oracle/12.1/client64/network/admin/. If the folder does not exist, create it.
In tnsnames.ora we need to add the connection information for our databases and name them. The reason we need to do this, is because sqlldr does not accept the connection string from the command line like sqlplus as seen at the end of this tutorial here http://bytefreaks.net/applications/oracle/installing-oracle-sqlplus-on-centos. The structure of the connection string though, is exactly the same as the one used in sqlplus. Following the example from the other guide and the naming convention for the tnsnames.ora file, the format of the string would be:
connectionname=(DESCRIPTION=(ADDRESS=(PROTOCOL=TCP)(HOST=HOSTNAME_OR_IP)(PORT=1521))(CONNECT_DATA=(SID=MY_SID)))
SQL*Loader will be available for use using the sqlldr command.
The following example will connect to server with
- IP 192.168.10.1,
- on the SID ASID
- using the user myuser
- the password pass
- and we will use the control file
profitLoader.ctlto configure what the program will do once it starts (profitLoader.ctlis a file we wrote that describes the structure of the input file and the table to which the data should be added, code below for reference)
In tnsnames.ora file will add the following line:
myconnection=(DESCRIPTION=(ADDRESS=(PROTOCOL=TCP)(HOST=192.168.10.1)(PORT=1521))(CONNECT_DATA=(SID=ASID)))"
and we will use the connection information as follows:
sqlldr "username[alias]/password@connectionname" control=profitLoader.ctl;
In our example we do not have an alias, so we will remove the [] part and use the rest. the command will be formed as follows:
sqlldr "myuser/pass@myconnection" control=profitLoader.ctl;
The content of profitLoader.ctl is as follows:
LOAD DATA
INFILE '/dev/shm/profitLoader.dat'
APPEND INTO TABLE PROFIT
FIELDS TERMINATED BY ','
(USERID, TRANSACTIONID, PROFIT)
In our scenario, we have a csv file that contains 3 columns and we want to load all the data to a table called PROFIT.


