Windows 10


Starting XAMPP with port 80 on Windows 10 Professional 1

Recently we were asked to have a look at a XAMPP installation on a Windows 10 Professional machine which would not start while giving the following error:

Problem detected!
Port 80 in use by "Unable to open process" with PID 4!
Apache WILL NOT start without the configured ports free!
You need to uninstall/disable/reconfigure the blocking application
or reconfigure Apache and the Control Panel to listen on a different port

The culprit of this problem was a module of the IIS (Internet Information Services for Windows Server) that is named World Wide Web Publishing Service (WWW service or W3SVC service). Apparently, the W3SVC was hoarding port 80 even though IIS was not executing. To provide a quick solution, we decided to stop the W3SVC and get over this difficulty in a jiffy.

As you can see in the following video, to stop the World Wide Web Publishing Service (WWW service or W3SVC service) we performed the next steps:

  1. Clicked on the Start button
  2. Typed in the word services, which showed the Services link which we clicked to start the windows services  manager
  3. Then, we scrolled down in the Services window until we found the World Wide Web Publishing Service
  4. Finally, we right clicked on it and selected Stop.

After that, XAMPP was able to start Apache on port 80 with no issues.


ATEN – USB-to-Serial Converter (35cm) UC232A – Windows 10 (64bit) Drivers

Background

Recently we started using the UC232A USB-to-Serial Converter to connect to a board.
The software we used was TeraTerm on a 64bit Windows 10 without installing custom drivers.

Our serial port configuration was the following:

  • Baud rate: 115200
  • Data: 8 bit
  • Parity: none
  • Stop: 1 bit
  • Flow control: none
  • Transmit delay:
    5 msec/char
    5 msec/line

The problem

We noticed that something was wrong with the process as the terminal would not operate consistently.
Some times keystrokes did not appear on screen, in other times results would not appear correctly (they could be truncated or mixed with other data) and in general, the system acted like it was possessed by a ghost.

Troubleshooting

We played around with the configuration parameters, hoping that it was an issue like having the need to add large transmit delay but it did not change anything, the communication with the board was unstable.
Afterwards, we switched to another cable, of a different company, and everything worked as expected. The data on the screen was consistent and the ghost was banished. The UC232A was brand new so we tested that it works on a GNU/Linux machine, which turned out to be OK. Doing so, these two tests led us to the conclusion that since both the cable operates properly on GNU/Linux and the board operates properly using the other cable, that the issue we had was the automatically installed Windows 10 drivers.

Solution

While the cable was unplugged, we installed the official drivers we found here.
To find the drivers on that page, click on Support and Download tab at the bottom and then click on the Software & Drivers panel.
From the new table that will appear, under the category Windows Legacy Software & Driver we used the latest version that was available at the time that this post was written, which was v1.0.082 dated 2016-01-27 uc232a_windows_setup_v1.0.082.zip ([download id=”2357″] retrieved on the 23rd of November 2016).
After the download was finished, we restarted the machine, plugged in the cable and gave it another go.
The system was working as expected.

Following, you will find the screenshots from the device manager, after we got the cable working right.

uc232a-device-manager

uc232a-device-properties

uc232a-drive-file-details


Activate a wireless hotspot on Windows 10 1

Requirements

  • You must be an administrator of the machine to complete this guide.
  • You need to have at least two network devices.
  • One of them needs to have access to the internet and the other one needs to be a WiFi adapter which has Hosted Network support.

To check if your wireless adapter supports the functionality for Hosted Network, open a Command Prompt and type NETSH WLAN show drivers.

To open the Command Prompt, press the buttons Windows+R on your keyboard.
A new run command prompt will appear.
Type in the input box cmd and hit the Enter button.

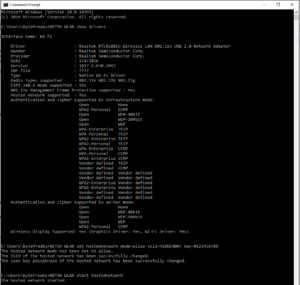
In the new Command Prompt type NETSH WLAN show drivers, the results should be similar to below.

C:\Users\bytefreaks>NETSH WLAN show drivers
 
Interface name: Wi-Fi
 
    Driver                    : Realtek RTL8188CU Wireless LAN 802.11n USB 2.0 Network Adapter
    Vendor                    : Realtek Semiconductor Corp.
    Provider                  : Realtek Semiconductor Corp.
    Date                      : 3/4/2016
    Version                   : 1027.4.630.2015
    INF file                  : ????
    Type                      : Native Wi-Fi Driver
    Radio types supported     : 802.11n 802.11b 802.11g
    FIPS 140-2 mode supported : Yes
    802.11w Management Frame Protection supported : Yes
    Hosted network supported  : Yes
    Authentication and cipher supported in infrastructure mode:
                                Open            None
                                WPA2-Personal   CCMP
                                Open            WEP-40bit
                                Open            WEP-104bit
                                Open            WEP
                                WPA-Enterprise  TKIP
                                WPA-Personal    TKIP
                                WPA2-Enterprise TKIP
                                WPA2-Personal   TKIP
                                WPA-Enterprise  CCMP
                                WPA-Personal    CCMP
                                WPA2-Enterprise CCMP
                                Vendor defined  TKIP
                                Vendor defined  CCMP
                                Vendor defined  Vendor defined
                                Vendor defined  Vendor defined
                                WPA2-Enterprise Vendor defined
                                WPA2-Enterprise Vendor defined
                                Vendor defined  Vendor defined
                                Vendor defined  Vendor defined
    Authentication and cipher supported in ad-hoc mode:
                                Open            None
                                Open            WEP-40bit
                                Open            WEP-104bit
                                Open            WEP
                                WPA2-Personal   CCMP
    Wireless Display Supported: Yes (Graphics Driver: Yes, Wi-Fi Driver: Yes)

In the results you need to find the line Hosted network supported and verify that the value is set to Yes, if it is not, then you cannot proceed with this wireless network adapter.

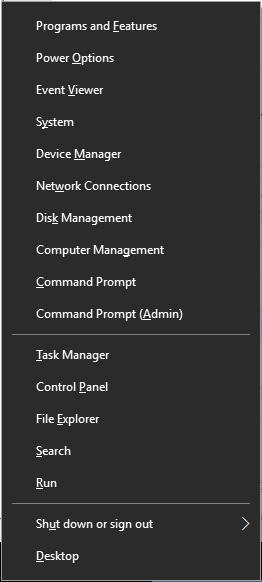
In case you got a permission error on the above command, try to open a new Command Prompt with admin rights.

Press the keys Windows+X, in the pop-up menu select Command Prompt (Admin). If your account has enough access rights, a new run command prompt will appear. In the new Command Prompt (Admin) type NETSH WLAN show drivers, the results should be similar to above.

If this failed as well, you cannot proceed with the current account, you either need to sign in with another account or ask your system administrator to perform this task for you.

How to setup the hotspot

In the Command Prompt enter the following command:

NETSH WLAN set hostednetwork mode=allow ssid=BYTEFREAKS key=0123456789

Update ssid=BYTEFREAKS with the name that you want to give your network. e.g. ssid=MY_NETWORK.

Update key=0123456789 with the password that you want to give your network. e.g. ssid=y0m2ZSQ3ng.

The new network will use WPA/WPA2 PSK security policy so your password needs to be at least 8 characters long.

The results will be similar to the following block.

C:\Users\bytefreaks>NETSH WLAN set hostednetwork mode=allow ssid=HIDDEN007 key=0123456789
The hosted network mode has been set to allow.
The SSID of the hosted network has been successfully changed.
The user key passphrase of the hosted network has been successfully changed.

How to activate the hotspot

Once the Hosted Network is created, enter the following command as is to activate it

NETSH WLAN start hostednetwork

C:\Users\bytefreaks>NETSH WLAN start hostednetwork
The hosted network started.

After this step, your network will be visible to connect to but it will not provide its users with internet access.

Please note that due to the lack of commands in the documentation (https://msdn.microsoft.com/en-us/library/windows/desktop/dd815243(v=vs.85).aspx) it is not possible to prevent your hotspot from broadcasting its SSID to everyone. In other words, it is not possible to hide your network from other users, so use a strong password!

hotspot-creation-commands

How to share internet connection with the hotspot

Press on the keyboard Windows+X to open the Power User menu, and select Network Connections.

power-user-menu

You will notice that a there is a new device in this list. The name of this device will be something line Local Area Connection* 12. That device is the new virtual device you created in the previous step to create the hotspot.

network-configuration-before-sharing

Right-click the other network adapter, that has an active internet connection and select Properties.

network-configuration-right-click-device

Click on the Sharing tab.

network-configuration-share-settings

Enable the Allow other network users to connect through this computer's Internet connection option.

From the Home networking connection drop-down menu select the virtual device that we created.

Click OK to close the configuration and apply the changes.

By completing this step, all devices connected to your Hotspot will have access to the internet via the connection of the second network device.


Using Sierra Wireless SL Series Development Kit on Windows 10

We got our hands on a SL Series Development Kit by Sierra Wireless.

sierra-wireless-sl-series-development-kit-with-sl8084t

Sierra Wireless SL Series Development Kit with SL8084T

sierra-wireless-sl-series-development-kit-with-sl6087

Sierra Wireless SL Series Development Kit with SL6087

Inside there was a USB with a couple of manuals and an installation package named Open_AT_Application_Framework_v2-51_Full_Installer.zip.
We installed the software, which included the USB drivers and an IDE based on eclipse named Developer Studio.
The version of Developer Studio was 2.3.2 and we installed it on Windows 10.
After the installation was complete, we did a check for updated as well.developer-studio-2-3-2

When we tried to connect to the device from the Target Management perspective, we could not connect to the COM1 port on the computer as it was not visible at all in the Devices List.

Later, we found that there were newer versions of the tool online (version 3 and version 4). So we downloaded the version 3 from this link that we found on this page on the line

“Please use the provided installer for Open AT Application Framework“.

Installing this version solved our problem, as we were able to connect to the device and load custom applications to it.

The version that worked for us was 3.6.0.

developer-studio-3-6-0

Note: We did not find a version 4 for Open AT Application Framework and that is why we used version 3.