linux


Extend LVM space to the rest of the free space on the disk

Recently, we formatted a server with Ubuntu 22.04 LTS. While selecting the disk settings, we selected the encrypted LVM partition scheme, and even though we selected the whole disk, we did not notice that the LVM would only allocate, by default, 100GB out of the 600GB available on the raid volume.

So, we proceeded with the installation, and at some point, we noticed that we ran out of space which should not have happened.

Using the command df -h we quickly spotted the problem:

$ df -h
Filesystem                 Size  Used Avail Use% Mounted on
tmpfs                      3,2G  3,9M  3,2G   1% /run
/dev/mapper/vgubuntu-root  100G   83G   17G  83% /
tmpfs                       16G   40M   16G   1% /dev/shm
tmpfs                      5,0M  4,0K  5,0M   1% /run/lock
/dev/sda5                  703M  257M  395M  40% /boot
/dev/sda1                  511M   24K  511M   1% /boot/efi
tmpfs                       16G     0   16G   0% /run/qemu
tmpfs                      3,2G  156K  3,2G   1% /run/user/1000

/dev/mapper/vgubuntu-root was only 100GB instead of the 600GB that we would expect it to be.

Using the command vgdisplay we verified that the space allocated to the logical volume group was not what we wanted.

To fix the problem, we issued the following commands:

lvextend -l +100%FREE /dev/ubuntu-vg/ubuntu-lv;
resize2fs /dev/mapper/ubuntu--vg-ubuntu--lv;

lvextend instructed our logical volume to consume all the available space on the hosting disk.

Then resize2fs allocated all the available space to our partition.


Rough notes on how to install CUDA on an Ubuntu 20.04LTS 1

To anyone coming across this post, please note that Canonical does not officially support CUDA. Not being supported formally means that you could face problems that we did not while setting up our machine.

Recently we wanted to use our GPU to execute various TensorFlow projects. We had to use version 1, specifically version 1.15 of TensorFlow, on one of our attempts. That setup was causing many problems even after version 2 was working perfectly. There must be something different with version 1, and it is not supported correctly anymore. We recommend avoiding using it unless needed.

Finding out what graphics card we have

Before getting started, we executed the following command that gave us the model of our graphics card:

lspci | grep -i nvidia;
$ lspci | grep -i nvidia
01:00.0 VGA compatible controller: NVIDIA Corporation TU104 [GeForce RTX 2080 Rev. A] (rev a1)
01:00.1 Audio device: NVIDIA Corporation TU104 HD Audio Controller (rev a1)
01:00.2 USB controller: NVIDIA Corporation TU104 USB 3.1 Host Controller (rev a1)
01:00.3 Serial bus controller [0c80]: NVIDIA Corporation TU104 USB Type-C UCSI Controller (rev a1)

Installing dependencies and NVidia repositories

Then we proceeded to install the headers of our Linux kernel, the repositories of NVidia, and finally install CUDA using apt-get.

sudo apt-get install linux-headers-$(uname -r);
wget https://developer.download.nvidia.com/compute/cuda/repos/ubuntu2004/x86_64/cuda-ubuntu2004.pin;
sudo mv cuda-ubuntu2004.pin /etc/apt/preferences.d/cuda-repository-pin-600;
sudo apt-key adv --fetch-keys https://developer.download.nvidia.com/compute/cuda/repos/ubuntu2004/x86_64/7fa2af80.pub;
sudo add-apt-repository "deb https://developer.download.nvidia.com/compute/cuda/repos/ubuntu2004/x86_64/ /";
sudo apt-get update;
sudo apt-get -y install cuda;
sudo apt-get install nvidia-gds;

After this step, we rebooted the computer to load the NVidia graphics driver.


Some notes on how to record audio from a terminal in Ubuntu 20.04LTS

Recently, we were trying to record the audio that was played on the system speakers using an Ubuntu 20.04LTS desktop. In the installation, there was no dedicated audio recorder installed and we did not want to install any. To record, we used the following command to get the list of all audio sources available to the system:

pactl list short sources;

The pactl command produced results like so:

3	alsa_output.pci-0000_00_1f.3.analog-stereo.monitor	module-alsa-card.c	s16le 2ch 44100Hz	SUSPENDED
4	alsa_input.pci-0000_00_1f.3.analog-stereo	module-alsa-card.c	s16le 2ch 44100Hz	SUSPENDED
10	alsa_input.usb-Dell_DELL_PROFESSIONAL_SOUND_BAR_AE515-00.iec958-stereo	module-alsa-card.c	s16le 2ch 44100Hz	SUSPENDED
12	alsa_output.usb-Dell_DELL_PROFESSIONAL_SOUND_BAR_AE515-00.analog-stereo.monitor	module-alsa-card.c	s16le 2ch 44100Hz	IDLE

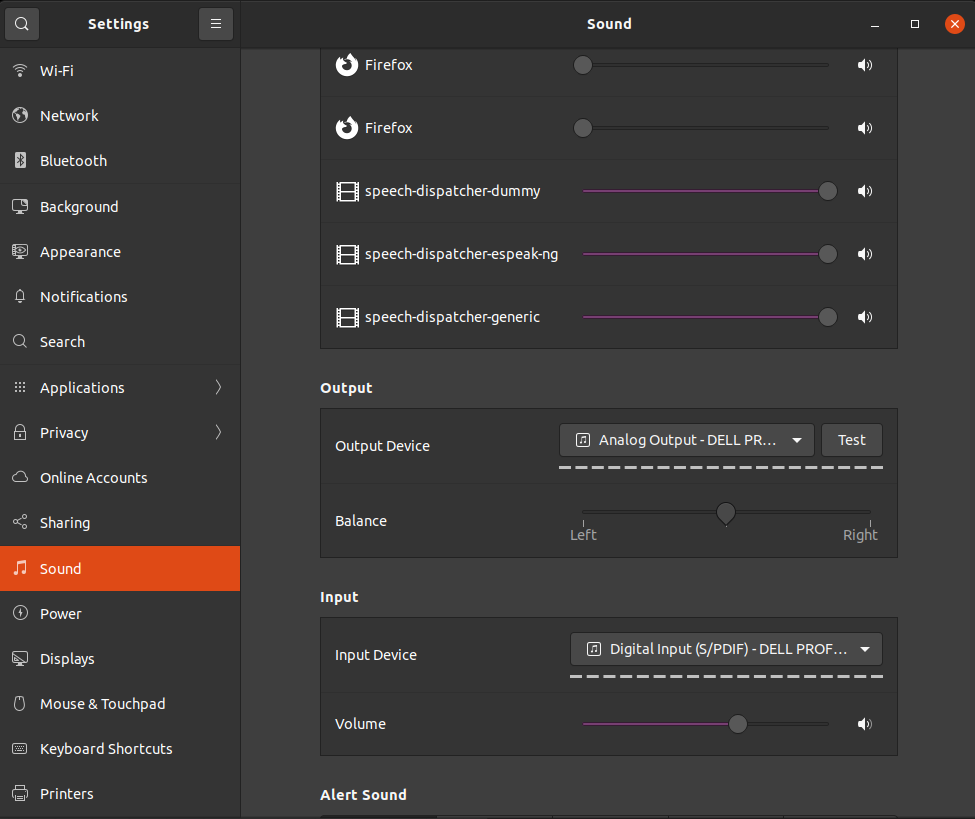
We knew that the system was using the Dell soundbar in analog mode to play the music (as we could see in the Settings under the Sound category, which is depicted below), so we copied the following name from the line that starts with the number 12:

alsa_output.usb-Dell_DELL_PROFESSIONAL_SOUND_BAR_AE515-00.analog-stereo.monitor

Then we used that monitor name as an input device for FFmpeg like so:

ffmpeg -f pulse -i alsa_output.usb-Dell_DELL_PROFESSIONAL_SOUND_BAR_AE515-00.analog-stereo.monitor test.mp3;

When we were done recording, we pressed CTRL+C to stop the recording.


How to see the isc2.org Webex Online Instructor-Led courses using your browser only

Recently, we registered for some online instructor-led courses in isc2.org.
We were using a Ubuntu GNU/Linux machine with the latest Firefox / Chromium and even Chrome versions.
There was something wrong with the meeting. When clicking on the Join button, instead of loading, it was trying to download a java applet configuration (CiscoWebExServlet).
After reading about those files and a lot of work, which included setting up a 32-bit version of Firefox with a 32-bit version of the Oracle JRE and installing IcedTea, we managed to connect to the meeting, but we had no audio.

When trying to connect to the meeting via phone, we got no voice.

When trying the mobile application, it required a password, which was never supplied.

So, we had to find another way in!

Using the Network tab of the Inspect Element menu, we clicked on the gear in the upper right corner and enabled the Persist Log option. Then we clicked on the Join button and logged all redirects with their parameters.

In isc2.org virtual class, the Join button has a custom link to https://www.cirqlive.com/, which is used to join the meetings.
Once you click on that button, the browser follows several redirects between webex.com and cirqlive.com, and it ends up on this page https://isc2training.webex.com/tc3300/webcomponents/docshow/meetingframe.do?siteurl=isc2training asking to download the servlet.

From the logged redirects of the above link, we got the request to https://isc2training.webex.com/tc3300/m.do where we got the meeting ID and password in the POST parameters.
Then went to https://signin.webex.com/join added the meeting ID, which led us to this page https://isc2training.webex.com/isc2training/e.php?AT=SI&From=GPS&MK=XXXXXXXX (using fake meeting ID)
We filled in the Session Password and clicked on Join by browser, and we could join as expected.