audio


FFmpeg tiny cheat sheet

We assume that the user has set the video filename to the variable named $video in the following commands.

FFmpeg export audio from any video to mp3

ffmpeg -i "$video" -vn -c:a libmp3lame -y "$audio";

FFmpeg export frames from video to images

ffmpeg -i "$video" "$frames_folder/%08d.ppm";

Retrieve the frame rate from the input video

#To view it on screen
ffprobe -v 0 -of csv=p=0 -select_streams v:0 -show_entries stream=r_frame_rate "$video";
#To assign it to a variable use the following
frame_rate=`ffprobe -v 0 -of csv=p=0 -select_streams v:0 -show_entries stream=r_frame_rate "$video"`;

To create a video out of a folder with frames/images and an audio file.

ffmpeg -framerate "$frame_rate" -i "$frames_folder/%08d.ppm" -i "$audio" -pix_fmt yuv420p -acodec copy -y "$output_video";
#To set a custom starting index for the frames you can use the -start_number argument
ffmpeg -start_number 62 -framerate "$frame_rate" -i "$frames_folder/%08d.ppm" -i "$audio" -pix_fmt yuv420p -acodec copy -y "$output_video";
#To use the MP4 coded use -vcodec libx264
ffmpeg -framerate "$frame_rate" -i "$frames_folder/%08d.ppm" -i "$audio" -vcodec libx264 -pix_fmt yuv420p -acodec copy -y "$output_video";

To merge an audio less video with an audio file

ffmpeg -i "$no_audio_video" -i "$audio" -shortest -vcodec copy -acodec copy "$output_video";

To change the frame rate of a video

ffmpeg -i "$video" -filter:v fps=20 "$output_video";

To merge two videos side by side

ffmpeg -i "$left_video" -i "$right_video" -filter_complex hstack "$output_video";

Concatenate multiple videos into one

The easiest way without writing huge commands is the following: First, create a file named parts.txt and add content similar to what we list below:

#Lines starting with # will be ignored
file 'part00-03.mp4'
file 'part04.mp4'
file 'part05-07.mp4'
file 'part08-09.mp4'
file 'part10.mp4'
file 'part11-13.mp4'

Then execute the following command to concatenate all those videos into one:

ffmpeg -f concat -safe 0 -i parts.txt -c copy "$output_video";

Speed up a video

Using the following command, you can speed up a video by dropping excess frames:

ffmpeg -i "$video" -filter:v "setpts=0.5*PTS" "$output_video";

The above example will double the speed (the value 0.5 controls it.)

To speed the video up without losing frames, you can increase the FPS value of the output video. To retrieve the frame rate, please see the command that was posted earlier.

ffmpeg -i "$video" -r 80 -filter:v "setpts=0.25*PTS" "$output_video";

In the second example, we assumed that the input video had 20 frames per second. Using the 0.25 value, we decided to speed the video up by a factor of 4. To preserve the input frames, we increased the frame rate from 20 to 80 using the parameter -r.

Some notes on how to record audio from a terminal in Ubuntu 20.04LTS

Recently, we were trying to record the audio that was played on the system speakers using an Ubuntu 20.04LTS desktop. In the installation, there was no dedicated audio recorder installed and we did not want to install any. To record, we used the following command to get the list of all audio sources available to the system:

pactl list short sources;

The pactl command produced results like so:

3	alsa_output.pci-0000_00_1f.3.analog-stereo.monitor	module-alsa-card.c	s16le 2ch 44100Hz	SUSPENDED
4	alsa_input.pci-0000_00_1f.3.analog-stereo	module-alsa-card.c	s16le 2ch 44100Hz	SUSPENDED
10	alsa_input.usb-Dell_DELL_PROFESSIONAL_SOUND_BAR_AE515-00.iec958-stereo	module-alsa-card.c	s16le 2ch 44100Hz	SUSPENDED
12	alsa_output.usb-Dell_DELL_PROFESSIONAL_SOUND_BAR_AE515-00.analog-stereo.monitor	module-alsa-card.c	s16le 2ch 44100Hz	IDLE

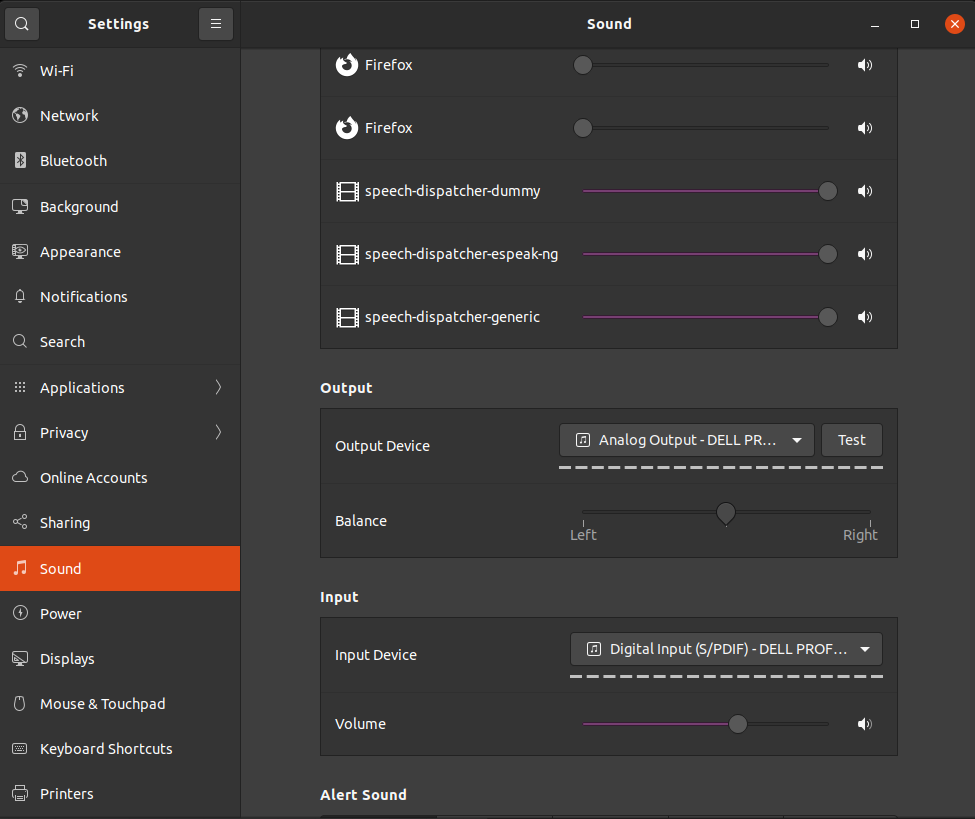
We knew that the system was using the Dell soundbar in analog mode to play the music (as we could see in the Settings under the Sound category, which is depicted below), so we copied the following name from the line that starts with the number 12:

alsa_output.usb-Dell_DELL_PROFESSIONAL_SOUND_BAR_AE515-00.analog-stereo.monitor

Then we used that monitor name as an input device for FFmpeg like so:

ffmpeg -f pulse -i alsa_output.usb-Dell_DELL_PROFESSIONAL_SOUND_BAR_AE515-00.analog-stereo.monitor test.mp3;

When we were done recording, we pressed CTRL+C to stop the recording.


Audacity – Automatically split an audio file into multiple files using at the quiet/silenced parts

This video demonstrates how we were able to automatically split a large audio file into multiple smaller files at the quiet parts of the audio using Audacity.

The steps to follow after you open your audio file are:

  1. Select the part of the audio that you want to automatically split to multiple parts or press ctrl + A to select all the track.
  2. Go to menu Analyze and select the option Label Sounds....
  3. Set the settings that best suit you. For example the noise level or the minimum duration of silence that should indicate a new part, etc.
  4. Press OK and give it some time to process the file and add labels around the new parts.
  5. You will see a new row appearing that will demonstrate in ranges the new parts that were created. If the file was not split as you expected, press ctrl + Z to undo the operation, then go to step 2 again and try with different settings.
  6. Once you are happy with the results, go to the menu File then select the category Export and finally the option Export Multiple....
  7. Unless you need specific settings, select the folder where you want the new file parts to be created and hit the Export button.
  8. In the following pop-up windows, which will be one per audio track segment, if you do not need to make changes just hit the OK button enough times to get the export process going.

A note on using Audacity on large audio files (which we assume applies to many other serious audio processing applications): When you open the audio file, Audacity will pre-process it, and it will take several GBs of disk space to use for its metadata. It will delete them as soon as you close the project, but it is good to keep it in mind before trying to work and then failing to perform an export.