KVM


Fedora Configure Hardware Acceleration for the Android Emulator 1

While setting up Android Studio on a Fedora 27 x64, we got the following message from the Android Studio Setup Wizard:

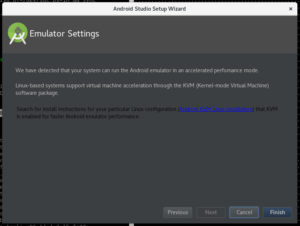
We have detected that your system can run the Android emulator in an accelerated performance mode.
Linux-based systems support virtual machine acceleration through the KVM (Kernel-mode Virtual Machine) software package.

Search for install instructions for your particular Linux configuration (Android KVM Linux Installation) that KVM is enabled for faster Android emulator performance.

After going through the website mentioned in the message we noticed that there were no instructions for Fedora so we decided to write our own.

Below are the steps we followed to enable hardware acceleration for the Android emulator.

Step 1: Verify that your CPU has virtualization extensions.

Execute the following in a terminal:


egrep '^flags.*(vmx|svm)' /proc/cpuinfo;

if you get ANY output then it would mean that your CPU supports either VMX or SVM which is good.
If it does not print anything then the emulator will fall back to software virtualization, which is extremely slow.

Step 2: Install the virtualization packages


sudo dnf group install --with-optional virtualization;

Step 3: Start the service


sudo systemctl start libvirtd;

Step 4: Automatically start the service on boot:


sudo systemctl enable libvirtd;

Step 5: Verify that the kvm kernel modules were loaded


lsmod | grep kvm

If the above command does not print kvm_intel or kvm_amd, it would mean that KVM is not properly configured.


Ubuntu 11.10 (Oneiric Ocelot): Cloning a KVM Virtual Machine

After properly installing and creating your first virtual machine, you might want to create a clone for some reason.

To do this we use the command virt-clone as follows:

sudo virt-clone --connect qemu:///system -o coeus -n phoebe -f /home/kvm/2KA.qcow2 -f /home/kvm/zK6.qcow2 --force

Where:

  • –connect is used to connect to the hypervisor of the virtual machine, here it is system
  • -o is the original virtual machine name (which is registered with the previous hypervisor)
  • -n is the name of the new virtual machine, the clone (this name will be used to register the clone to the hypervisor)
  • -f the location that the clone will use to store it’s virtual hard drives, can be used as many times as needed (in the above example coeus has two hard disks and that is why we need to provide two -f paramaters)
  • –force prevents interactive prompts and replies ‘yes’ to all yes/no questions

There is more directives that can be provided to the clone manager from which a very important one is the: –mac where you get to define the mac address of the new virtual machine (e.g –mac C0:FF:EE:11:00:11)


KVM: How to configure a bridge connection in Ubuntu 11.10 2

Make the file : /etc/network/interfaces  look something like this (make changes only to br0, add it if not there and to the device that you want to bridge with, we used eth1):

# This file describes the network interfaces available on your system
# and how to activate them. For more information, see interfaces(5).

# The loopback network interface
auto lo
iface lo inet loopback

# The primary network interface
auto eth0
iface eth0 inet dhcp

auto eth1
iface eth1 inet dhcp

# Building a bridge to be used by the Virtual Machines
auto br0
iface br0 inet static
        address 192.168.0.10
        network 192.168.0.0
        netmask 255.255.255.0
        broadcast 192.168.0.255
        gateway 192.168.0.1
        bridge_ports eth1
        bridge_fd 9
        bridge_hello 2
        bridge_maxage 12
        bridge_stp off

Then issue: sudo /etc/init.d/networking restart
If you get:

* Running /etc/init.d/networking restart is deprecated because it may not enable again some interfaces
 * Reconfiguring network interfaces...                                                                                                                                                    RTNETLINK answers: File exists
ssh stop/waiting
ssh start/running, process 11489

Waiting for br0 to get ready (MAXWAIT is 20 seconds).
RTNETLINK answers: File exists
Failed to bring up br0.                        [ OK ]

Try bringing down the device to be bridged (eth1) like this: sudo  ifdown eth1 and then issue sudo /etc/init.d/networking restart again.
After that enable it the device again again like this: sudo  ifup eth1
If this doesn’t worked try restarting the machine, worked for us.

When properly configured ifconfig should result to something similar as this:

br0       Link encap:Ethernet  HWaddr 00:1a:64:67:d3:86  
          inet addr:192.168.0.10  Bcast:192.168.0.255  Mask:255.255.255.0
          inet6 addr: fe80::21a:64ff:fe67:d386/64 Scope:Link
          UP BROADCAST RUNNING MULTICAST  MTU:1500  Metric:1
          RX packets:1752 errors:0 dropped:0 overruns:0 frame:0
          TX packets:18 errors:0 dropped:0 overruns:0 carrier:0
          collisions:0 txqueuelen:0
          RX bytes:136973 (136.9 KB)  TX bytes:1500 (1.5 KB)

eth0      Link encap:Ethernet  HWaddr 00:1a:64:67:d3:84  
          inet addr:10.16.20.60  Bcast:10.16.20.63  Mask:255.255.255.224
          inet6 addr: fe80::21a:64ff:fe67:d384/64 Scope:Link
          UP BROADCAST RUNNING MULTICAST  MTU:1500  Metric:1
          RX packets:91218 errors:0 dropped:0 overruns:0 frame:0
          TX packets:51796 errors:0 dropped:0 overruns:0 carrier:0
          collisions:0 txqueuelen:1000
          RX bytes:123551183 (123.5 MB)  TX bytes:4754458 (4.7 MB)
          Interrupt:16 Memory:ce000000-ce012800

eth1      Link encap:Ethernet  HWaddr 00:1a:64:67:d3:86  
          inet addr:10.16.20.33  Bcast:10.16.20.63  Mask:255.255.255.224
          UP BROADCAST RUNNING PROMISC MULTICAST  MTU:1500  Metric:1
          RX packets:2605 errors:0 dropped:48 overruns:0 frame:0
          TX packets:38 errors:0 dropped:0 overruns:0 carrier:0
          collisions:0 txqueuelen:1000
          RX bytes:321878 (321.8 KB)  TX bytes:3490 (3.4 KB)
          Interrupt:17 Memory:ca000000-ca012800

lo        Link encap:Local Loopback  
          inet addr:127.0.0.1  Mask:255.0.0.0
          inet6 addr: ::1/128 Scope:Host
          UP LOOPBACK RUNNING  MTU:16436  Metric:1
          RX packets:129 errors:0 dropped:0 overruns:0 frame:0
          TX packets:129 errors:0 dropped:0 overruns:0 carrier:0
          collisions:0 txqueuelen:0
          RX bytes:17588 (17.5 KB)  TX bytes:17588 (17.5 KB)

virbr0    Link encap:Ethernet  HWaddr b6:ae:8d:e0:06:c3  
          inet addr:192.168.122.1  Bcast:192.168.122.255  Mask:255.255.255.0
          UP BROADCAST MULTICAST  MTU:1500  Metric:1
          RX packets:0 errors:0 dropped:0 overruns:0 frame:0
          TX packets:0 errors:0 dropped:0 overruns:0 carrier:0
          collisions:0 txqueuelen:0
          RX bytes:0 (0.0 B)  TX bytes:0 (0.0 B)


Ubuntu 11.10 (Oneiric Ocelot): Installing KVM 2

Without any additional comments, we managed to install KVM over a fresh installation of Ubuntu 11.10 (Oneiric Ocelot).

To do this we installed the following packages from the repositories and added our user to the libvirtd group.

We called kvm-ok to make sure that our hardware supports KVM properly and thus having better performance.
Installation Commands:

sudo apt-get install kvm libvirt-bin
sudo adduser $USER libvirtd
sudo apt-get install virt-viewer
sudo apt-get install python-vm-builder
sudo apt-get install bridge-utils
sudo apt-get install virtinst #for cloning

After these we created a virtual machine with the following command:

sudo vmbuilder kvm ubuntu --suite oneiric --flavour virtual --arch amd64 --mem 1024 --cpus 2 -o --libvirt qemu:///system --ip 192.168.0.100 --hostname uranus --part vmbuilder.partition --user userName --name MyName MySurname --pass myPassword --addpkg unattended-upgrades --addpkg acpid --addpkg nano

where in general, what it does is, create an Ubuntu Oneiric Ocelot JeOS virtual machine that has an AMD64 architecture, 1GB of RAM, 2 Virtual CPUs, it’s name is uranus, has a user with the username userName, has pre-installed some applications like nano and enabled automatic updates for the system.