ImageMagick Collage: Merge two images diagonally
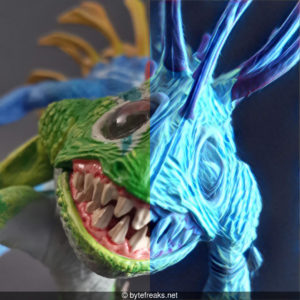
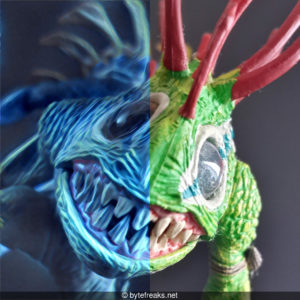
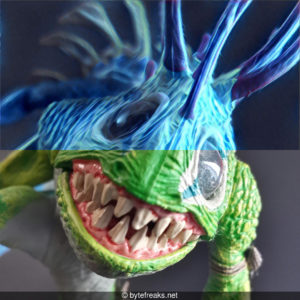
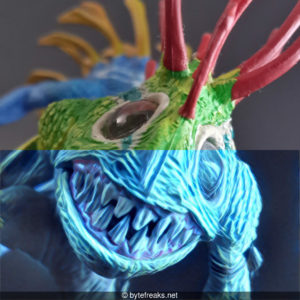
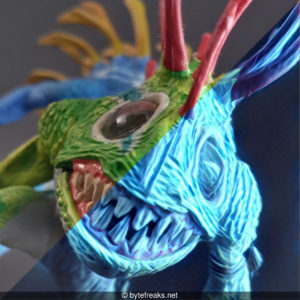
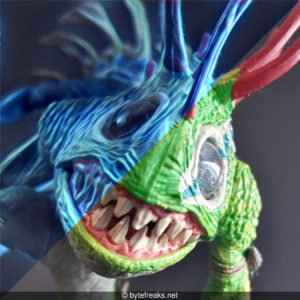
We wanted to merge two images into a collage and have one image fill the upper triangle of the final image and the other image the lower one.
To do this, we created two bash scripts that will take as parameters the names of the two files and produce the collage image composed by the two input images.
We have two scripts created for this task:
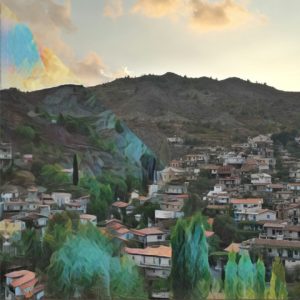
- The first one will create a collage where the diagonal separator starts from the top left corner [download id=”1985″]
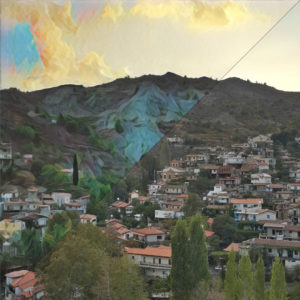
- The second one will create a collage where the diagonal separator starts from the bottom left corner [download id=”1986″]
Diagonal Down Version [download id=”1985″]
#!/bin/bash

#This script will merge two jpg images into one using imageMagick.
#The final result will be a picture that is split diagonally.
#The diagonal line will start from the top left of the image.
#Both pictures must be of the same size.
#If you do not give the filenames as part of the command line, the default names will be used (Left.jpg and Right.jpg).

#If command line argument 1 is not provided, the value will default to the variable $LEFT_DEFAULT
LEFT_DEFAULT="Left.jpg";
LEFT=${1:-$LEFT_DEFAULT};

#If command line argument 2 is not provided, the value will default to the variable $Right_DEFAULT
RIGHT_DEFAULT="Right.jpg";
RIGHT=${2:-$RIGHT_DEFAULT};

#The intermediate images we will use must be png to support transparency.
#We remove the extension '.jpg' from the filenames and add the extension '.png'.
LEFT_OUT="${LEFT%.jpg}.Diagonal Down - Mask.png";
RIGHT_OUT="${RIGHT%.jpg}.Diagonal Down - Mask.png";
OUT="Diagonal Down - Mask.jpg";

#Read the width of one of the images;
WIDTH=`identify -format %w "$LEFT"`;
#Read the height of one of the images;
HEIGHT=`identify -format %h "$LEFT"`;

convert -respect-parenthesis \
\( "$LEFT" -gravity north -crop "$WIDTH"x"$HEIGHT"+0+0 +repage -write "$LEFT_OUT" \) `#Load first image to a new png` \
\( "$RIGHT" -gravity east -crop "$WIDTH"x"$HEIGHT"+0+0 +repage -write "$RIGHT_OUT" \) `#Load second image to a new png` \
\( -size "$WIDTH"x"$HEIGHT" xc:black -fill white -draw "polygon 0,0 "$WIDTH","$HEIGHT" 0,"$HEIGHT"" -write "MASK_$LEFT_OUT" \) `#Create the mask of the lower triangle` \
\( -clone 2 -negate -write "MASK_$RIGHT_OUT" \) `#Create the mask of the upper triangle` \
\( -clone 0 -clone 2 -alpha off -compose copy_opacity -composite -write "$LEFT_OUT" \) `#Apply the upper triangle mask to the left image` \
\( -clone 1 -clone 3 -alpha off -compose copy_opacity -composite -write "$RIGHT_OUT" \) `#Apply the lower triangle mask to the right image` \
-delete 0-3 -compose over -composite "$OUT" `#Merge the two images together`;

#Cleaning up
rm "MASK_$RIGHT_OUT" "MASK_$LEFT_OUT" "$LEFT_OUT" "$RIGHT_OUT";
Diagonal Up Version [download id=”1986″]
#!/bin/bash

#This script will merge two jpg images into one using imageMagick.
#The final result will be a picture that is split diagonally.
#The diagonal line will start from the bottom left of the image.
#Both pictures must be of the same size.
#If you do not give the filenames as part of the command line, the default names will be used (Left.jpg and Right.jpg).

#If command line argument 1 is not provided, the value will default to the variable $LEFT_DEFAULT
LEFT_DEFAULT="Left.jpg";
LEFT=${1:-$LEFT_DEFAULT};

#If command line argument 2 is not provided, the value will default to the variable $Right_DEFAULT
RIGHT_DEFAULT="Right.jpg";
RIGHT=${2:-$RIGHT_DEFAULT};

#The intermediate images we will use must be png to support transparency.
#We remove the extension '.jpg' from the filenames and add the extension '.png'.
LEFT_OUT="${LEFT%.jpg}.Diagonal Up - Mask.png";
RIGHT_OUT="${RIGHT%.jpg}.Diagonal Up - Mask.png";
OUT="Diagonal Up - Mask.jpg";

#Read the width of one of the images;
WIDTH=`identify -format %w "$LEFT"`;
#Read the height of one of the images;
HEIGHT=`identify -format %h "$LEFT"`;

convert -respect-parenthesis \
\( "$LEFT" -gravity north -crop "$WIDTH"x"$HEIGHT"+0+0 +repage -write "$LEFT_OUT" \) `#Load first image to a new png` \
\( "$RIGHT" -gravity east -crop "$WIDTH"x"$HEIGHT"+0+0 +repage -write "$RIGHT_OUT" \) `#Load second image to a new png` \
\( -size "$WIDTH"x"$HEIGHT" xc:black -fill white -draw "polygon 0,0 0,"$HEIGHT" "$WIDTH",0" -write "MASK_$LEFT_OUT" \) `#Create the mask of the upper triangle` \
\( -clone 2 -negate -write "MASK_$RIGHT_OUT" \) `#Create the mask of the lower triangle` \
\( -clone 0 -clone 2 -alpha off -compose copy_opacity -composite -write "$LEFT_OUT" \) `#Apply the upper triangle mask to the left image` \
\( -clone 1 -clone 3 -alpha off -compose copy_opacity -composite -write "$RIGHT_OUT" \) `#Apply the lower triangle mask to the right image` \
-delete 0-3 -compose over -composite "$OUT" `#Merge the two images together`;

#Cleaning up
rm "MASK_$RIGHT_OUT" "MASK_$LEFT_OUT" "$LEFT_OUT" "$RIGHT_OUT";

Older Attempts with Black Line in the Middle

Diagonal Down Version with Black Line in the Middle [download id=”1983″]
#!/bin/bash

#This script will merge two jpg images into one using imageMagick.
#The final result will be a picture that is split diagonally.
#The diagonal line will start from the top left of the image.
#Both pictures must be of the same size.
#If you do not give the filenames as part of the command line, the default names will be used (Left.jpg and Right.jpg).

#If command line argument 1 is not provided, the value will default to the variable $LEFT_DEFAULT
LEFT_DEFAULT="Left.jpg";
LEFT=${1:-$LEFT_DEFAULT};

#If command line argument 2 is not provided, the value will default to the variable $Right_DEFAULT
RIGHT_DEFAULT="Right.jpg";
RIGHT=${2:-$RIGHT_DEFAULT};

#The intermediate images we will use must be png to support transparency.
#We remove the extension '.jpg' from the filenames and add the extension '.png'.
LEFT_OUT="${LEFT%.jpg}.Diagonal Down.png";
RIGHT_OUT="${RIGHT%.jpg}.Diagonal Down.png";
OUT="Diagonal Down.jpg";

#Read the width of one of the images;
WIDTH=`identify -format %w "$LEFT"`;
#Read the height of one of the images;
HEIGHT=`identify -format %h "$LEFT"`;

OFFSET=1;
WIDTH_M=$((WIDTH-OFFSET));
HEIGHT_M=$((HEIGHT-OFFSET));

#We create a transparent triangle on the side of the image we do not want visible.
#A problem that arises here: we create a triangle with no fill, which turns black. Then we fill that area to make it transparent, since the image is a jpg some of the newly created black pixels do not get removed. When merging the two images, this creates a black diagonal line in the middle.
convert "$LEFT" -gravity north -crop "$WIDTH"x"$HEIGHT"+0+0 +repage \
-draw "polygon 0,0 "$WIDTH","$HEIGHT" "$WIDTH",0 fill none matte "$WIDTH_M","$OFFSET" floodfill" \
\( +clone -channel RGBA \) \
-compose DstOver -composite "$LEFT_OUT";

#We create a transparent triangle on the side of the image we do not want visible.
convert "$RIGHT" -gravity north -crop "$WIDTH"x"$HEIGHT"+0+0 +repage \
-draw "polygon "$WIDTH","$HEIGHT" 0,0 0,"$HEIGHT" fill none matte "$OFFSET","$HEIGHT_M" floodfill" \
\( +clone -channel RGBA \) \
-compose DstOver -composite "$RIGHT_OUT";

#We merge the two images together.
composite -blend 50% "$LEFT_OUT" "$RIGHT_OUT" "$OUT";

#Cleaning up
rm "$LEFT_OUT" "$RIGHT_OUT";
Diagonal Up Version with Black Line in the Middle [download id=”1984″]
#!/bin/bash

#This script will merge two jpg images into one using imageMagick.
#The final result will be a picture that is split diagonally.
#The diagonal line will start from the bottom left of the image.
#Both pictures must be of the same size.
#If you do not give the filenames as part of the command line, the default names will be used (Left.jpg and Right.jpg).

#If command line argument 1 is not provided, the value will default to the variable $LEFT_DEFAULT
LEFT_DEFAULT="Left.jpg";
LEFT=${1:-$LEFT_DEFAULT};

#If command line argument 2 is not provided, the value will default to the variable $Right_DEFAULT
RIGHT_DEFAULT="Right.jpg";
RIGHT=${2:-$RIGHT_DEFAULT};

#The intermediate images we will use must be png to support transparency.
#We remove the extension '.jpg' from the filenames and add the extension '.png'.
LEFT_OUT="${LEFT%.jpg}.Diagonal Up.png";
RIGHT_OUT="${RIGHT%.jpg}.Diagonal Up.png";
OUT="Diagonal Up.jpg";

#Read the width of one of the images;
WIDTH=`identify -format %w "$LEFT"`;
#Read the height of one of the images;
HEIGHT=`identify -format %h "$LEFT"`;

OFFSET=1;
WIDTH_M=$((WIDTH-OFFSET));
HEIGHT_M=$((HEIGHT-OFFSET));

#We create a transparent triangle on the side of the image we do not want visible.
#A problem that arises here: we create a triangle with no fill, which turns black. Then we fill that area to make it transparent, since the image is a jpg some of the newly created black pixels do not get removed. When merging the two images, this creates a black diagonal line in the middle.
convert "$LEFT" -gravity north -crop "$WIDTH"x"$HEIGHT"+0+0 +repage \
-draw "polygon "$WIDTH","$HEIGHT" 0,"$HEIGHT" "$WIDTH",0 fill none matte "$WIDTH_M","$HEIGHT_M" floodfill" \
\( +clone -channel RGBA -blur 1x65000 \) \
-compose DstOver -composite "$LEFT_OUT";

#We create a transparent triangle on the side of the image we do not want visible.
convert "$RIGHT" -gravity north -crop "$WIDTH"x"$HEIGHT"+0+0 +repage \
-draw "polygon 0,0 0,"$HEIGHT" "$WIDTH",0 fill none matte "$OFFSET","$OFFSET" floodfill" \
\( +clone -channel RGBA -blur 1x65000 \) \
-compose DstOver -composite "$RIGHT_OUT";

#We merge the two images together.
composite -blend 50% "$LEFT_OUT" "$RIGHT_OUT" "$OUT";

#Cleaning up
rm "$LEFT_OUT" "$RIGHT_OUT";
Useful Links:
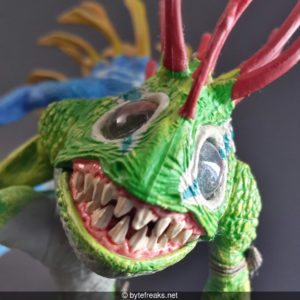
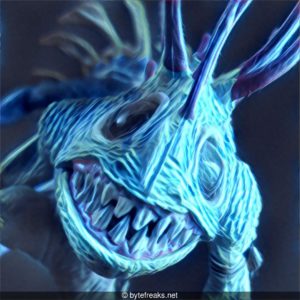
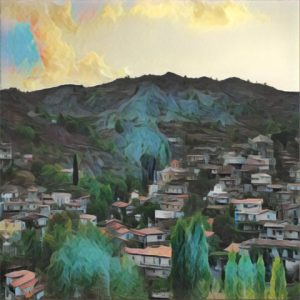
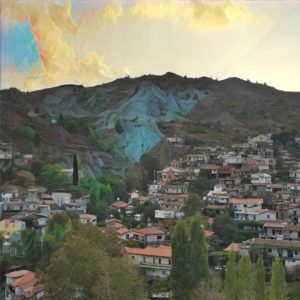
- The above photos depict Palaichori Morfou (https://en.wikipedia.org/wiki/Palaichori)
- Filter used in second image is called Dallas from the application prisma of Prisma Labs inc.