cut


papouch: TMU – USB thermometer

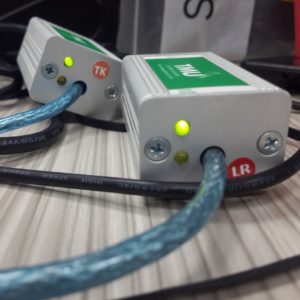
Today, we found in stock some USB thermometers by papouch, which we decided to put to use.
We wanted to create a small bash script that would take the measurements from the thermometers and log them along with the system date/time.
After doing some minor research we got to the product website, where it had a lot of useful information about the device, device drivers and source code which can utilize the device on a Windows machine.

Unfortunately for us, there was no source code for a simple bash script on Linux.

Before we continue, lets fill our heads with some information on the device:

TMU is a simple thermometer with a USB interface. The thermometer uses the USB interface for communication and also as a power source. It measures temperatures from –55 °C to +125 °C (with 0.1 °C resolution). The communication utilizes a simple ASCII protocol. Temperature values are transmitted in degrees Celsius; no numerical conversion is necessary.

–From https://www.papouch.com/en/shop/product/tmu-usb-thermometer/

The operating system on our machine was GNU/Linux CentOS 7, after plugging in the devices, we issued the command lsusb from which we saw that the OS had recognized the devices.
From the manual we read that the interface for communication of the device with the computer is implemented via a serial port.
The configuration parameters of the serial port that the device creates were the following:

COMMUNICATION PROTOCOL
TMU cannot receive instructions, it can only send out the temperature values in regular time intervals (approx. 10 seconds).
The temperature is send in a format that is compatible with the Spinel protocol.
The thermometer’s serial line parameters are:

Speed : 9,600 Baud
Number of data bits : 8
Parity : none
Number of stop-bits : 1

— From https://www.papouch.com/en/shop/product/tmu-usb-thermometer/tmu_en.pdf/_downloadFile.php

Since the newly attached devices were USB-to-Serial devices, we knew that they would create ttyUSBx devices in the /dev folder.
Indeed, after checking into the /dev folder, there were two newly created devices ttyUSB0 and ttyUSB1, one for each device.

We tried to connect to the devices using various methods and attempted to redirect the output so that we could parse it.
To our surprise, the data would ‘disappear’ from the pipe…
We could see the data on the screen when we had no pipes following and we could even replace the \r character with \n so that each new information block would appear in a new line. But, whenever we tried to do additional formatting, e.g. remove all characters that are not part of the temperature description, the whole data would vanish..

Our solution

For us process substitution did the trick!
Process substitution feeds the output of a process into the stdin of another process.
We redirected the stdout that was being generated while reading the data from the serial port to another process from where we were able to normally process them.

The following example, reads the data from the serial port, from each line it discards all characters except for characters at the positions 6 until 11 where the temperature information is presented according to the documentation.

sudo sh -c "cat < /dev/ttyUSB0" 1> >(while read line; do echo $line | cut -c6-11; done);

The above command would turn data of this format:

*B1E1+026.0
*B1E1+026.1

To this format:

+026.0
+026.1

And so we could start the development of our script.

Our script

The following script will prepend the current date and time on each line (right before the temperature reading).

 sudo sh -c "cat < /dev/ttyUSB0" 1> >(while read line; do echo $line | cut -c6-11 | xargs -L 1 echo `date`; done); 

Another solution, using miniterm.py

It has come to our attention that some times the thermometers do no work as expected using the cat command.
So, we propose an alternative using miniterm.py.
miniterm.py is a very simple serial terminal and is part of pySerial.

 miniterm.py --echo --eol CR --quiet /dev/ttyUSB0 1> >(while read line; do echo $line | cut -c6-11 | xargs -L 1 echo `date`; done); 

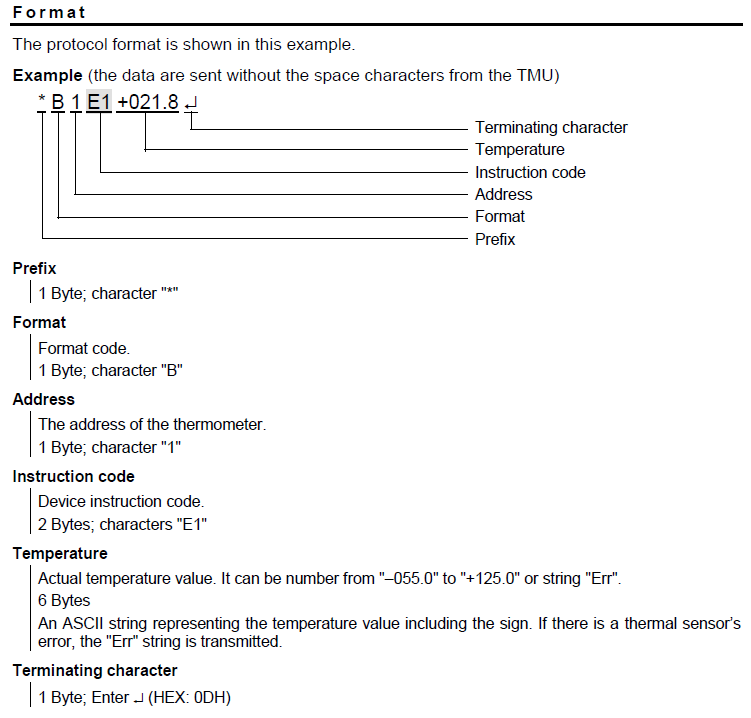
Some details on the format from the manual:

The protocol format is shown in this example.
Example (the data are sent without the space characters from the TMU)

*B1E1+026.1
  • 1 Byte; Prefix: the character *
  • 1 Byte; Format code: the character B
  • 1 Byte; The address of the thermometer: the character 1
  • 2 Bytes; Device instruction code: the characters E1
  • 6 Bytes; Actual temperature value. It can be number from –055.0 to +125.0 or string Err.
    An ASCII string representing the temperature value including the sign. If there is a thermal sensor’s error, the Err string is transmitted.
  • 1 Byte; Terminating character: Carriage Return (Decimal: 13, Hex: 0Dh, Binary: 00001101, Character \r)


Bash: Extract data from files both filtering filename, the path and doing internal processing

The following code will find all files that match the pattern 2016_*_*.log (all the log files for the year 2016).

To avoid finding log files from other services than the Web API service, we filter only the files that their path contains the folder webapi. Specifically, we used "/ServerLogs/*/webapi/*" with the following command to match all files that are under the folder /ServerLogs/ and somewhere in the path there is another folder named webapi, we do that to match files that are like /ServerLogs/Production/01/webapi/* only. The way we coded our regular expression, it will not match if there is a folder called webapi directly under the /ServerLogs/ (e.g. /ServerLogs/webapi/*).

For each result, we execute an awk script that will split the lines using the comma (FS=",";) character, then check if the line contains exactly 4 tokens (if (NF == 4) {). Later, we get the 4th token and check if it contains the substring "MASTER=" (if (match($4,"MASTER=")) {), if it does contain it we split it using the space character and assign the result to the variable named tokens. From tokens, we get the first token and use substr to remove the first character. Finally, we use the formatted result to create an array where the keys are the values we just created and it is used as a hashmap to keep record of all unique strings. In the end clause, we print all the elements of our hash map.

Finally, we sort all the results from all the awk executions and remove duplicates using sort --unique.


find /ServerLogs/ \
    -iname "2016_*_*.log" \
    -ipath "/ServerLogs/*/webapi/*" \
    -exec awk '
        BEGIN {
            FS=",";
        }
        {
            if (NF == 4) {
                if (match($4,"MASTER=")) {
                    split($4, tokens, " ");
                    instances[substr(tokens[1], 2)];
                }
            }
        }
        END {
            for (element in instances) {
                print element;
            }
        }
    ' \
    '{}' \; | sort --unique;

Following is the same code in one line.

 find /ServerLogs/ -iname "2016_*_*.log" -ipath "/ServerLogs/*/webapi/*" -exec awk 'BEGIN {FS=",";} {if (NF == 4) {if (match($4,"MASTER=")){split($4, tokens, " "); instances[substr(tokens[1], 2)];}}} END {for (element in instances) {print element;}}' '{}' \; | sort --unique 

Another way

Another way to do similar functionality would be the following


find /ServerLogs/ \
    -iname "2016_*_*.log" \
    -ipath "/ServerLogs/*/webapi/*" \
    -exec sh -c '
        grep "MASTER=" -s "$0" | awk "BEGIN {FS=\",\";} NF==4" | cut -d "," -f4 | cut -c 3- | cut -d " " -f1 | sort --unique
    ' \
    '{}' \; | sort --unique;

What we changed is the -exec part. Instead of calling a awk script, we create a new sub-shell using sh -c, then we define the source to be executed inside the single codes and we pass as the first parameter of the shell the filename that matched.

Inside the shell, we find all lines that contain the string MASTER= using the grep command. Later we filter out all lines that do not have four columns when we tokenize using the comma character using awk. Then, we get the 4th column using cut and delimiter the comma. We remove the first two characters of the input string using cut -c 3- and later we get only the first column by reusing cut and changing the delimiter to be the space character. With those results we perform a sort that eliminates duplicates and we pass the results to the parent process to perform other operations.

Following is the same code in one line


find /ServerLogs/ -iname "2016_*_*.log" -ipath "/ServerLogs/*/webapi/*" -exec sh -c 'grep "MASTER=" -s "$0" | awk "BEGIN {FS=\",\";} NF==4" | cut -d "," -f4 | cut -c 3- | cut -d " " -f1 | sort --unique' '{}' \; | sort --unique;


bash: Simple way to get n-th column

Using cut you can select any column and define a custom delimiter to support multiple input formats you can select a column (or more) with barely minimum code.

cut -d',' -f2 myFile.csv

The above command will read the file myFile.csv (which is a CSV file) break it down to columns using the ‘,‘ character and then get the second column.

The option -f specifies which field (column) you want to extract, and the option -d specifies what is the field delimiter (column) that is used in the input file.

The -f parameter allows you to select multiple columns at the same time. You can achieve that by defining multiple columns separated using the ‘,‘ and by defining ranges using the - character.

Examples

  • -f1 selects the first column
  • -f1,3,4 selects columns 1, 3 and 4
  • -f1-4 selects all columns in the range 1-4
  • -f1,3,5-7,9 selects columns 1,3,8 and all the columns in the range 5-7

Fedora/Bash: Get the IP of enp0s3

Following is a small snippet that will print on screen the IP of enp0s3 (or any other device if you change the name) while in Fedora.
As you will see, it is not a very sound solution as it depends on the structure of the output of ifconfig enp0s3.

Nevertheless is works (for Fedora at least)! 🙂

ifconfig enp0s3 | grep "inet " | sed -e 's/^[[:space:]]*//' -e 's/[[:space:]]*$//' | cut -d ' ' -f 2

What this line does is: first it prints out the configuration information for enp0s3, then finds the line that contains the inet, then using sed it will trim the result (in other words, it will remove all leading and all trailing white-space from the pipe), finally cut gets the second column of the data after separating the line using the space symbol.

The Fedora version that was used for this tutorial is

$cat /etc/fedora-release 
Fedora release 23 (Twenty Three)

The version of ifconfig for this tutorial is

$ifconfig --version
net-tools 2.10-alpha

In case you want to assign the IP of enp0s3 to a variable, you can easily do as follows

IP=`ifconfig enp0s3 | grep "inet " | sed -e 's/^[[:space:]]*//' -e 's/[[:space:]]*$//' | cut -d ' ' -f 2`;