split


Splitting a zip file (or any file) into smaller parts

In this post, we will explain the following commands:

  1. zip Original.zip Original/
  2. split -b 5M -d Original.zip Parts.zip.
  3. cat Parts.zip* > Final.zip
  4. unzip Final.zip -d Final

These commands are commonly used in Linux/Unix systems and can be very helpful when working with large files or transferring files over a network.

Command 1: zip Original.zip Original/

The zip command is used to compress files and create a compressed archive. In this command, we are compressing the directory named Original and creating an archive named Original.zip. The -r option is used to recursively include all files and directories inside the Original directory in the archive.

Command 2: split -b 5M -d Original.zip Parts.zip.

The split command is used to split a large file into smaller files. In this command, we are splitting the file Original.zip into smaller files with a size of 5 MB each. The -b option specifies the size of each split file, and the -d option is used to create numeric suffixes for the split files. The Parts.zip is the prefix for the split files.

Command 3: cat Parts.zip* > Final.zip

The cat command is used to concatenate files and print the output to the standard output. In this command, we are concatenating all the split files (which have the prefix Parts.zip) into a single file named Final.zip. The * is a wildcard character that matches any file with the specified prefix.

Command 4: unzip Final.zip -d Final

The unzip command is used to extract files from a compressed archive. In this command, we extract the files from the archive Final.zip and store them in a directory named Final. The -d option is used to specify the destination directory for the extracted files.

In conclusion, these commands can be beneficial when working with large files or transferring files over a network. By using the zip and split commands, we can compress and split large files into smaller ones, making them easier to transfer. Then, using the cat command, we can concatenate the split files into a single file. Finally, we can use the unzip command to extract the files from the compressed archive.

GNU Linux/Bash: A function that splits a word in half

The following function takes one argument – a text file.
The text file should contain one word on each line.
The function reads the text file (argument) line by line.
Then it checks if the line has one word; if this is true, it splits the word in half.
Finally, it prints the two new words with a space between them.

#!/bin/bash

splitWordsInHalf () {
  # This function takes one argument - a text file.
  # The text file contains one word on each line.
  # It reads the text file (argument) line by line.
  # Then it checks if the line contains one word, if this is true, it splits the word in half.
  # Finally, it prints the two new words with a space between them
  while read line
  do
    words=( $line )
    if [ ${#words[@]} == 1 ]
    then
      echo ${line:0:${#line}/2} ${line:${#line}/2}
    fi
  done < $1
}

splitWordsInHalf input.txt

Example

Using the following input file:

banana
apple
ball
car
door

We will get the following output when we execute splitWordsInHalf input.txt:

ban ana
ap ple
ba ll
c ar
do or

Notes

The following parts of the code are in charge of looping on the data of the incoming file. The parameter (the input file) given to the function is translated into the variable $1. The while loop gets one line of text on each iteration and assigns the text to the variable that is named line. You could have chosen any other name that suits you instead of the word line.

splitWordsInHalf () {
  while read line
  do
    ...
  done < $1
}

The next part of the code (words=( $line )) converts the string value that is contained in the line variable into an array of words, and it assigns that array to the variable named words. Then, it counts the number of elements in the array (the number of words in the line) using the following ${#words[@]} and it checks that there is only one item.

words=( $line )
if [ ${#words[@]} == 1 ]
then
  ...
fi

The following line will print two strings. The first string is a sub-string of variable line that is composed by the first half of the value. The second sub-string is the second half of the value contained in the variable named line.

echo ${line:0:${#line}/2} ${line:${#line}/2}

The ${#line} will return the length of the string contained in the variable.

The structure ${VARIABLE:START:END} defines the slice of the string that we want returned.


Audacity – Automatically split an audio file into multiple files using at the quiet/silenced parts

This video demonstrates how we were able to automatically split a large audio file into multiple smaller files at the quiet parts of the audio using Audacity.

The steps to follow after you open your audio file are:

  1. Select the part of the audio that you want to automatically split to multiple parts or press ctrl + A to select all the track.
  2. Go to menu Analyze and select the option Label Sounds....
  3. Set the settings that best suit you. For example the noise level or the minimum duration of silence that should indicate a new part, etc.
  4. Press OK and give it some time to process the file and add labels around the new parts.
  5. You will see a new row appearing that will demonstrate in ranges the new parts that were created. If the file was not split as you expected, press ctrl + Z to undo the operation, then go to step 2 again and try with different settings.
  6. Once you are happy with the results, go to the menu File then select the category Export and finally the option Export Multiple....
  7. Unless you need specific settings, select the folder where you want the new file parts to be created and hit the Export button.
  8. In the following pop-up windows, which will be one per audio track segment, if you do not need to make changes just hit the OK button enough times to get the export process going.

A note on using Audacity on large audio files (which we assume applies to many other serious audio processing applications): When you open the audio file, Audacity will pre-process it, and it will take several GBs of disk space to use for its metadata. It will delete them as soon as you close the project, but it is good to keep it in mind before trying to work and then failing to perform an export.


Download Large Jupyter Workspace files

Recently, we were working on a Jupyter Workspace at anyscale-training.com/jupyter/lab. As there was no option to download all files of the workspace nor there was a way to create an archive from the GUI, we followed the procedure below (that we also use on Coursera.org and works like a charm):

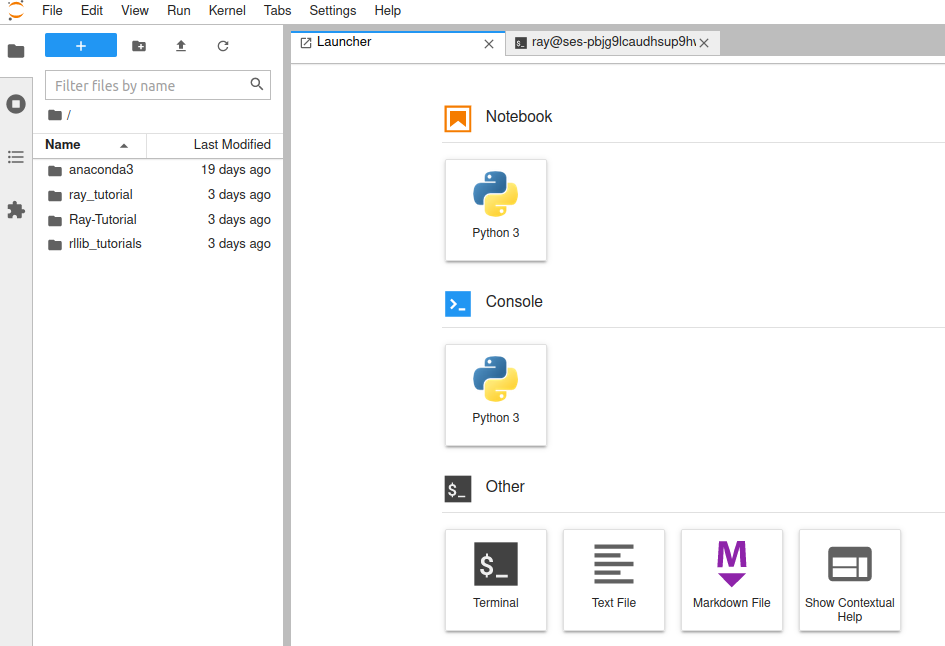
First, we clicked on the blue button with the + sign in it.
That opened the Launcher tab that is visible on the image above.
From there, we clicked on the Terminal button under the Other category.

In the terminal, we executed the following command to create a compressed archive of all the files we needed to download:

tar -czf Ray-RLLib-Tutorials.tar.gz ray_tutorial/ Ray-Tutorial/ rllib_tutorials/;

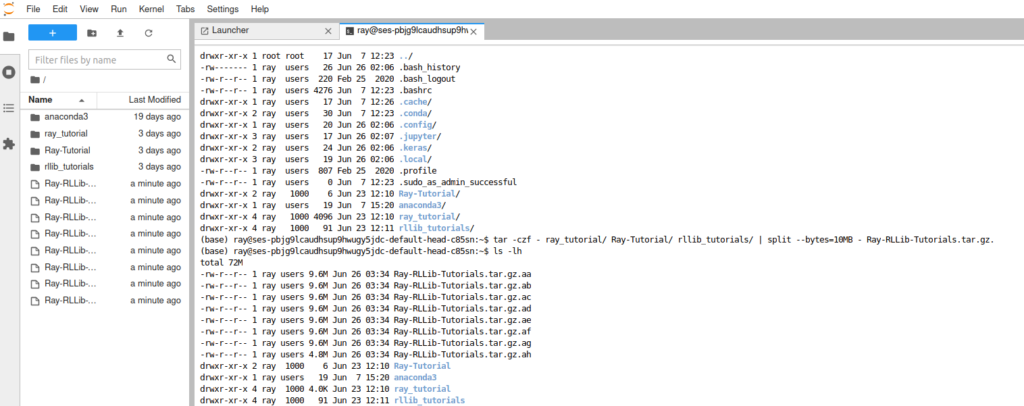
After the command completed its execution, we could see our archive on the left list of files. By right-clicking it we we are able to initiate its download. Unfortunately, after the first 20MB the download would always crash! To fix this issue, we split the archive to multiple archives of 10MB each, then downloaded them individually and finally merged them back together on our PC. The command to split the compressed archive to multiple smaller archives of fixed size was the following:

tar -czf - ray_tutorial/ Ray-Tutorial/ rllib_tutorials/ | split --bytes=10MB - Ray-RLLib-Tutorials.tar.gz.;

After downloading those files one by one by right-clicking on them and then selecting the Download option we recreated the original structure on our PC using the following command:

cat Ray-RLLib-Tutorials.tar.gz.* | tar xzvf -;

To clean up both the remote Server and our Local PC, we issued the following command:

rm Ray-RLLib-Tutorials.tar.gz.*;

This is a guide on how to download a very big Jupyter workspace by splitting it to multiple smaller files using the console.