Applications


Skype: Disable notifications for a specific group chat without leaving the group nor changing the status of the account

In cases where you are part of a Skype group chat and you do not want to receive notifications for the messages that arrive you can mute most of the notifications without leaving the group and without changing your account status to Do not disturb.

Method A

Use the Skype chat command /alertsoff that will disable message notifications. To use the command, type in the chat window /alertsoff and press Enter.

Method B

Right click on the group chat name or avatar, select View Profile and in the popup window uncheck the option Notify me when something new happens. This method will have the same effect as Method A.

Note

Both methods will disable message alerts, notifications for incoming files and pictures will still be displayed.

To enable the message notifications

Reverse Method A

Use the Skype chat command /alertson that will enable message notifications. To use the command, type in the chat window /alertson and press Enter.

Reverse Method B

Right click on the group chat name or avatar, select View Profile and in the popup window check the option Notify me when something new happens. This method will have the same effect as reversing Method A.

Additional info for Method A reversal

If you do not want to enable all message notifications but you would like to be informed when specific buzz words appear in the chat you could enable notifications only for those words.

For example, if you are interested in getting notified when the word Goal appears in the chat, type in the chat window /alertson Goal. Any other chat message will be ignored while the messages containing the buzz word Goal will create notifications.


WordPress: Google AdSense Plugin 3

Recently, we were trying to changing the position of the Google Ads that are shown on a website using the Google AdSense plugin for WordPress.

After clicking on the Manage Ads button at the configuration page (http://example.com/wp-admin/options-general.php?page=GooglePublisherPlugin) we would get an error that another theme had set the active ads and that the plugin cannot proceed to modify them unless they are disabled from the other theme (Specifically we would get the following error: Due to a theme change, ads are not being shown. Please reconfigure your ads or restore the previous theme.).

(a) Disabling the plugin, (b) Uninstalling the plugin (c) Reconnecting with another AdSense account did not help at all.

What we did at the end was to remove the GooglePublisherPlugin entry from the wp_option database of our installation.

DELETE FROM `MyDatabase`.`wp_options` WHERE `option_name` = "GooglePublisherPlugin";

Next time we visited the configuration page, we were disconnected from the previous account and we had to reconnect.

GetStarted-AdSense
After reconnecting, we followed the configuration procedure, we pressed the Manage Ads button, the website was analyzed, we got the confirmation message and we clicked on the Save & Activate button to store the changes.

For a few hours, no ads were shown on the site. We did not take any action and on the next day that ads started appearing as expected.


How to randomize order of rows in Excel

In the following video we demonstrate how to randomize the rows of an Excel sheet.

Methodology:

  • We created a new column next to the data we want to randomize their order, then we typed in the first cell the following formula =rand().
    =rand() will generate a random value between 0 and 1.
  • After that we applied the same formula to the entire column.
  • To apply the formula to the whole column we used a very simple method: we double-clicked on the bottom right hand corner of the cell .

Apply formula to whole column by double clicking on the bottom right corner of the cell

  • Later, we sorted our date using the column of random values.
  • Finally, we deleted the new column.


Alternative way to copy the formula to the entire column:

  • Including the cell with the formula, select the cells in the new column that you want the new formula applied to (all the rows you want to be randomized) and the press Ctrl+D.

How to “group by” and sum in Excel

In the following example we used the Subtotal feature to create a spreadsheet that shows the partial sum based on another column.

Methodology:

  1. Click the Data tab in Excel’s ribbon toolbar
  2. Click the Sort button to sort our data by the user column
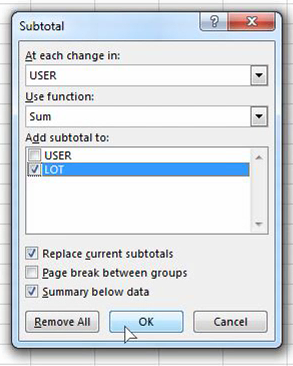
  3. Click the Subtotal button and fill in the dialog as appropriate, then click OK

In our example, we had only two columns (User and Lot), we wanted to produce the total sum of lots per user and so filled the dialog as follows:

Subtotal

What the above options do is the following:

  • Use the User column to group on by checking when its value changes
  • Use the Sum function on the columns that will be selected later on
  • Apply the function on the Lot column