server


Ubuntu: install / start/stop enable/disable ssh server 2

OpenSSH is a freely available version of the Secure Shell (SSH) protocol family of tools for remotely controlling, or transferring files between, computers.

Install SSH server

To install the openssh-server on an Ubuntu, you need execute the following command as root or using sudo:

apt-get install openssh-server -y;

Disable SSH server

To disable the ssh service, execute the following command as root or using sudo:

systemctl disable ssh;

Enable SSH server

To enable the ssh service, execute the following command as root or using sudo:

systemctl enable ssh;

Stop SSH server

To stop (or deactivate) the ssh service, execute the following command as root or using sudo:

systemctl stop ssh;

Start SSH server

To start (or activate) the ssh service, execute the following command as root or using sudo:

systemctl start ssh;

Status of SSH server

To check the status of the ssh service, execute the following command as root or using sudo:

systemctl status ssh;

CONCEPTS

In a nutshell:

  • enabled is a service that is configured to start when the system boots
  • disabled is a service that is configured to not start when the system boots
  • active is a service that is currently running
  • inactive is a service that is currently stopped and may be disabled, but it can be started and become active

In much more detail:

systemd provides a dependency system between various entities called “units” of 12 different types. Units encapsulate various objects that are relevant for system boot-up and maintenance. The majority of units are configured in unit configuration files, whose syntax and basic set of options is described in systemd.unit(5), however some are created automatically from other configuration, dynamically from system state or programmatically at runtime. Units may be “active” (meaning started, bound, plugged in, …, depending on the unit type, see below), or “inactive” (meaning stopped, unbound, unplugged, …), as well as in the process of being activated or deactivated, i.e. between the two states (these states are called “activating”, “deactivating”). A special “failed” state is available as well, which is very similar to “inactive” and is entered when the service failed in some way (process returned error code on exit, or crashed, or an operation timed out). If this state is entered, the cause will be logged, for later reference. Note that the various unit types may have a number of additional substates, which are mapped to the five generalized unit states described here.
— From man systemd



Ubuntu SSHD listen to multiple ports

Recently, we’ve setup an Ubuntu server behind CloudFlare that needed to listen for SSH connections.
Unfortunately, CloudFlare does not allow connections to the default SSH port which is 22.
So, to achieve what it was needed we either had to change the port that the SSH service was listening to or add an additional port.
We decided to go with the option of listening to multiple ports for SSH connections, this way users that were also behind the CloudFlare CDN could still continue to use their SSH clients without being forced to define the connection port manually.

The port listening setting is available in /etc/ssh/sshd_config, using sudo we edited the file with a text editor and searched for the following lines:

# What ports, IPs and protocols we listen for
Port 22

Right after the line that contains Port 22, we added another line for the new port (to see the list of all available open ports on CloudFlare, check this post)

And the file became as follows:

# What ports, IPs and protocols we listen for
Port 22
Port 2053

Afterwards, we restarted the SSHD service to apply the changes by executing the following command by using sudo:


systemctl restart ssh;


CloudFlare does not allow port 22 (usual SSH port) on domain 3

When you try to connect via ssh on a domain for which you are using CloudFlare as a HTTP proxy, you will get the following error:

$ ssh [email protected]
 ssh_exchange_identification: Connection closed by remote host

You have a few options to resolve for this issue:

  1. Either connect directly to the IP of the machine.
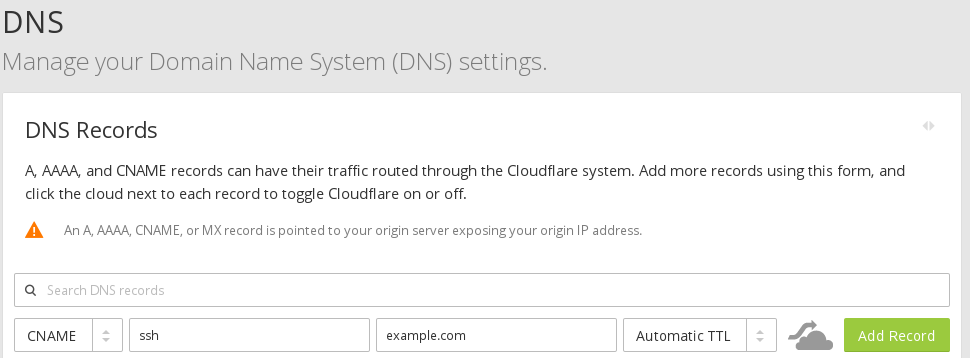
  2. Or, setup a CNAME record with no HTTP proxy for the SSH (so that you do not need to remember the IP).
    This solution does not offer any additional benefits than connecting directly to the IP of the server.
    To do that, you need to visit the configure DNS page for your site: e.g. https://www.cloudflare.com/a/dns/example.com,
    then create the CNAME named ssh, use as target your domain (e.g. example.com) and disable HTTP proxy by clicking on the orange cloud and making it gray before pressing the Add Record button.

    Then, you will be able to connect via ssh [email protected].
  3. Last solution but not least is configuring your server to listen for SSH on one of the ports of CloudFlare that are open.
    When this post was written, the following ports were available/open for any site in CloudFlare:
    For requests made via HTTP:

    80
    8080
    8880
    2052
    2082
    2086
    2095

    For requests made via HTTPS:

    443
    2053
    2083
    2087
    2096
    8443

    At the time, we were using an Ubuntu GNU/Linux server, to instruct Ubuntu SSHD to listen to multiple ports we edited the file /etc/ssh/sshd_config and right after the lines:

    # What ports, IPs and protocols we listen for
    Port 22

    we added another line with the new port we wanted to use:

    # What ports, IPs and protocols we listen for
    Port 22
    Port 2053

    After restarting the service
    service ssh restart;
    we were able to connect to our page as follows:
    ssh -p 2053 [email protected];


CentOS 6: install / start and stop / enable and disable ssh server

Install

To install the openssh-server, you need to install the openssh-server package:

sudo yum install -y openssh-server;

Start

To start the sshd daemon (openssh-server) in the current session:

sudo service sshd start;

Stop

To stop the active (if any) sshd daemon in the current session:

sudo service sshd stop;

Enable

To configure the sshd daemon to start automatically at boot time:

sudo chkconfig sshd --add;
sudo chkconfig sshd on --level 2,3,4,5;

Disable

To configure the sshd daemon to stop automatic initialization at boot time:

sudo chkconfig sshd off;
sudo chkconfig sshd --del;