Microsoft


Python: How to Connect and Use Office 365 Email

As Office 365 transitions away from Basic authentication and embraces Multi-Factor Authentication (MFA) for end-users and OAuth for other purposes, connecting Python to Office 365 email requires a slightly different approach. This blog post will explore how to connect Python to Office 365 email using the exchangelib library and OAuth2 credentials. By following these steps, you can access and interact with your Office 365 email programmatically.

Prerequisites: Before diving into the code, ensure you have the following prerequisites in place:

  1. Access to the Office 365 admin portal
  2. Basic knowledge of Python programming
  3. Required Python libraries: exchangelib

Step 1: Registering an App and Gathering Credentials: To connect Python with Office 365 email, you must register an application in the Azure Active Directory. Here’s how you can do it:

  1. Log into the Office 365 admin portal at https://admin.microsoft.com.
  2. Locate and click on the link to Azure Active Directory.
  3. Register a new app and make a note of the Directory (tenant) ID, Application (client) ID, and the secret (client secret).

Step 2: Granting App Permissions: To grant necessary permissions to the registered app, follow these steps:

  1. Navigate to the API permissions page within the Azure Active Directory.
  2. Add the full_access_as_app permission for your app.

Step 3: Verify App Permissions: To ensure the app has the required permissions, perform the following steps:

  1. Go to the Enterprise applications page in Azure Active Directory.
  2. Select your app.
  3. Continue to the Permissions page and verify that your app has the full_access_as_app permission.

Connecting Python to Office 365 Email: Now that we have the required credentials and permissions in place, let’s connect Python to Office 365 email using the exchangelib library. Here’s the code snippet to establish the connection:

import logging
from exchangelib import Account, Configuration, Identity, OAUTH2, OAuth2Credentials

logging.basicConfig(level=logging.ERROR, format='%(asctime)s - %(levelname)s - %(message)s')
logging.debug('Start...')

creds = OAuth2Credentials(
    client_id='4e89**********************',
    client_secret='cx67**********************',
    tenant_id='gt6**********************',
    identity=Identity(primary_smtp_address=r'[email protected]')
)

config = Configuration(server='outlook.office365.com', credentials=creds, auth_type=OAUTH2)

a = Account(
    primary_smtp_address='[email protected]',
    autodiscover=False,
    config=config
)

# Print first inbox messages in reverse order
for item in a.inbox.all().only('subject').order_by('-datetime_received')[:2]:
    print(item.subject)

a.protocol.close()

logging.debug('End...')

Make sure to replace the code’s placeholders with your credentials and email address.

Explanation of the Code:

  1. The exchangelib library is imported, and logging is set up to display any errors.
  2. OAuth2 credentials are created using the previously obtained client ID, client secret, tenant ID, and primary SMTP address.
  3. A configuration object is created with the server address, credentials, and authentication type.
  4. An Account object is initialized using the email address, disabling autodiscover, and providing the configuration.
  5. The code retrieves the two most recent inbox messages and prints their subjects.
  6. The connection is closed, and the logging is finalized.

Conclusion: By following the steps outlined in this blog post, you can easily connect Python to your Office 365 email using the exchangelib library and OAuth2 credentials. This enables you to automate email-related tasks, retrieve messages, send emails, and perform various other operations programmatically. Embracing OAuth2 and MFA adds an extra layer of security to your email communication. Enjoy leveraging the power of Python and Office 365 to streamline your workflows!

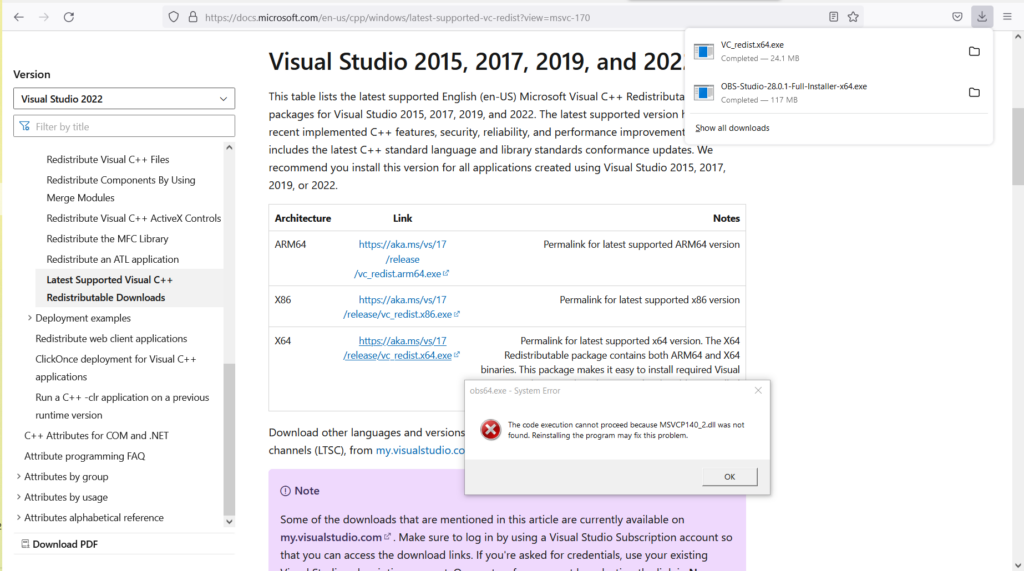
The code execution cannot proceed because MSVCP140_2.dll was not found. Reinstalling the program may fix this problem.

Introduction

Open Broadcaster Software (OBS) is a free and open-source streaming and recording software that is widely used by content creators. It allows users to record and stream high-quality videos and is compatible with various platforms. However, users may encounter issues while installing or using OBS on WIndows systems. One such issue is the missing MSVCP140_2.dll file error.

In this blog post, we will discuss this error in detail and provide a solution to fix it.

Error Description

When a user tries to install or launch OBS on their computer, they may encounter the following error message:

The code execution cannot proceed because MSVCP140_2.dll was not found. Reinstalling the program may fix this problem.

This error occurs because the system is missing the MSVCP140_2.dll file, which is a part of the Microsoft Visual C++ Redistributable package. OBS requires this package to function properly.

Solution

To fix the missing MSVCP140_2.dll error in OBS, follow the steps below:

Step 1: Download the Microsoft Visual C++ Redistributable Packages.

Visit the Microsoft website and download the following package:

Make sure to download the 64-bit version of each package that matches your system architecture.

Step 2: Install the Packages

After downloading the packages, install them on your computer by following the on-screen instructions.

Step 3: Restart OBS

After installing the packages, restart OBS and try launching it again. The missing MSVCP140_2.dll error should be resolved, and OBS should function properly.

Conclusion

In conclusion, the missing MSVCP140_2.dll error is a common issue while installing or using OBS. This error occurs because the system lacks the Microsoft Visual C++ Redistributable package. To fix this error, download and install the Microsoft Visual C++ Redistributable packages for Visual Studio 2015, 2017, 2019, and 2022 (64-bit version) from the Microsoft website. After installing these packages, restart OBS, and the error should be resolved.


Microsoft invented a new way to force users into using their online accounts

It became apparent that new Microsoft installations are getting increasingly aggressive, forcing users to create an online Microsoft account on their machines.

Please note that we created a new online Microsoft account in the end… We do not have a working solution to this issue.

Backstory: we purchased a new laptop that had Microsoft Windows 10 pre-installed. The first time we booted it, we did not want to sign in using a Microsoft online account, so we did not give internet to the laptop. Doing so allowed us to create a local account on the computer without associating it with an online account.

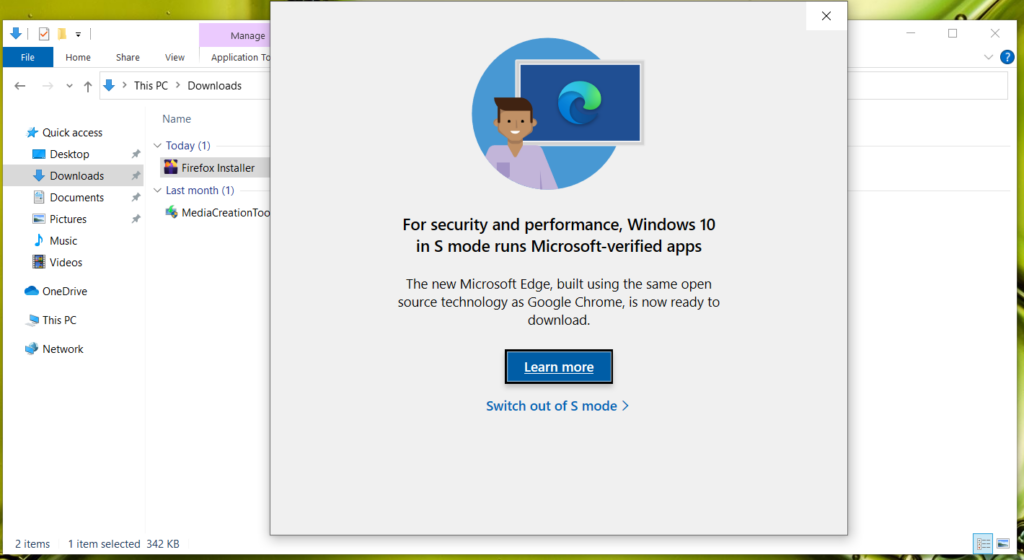
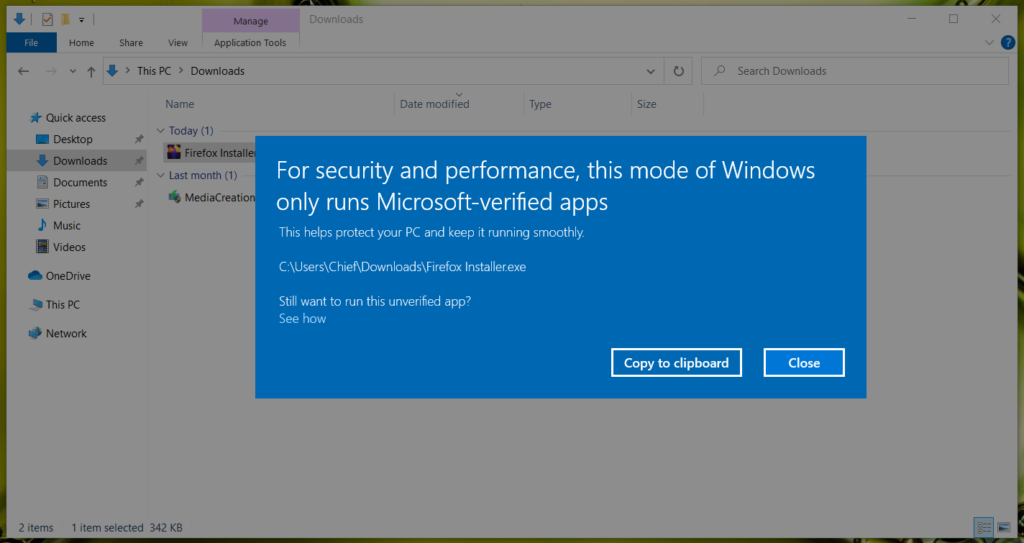
After several updates, we tried to install Firefox, and besides the usual annoying Microsoft advertisements about Bing, we got the following messages for Microsoft Windows S Mode.

For security and performance, this mode of Windows only runs Microsoft-verified apps
Initial notification of Microsoft S Mode – For security and performance, Windows 10 in S mode runs Microsoft-verified apps

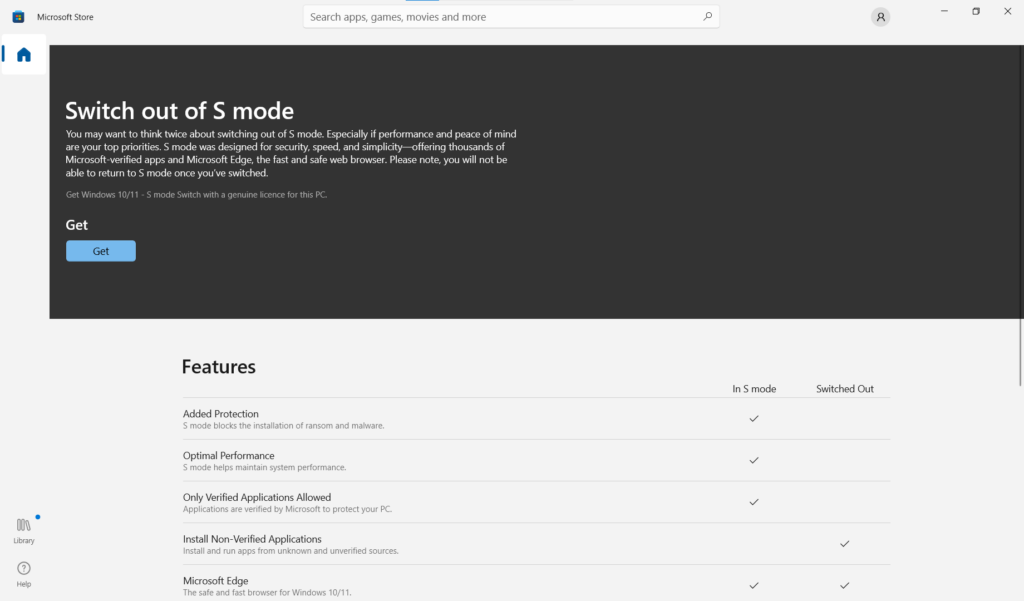
After clicking on the “Learn More” button, we got the following:

Microsoft S Mode – Switch out prompt

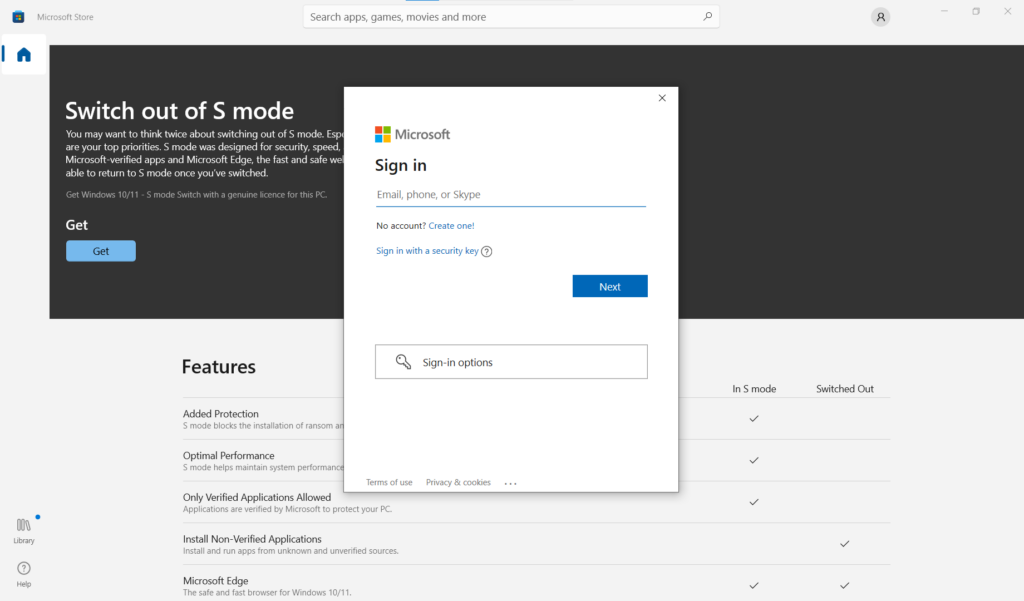
Clicking on the “Get” button got us to the Microsoft Online Account login form…

Microsoft sign-in form appears when you try to switch out of S mode.

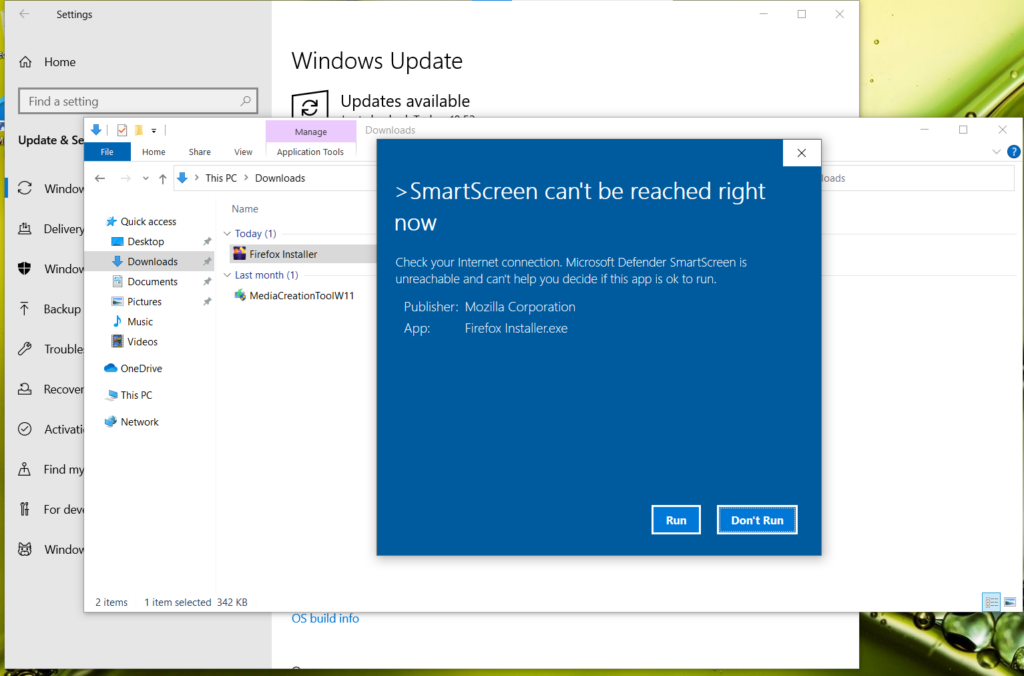
We then closed all windows, disabled internet access, and tried installing Firefox again. This time, we got the following message:

After disabling the internet connection, we tried to bypass the SmartScreen and the S mode settings

After clicking on the “Run” button, we got stopped again by the Microsoft Windows S Mode settings.

As this post mentioned, we eventually created a new online Microsoft account and used it to log in and disable Microsoft S Mode.


Microsoft Windows “God Mode” and other shortcuts

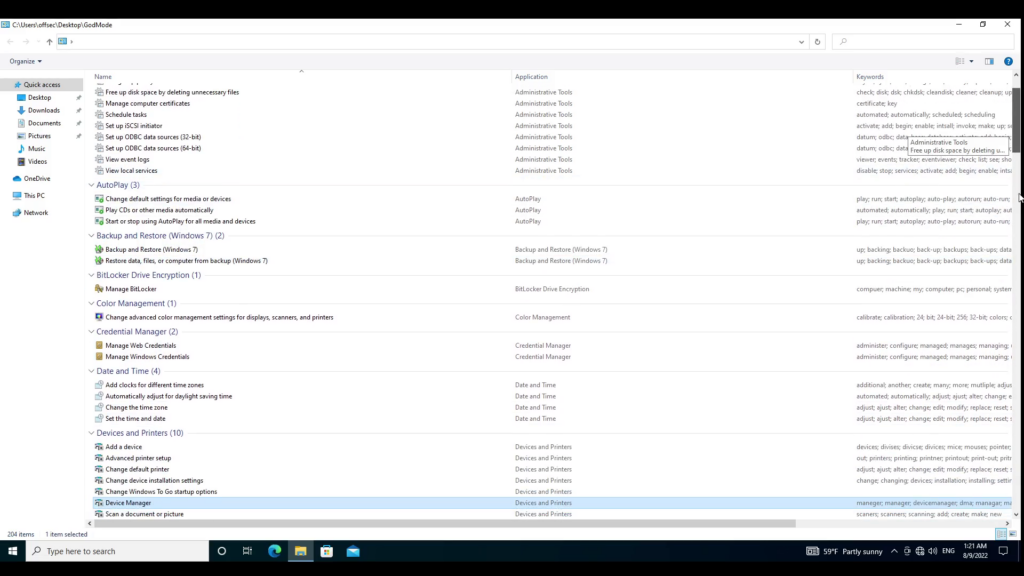
Recently, it came to our attention the existence of the so-called Windows “God Mode.” In reality, the “God Mode” is an alternative Control Panel with many options listed on one page. The most important feature of this “God Mode” Control Panel is that it makes it easier to find specific options and settings that Microsoft Windows developers hid for no apparent reason.

In the following video, we tried two methods to create the shortcut to the “God Mode” option, which was most likely named like this by people online rather than Microsoft.

Folder Method

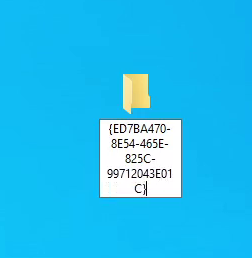
The first method was to create a new folder and add the following string as the name of the folder:

GodMode.{ED7BA470-8E54-465E-825C-99712043E01C}

The result was the following: the folder’s icon changed, and the folder’s name disappeared.

When we double-clicked the new icon, it opened a window with the variety of options that we mentioned before.

Shortcut Method

The second method involved creating a shortcut. We used that method to preserve the folder’s name and select the icon we would keep.
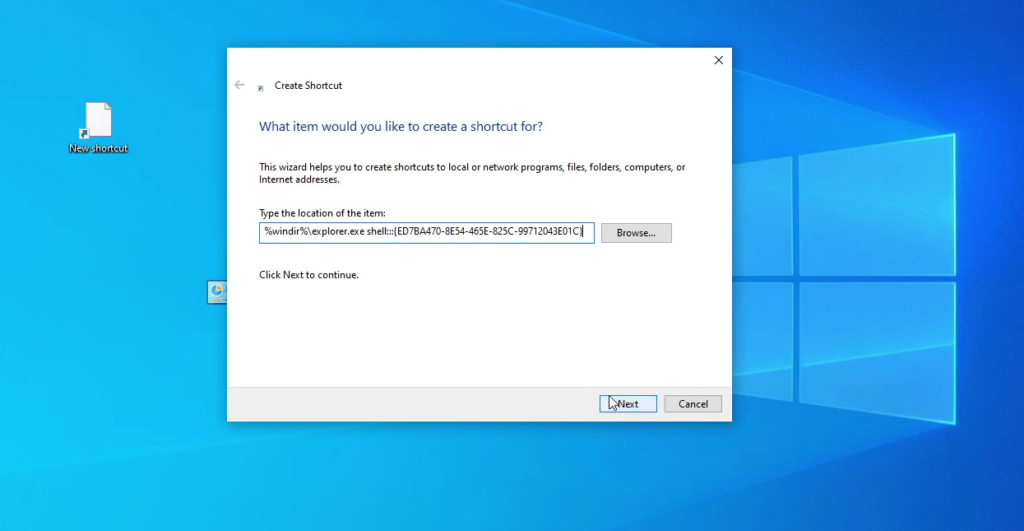
The first step was to create a new shortcut on the Desktop.
In the popup window, we set the following value at the “Type the location of the item:” option:

%windir%\explorer.exe shell:::{ED7BA470-8E54-465E-825C-99712043E01C}

Then we clicked on the “Next” button.
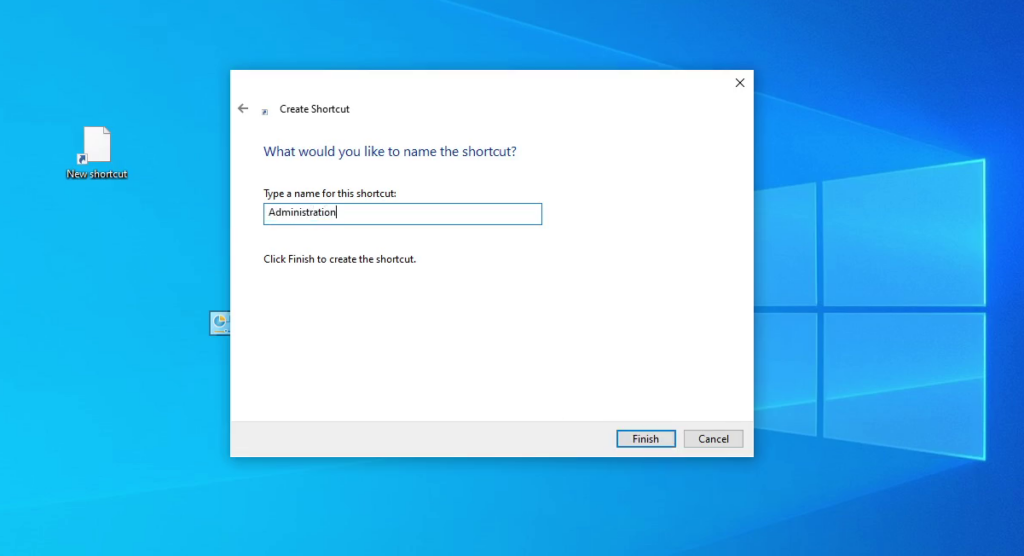
On the new page, we filled the “Type a name for this shortcut:” option with the value that we wanted to appear on the shortcut name. In our example, we used the word “Administration.”

After this, we clicked on the “Finish” button.
On the Desktop, our new shortcut appeared with the correct name. As we did not like the predefined icon, we right-clicked the shortcut and selected the “Properties” option. We clicked the “Change Icon…” button in the new window. Another window opened, we pressed the “Browse…” button and navigated to the file:

%windir%\System32\imageres.dll

After clicking the “Open” button, a new list of icons appeared from which we selected one that we liked, then clicked on the “OK” button. We clicked the “Apply” button on the remaining window, and Windows applied the icon change to our shortcut.

Additional “God Mode” codes

The following values allow you to create folders to specific items on your Windows PC.

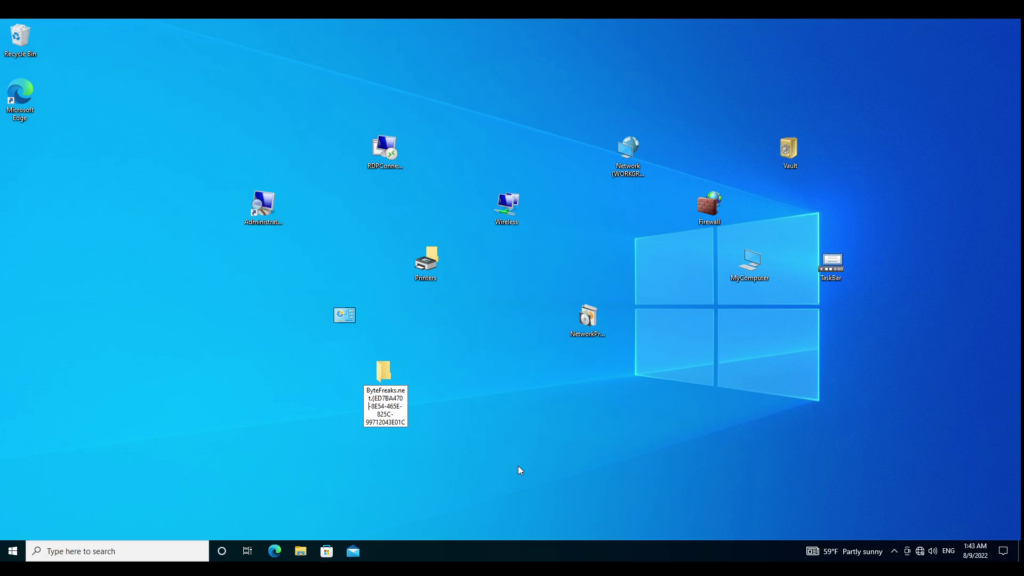
Bytefreaks.net.{ED7BA470-8E54-465E-825C-99712043E01C}
TaskBarIcons.{05D7B0F4-2121-4EFF-BF6B-ED3F69B894D9}.
MyComputer.{20D04FE0-3AEA-1069-A2D8-08002B30309D}.
WinVault.{1206F5F1-0569-412C-8FEC-3204630DFB70}.
Firewall.{4026492F-2F69-46B8-B9BF-5654FC07E423}.
Network.{208D2C60-3AEA-1069-A2D7-08002B30309D}.
NetworkApplicationInstallation.{15EAE92E-F17A-4431-9F28-805E482DAFD4}.
Wireless.{1FA9085F-25A2-489B-85D4-86326EEDCD87}.
RDPConnecitions.{241D7C96-F8BF-4F85-B01F-E2B043341A4B}.
Printers.{2227A280-3AEA-1069-A2DE-08002B30309D}.