In the world of web development and network administration, the cURL command is a versatile tool used for transferring data using various protocols. One interesting application of this command is to measure the performance of a web server. Let’s dissect a specific cURL command to understand how it works:
curl: This is the basic command call for using cURL, which initiates the data transfer.
-sv: The -s flag stands for ‘silent’, which makes cURL less talkative by hiding the progress meter and error messages. The -v flag is for ‘verbose’, providing more information about the transaction. These flags might seem contradictory, but together, they suppress unnecessary details while keeping the essential info visible.
/dev/null: This part redirects the output of the command to a special file that discards all data written to it. In essence, it’s used here to ignore the body of the response.
-w: This flag is used to specify what data to display on the screen after the execution of the command. It stands for ‘write-out’.
"Connect: %{time_connect} \n TTFB: %{time_starttransfer} \n Total time: %{time_total} \n": This is a formatted string that curl will use to display the timing statistics:
%{time_connect}: Shows the time it took to establish the connection to the server.
%{time_starttransfer}: Stands for ‘Time to First Byte’ (TTFB), indicating the time from the start until the first byte is received.
%{time_total}: Displays the total time taken for the operation.
https://bytefreaks.net/: This is the URL to which the cURL request is made.
Practical Use
This command is particularly useful for testing the performance of web servers. By analyzing the connect time, TTFB, and total time, administrators and developers can get insights into potential bottlenecks or performance issues. For instance, a long TTFB might suggest server-side delays in processing requests.
Conclusion
The cURL command demonstrated here is a powerful tool for performance testing. It’s concise yet provides crucial metrics for understanding how a web server responds to requests. By mastering such commands, one can effectively monitor and optimize web server performance, ensuring better user experiences and efficient server management.
In today’s surveillance-driven world, managing and retrieving recorded videos from Network Video Recorders (NVRs) is crucial for security professionals. This blog post will introduce a set of Python scripts that automate the process of searching for and downloading recorded videos from a HIKVision NVR. The scripts enable users to specify a date range and camera track, making it easier to access and manage video footage efficiently.
The Python Scripts:
generate.py
#!/usr/bin/env python

# This scripts calls search.py to search in the HIKVision NVR for recorded videos and the uses download.py to download those videos.
# The script loops over the camera tracks and the last 120 days.

import sys
import os
import datetime

base = datetime.datetime.today().replace(hour=0, minute=0, second=0, microsecond=0);
numdays = 120;
dateList = [base - datetime.timedelta(days=x) for x in range(numdays)];

tracks = ["101", "201", "301", "401", "501", "601", "701", "801"];

for trackID in tracks:
  for dateItem in dateList:
    os.system("python search.py " + trackID + " " + dateItem.strftime('%Y-%m-%dT%H:%M:%SZ') + " " + (dateItem + datetime.timedelta(days=1)).strftime('%Y-%m-%dT%H:%M:%SZ'));

for trackID in tracks:
  for dateItem in dateList:
    os.system("python download.py " + trackID + " " + dateItem.strftime('%Y-%m-%dT%H:%M:%SZ') + " " + (dateItem + datetime.timedelta(days=1)).strftime('%Y-%m-%dT%H:%M:%SZ'));
This script acts as the orchestrator, controlling the entire process.
It generates a list of dates, spanning the last 120 days, and a list of camera tracks to search for video recordings.
It then iterates through each camera track and date, calling two other Python scripts: search.py and download.py.
search.py
#!/usr/bin/env python

# This script makes an API call to the HIKVision NVR with a Track ID and a datetime range and retrieves an XML list with all videos with their download links that were recorded on that camera during that time period.

import sys
import os

trackID = sys.argv[1];
startTime = sys.argv[2];
endTime = sys.argv[3];
xmlFilename = "results/" + trackID + "." + startTime + "." + endTime + ".xml";

os.system("curl 'http://username:[email protected]/ISAPI/ContentMgmt/search' --data-raw $'<?xml version='1.0' encoding='UTF-8'?>\n<CMSearchDescription><searchID>CA77BA52-0780-0001-34B2-6120F2501D36</searchID><trackList><trackID>" + trackID + "</trackID></trackList><timeSpanList><timeSpan><startTime>" + startTime + "</startTime><endTime>" + endTime + "</endTime></timeSpan></timeSpanList><maxResults>100</maxResults><searchResultPostion>0</searchResultPostion><metadataList><metadataDescriptor>//recordType.meta.std-cgi.com</metadataDescriptor></metadataList></CMSearchDescription>' -o "+ xmlFilename);
This script is responsible for making an API call to the HIKVision NVR to search for recorded videos.
It takes three command-line arguments: track ID, start time, and end time.
It constructs a search request in XML format and uses curl to send the request to the NVR.
The search results are saved as an XML file for later processing.
download.py
#!/usr/bin/env python

# This script reads an XML file that was retrieved from the HIKVision NVR which containes videos with their download links. For each link, it appends the credentials for login and uses ffmpeg to download the video.

from xml.dom import minidom
import os
import sys

trackID = sys.argv[1];
startTime = sys.argv[2];
endTime = sys.argv[3];
xmlFilename = "results/" + trackID + "." + startTime + "." + endTime + ".xml";
dom = minidom.parse(xmlFilename)
elements = dom.getElementsByTagName('playbackURI')

i = 0
for element in elements:
    video = element.firstChild.data
    video = video.replace("rtsp://10.20.30.1", "rtsp://username:[email protected]")
    video = video.replace("\n", "")
    size = video.rsplit('=', 1)[1]
    os.system("ffmpeg -i '" + video + "' -max_muxing_queue_size " + size + "0 videos/" + trackID + "." + startTime + "." + endTime + "." + str(i+1) + ".mp4;")
    i += 1
exit
After the search has been performed and results stored in an XML file, this script is called to download the videos.
It reads the XML file and extracts the video playback URLs.
For each video, it appends the required credentials for login and uses ffmpeg to download the video.
Downloaded videos are saved with a filename indicating track ID, start time, end time, and a unique index.
Usage:
To use these scripts, you’ll need to modify the following parts:
Update the base variable in generate.py to set the desired starting date.
Adjust the tracks list in generate.py to specify the camera tracks you want to search.
Replace username, password, and the IP address in the curl command in search.py with your NVR’s credentials and address.
Ensure you have ffmpeg installed on your system for video downloading.
With these Python scripts, you can automate the process of searching for and downloading recorded videos from a HIKVision NVR. This can significantly simplify video retrieval tasks for security professionals, saving time and effort in managing surveillance footage. By customizing and expanding upon these scripts, you can further enhance your video management capabilities and streamline your security operations.
We chose to install the php-cli package instead of the php as we do not need to install all the additional dependencies php has, like apache2. Since we are working on a development computer, we can skip the required packages for deployment.
We decided to use MySQL in our project, so we installed the php-mysql package that provides the PDO for that database technology.
php-intl and php-mbstring were installed to suppress the following warnings:
Optional recommendations to improve your setup
~~~~~~~~~~~~~~~~~~~~~~~~~~~~~~~~~~~~~~~~~~~~~~

 * mb_strlen() should be available
   > Install and enable the mbstring extension.

 * intl extension should be available
   > Install and enable the intl extension (used for validators).
Downloading and installing symfony
Since Symfony version 5, there is a new support application for the development of Symfony projects. Using the following commands:
we downloaded it from the official website,
installed it to our home folder,
and then moved it to /user/local/bin/symfony to be accessible from any terminal without changing the path each time.
In case you do not want to move the binary to /usr/local/bin you can either use it as a local file:
~/.symfony/bin/symfony;
or add it to your $PATH variable:
export PATH="$HOME/.symfony/bin:$PATH";
Creating a new project and making sure dependencies are met
After the above steps are done, we can clone the Symfony 5 skeleton and then use the symfony support application to check that our system has all the needed features.
symfony new symfony_project;
cd symfony_project;
symfony check:req;
If everything is OK, you should get a message similar to the one below:
$ symfony check:req

Symfony Requirements Checker
~~~~~~~~~~~~~~~~~~~~~~~~~~~~

> PHP is using the following php.ini file:
/etc/php/7.4/cli/php.ini

> Checking Symfony requirements:

...................................


 [OK]
 Your system is ready to run Symfony projects


Note  The command console can use a different php.ini file
~~~~  than the one used by your web server.
      Please check that both the console and the web server
      are using the same PHP version and configuration.
Starting a minimal web server to see the skeleton application
Using PHP’s built-in server, we can execute the skeleton application and see the result in our browser:
php -S 127.0.0.1:8000 -t public/;
Starting the Symfony minimal web server to see the skeleton application
Another option to check out your application is using the Symfony built-in web server, which is richer in features than the PHP server but lighter than Apache or Nginx. Below we present how to start it as an application in a terminal and how to start it as a detached service (leaving your terminal free for other operations).
#If you start it as it as an application, you will need to press Ctrl + C to kill it.
symfony serve;
Starting Symfony server as a detached service:
symfony serve -d;
#To stop it, use the following
symfony server:stop;
#Please note that the command contains the word server and not serve like before.
Adding more features to our project
To make our project more dynamic and versatile, we need to install a few packages using composer. Composer is a PHP utility for managing dependencies. It allows you to indicate the libraries your project relies on, and it will take care of installing and updating them. To fast install it, open a terminal and type the following command:
curl -Ss getcomposer.org/installer | php;
# Moving the composer into the /usr/local/bin/ folder will allow us to access it from any folder later on as that folder is in the default PATH variable. You could again avoid this step but it makes the process more user friendly.
sudo mv composer.phar /usr/local/bin/composer;
Allowing code annotations in our PHP code
After the composer is successfully installed, we can install the annotations package, which among other features, will allow us to define routes inside our PHP controller files.
composer require annotations;
A code example of that is the following:
<?php


namespace App\Controller;

use Symfony\Bundle\FrameworkBundle\Controller\AbstractController;
use Symfony\Component\HttpFoundation\Response;
use Symfony\Component\Routing\Annotation\Route;

class QuestionController extends AbstractController
{
    /**
     * @Route("/", name="app_homepage")
     */
    public function homepage()
    {
        return new Response('Done');
    }

    /**
     * @Route("/questions/{slug}", name="app_question_show")
     */
    public function show($slug)
    {
        $answers = [
            'a',
            'b',
            'c'
        ];
        dump($this);

        return $this->render('question/show.html.twig', [
            'question' => ucwords(str_replace('-', ' ', $slug)),
            'answers' => $answers
        ]);
        #return new Response(sprintf("The question: %s", $slug));
    }
}
Installing the twig package that allows us to work better with HTML templates
To avoid embedding HTML code in our PHP code, we can install twig, which provides a framework of templates to build several sites quickly.
composer require template;
Enriching the development experience
To debug in a better way our applications, we install the following two groups of packages that provide several debugging features, including a logging mechanism.
To avoid hardcoding items in your DOM (and forcing yourself to remember to edit them depending on the deployment options you are using), you can use the asset package that will handle most of those issues.
composer require symfony/asset;
Serializing more items and objects to JSON and XML
To enrich the power of API calls that return JSON or XML objects (like the code below)
return $this->json(/*...*/);
we can install the following serializer:
composer require symfony/serializer;
and be used as follows:
$serializer->serialize(
  $myObject,
  'json'
);
Develop using HTTPS / SSL for free
Although we are not super happy about installing local Certificate Authorities on our machines, we used the following commands to install the Symfony Certifying Authority certificate and enable HTTPS/SSL development without accepting a non-verified certificate in the browser each time.
If you do not install libnss3-tools, you will get the following warning:
$ symfony server:ca:install
You might have to enter your root password to install the local Certificate Authority certificate
Sudo password:
The local CA is now installed in the system trust store!
WARNING "certutil" is not available, so the CA can't be automatically installed in Firefox and/or Chrome/Chromium!
Install "certutil" with "apt install libnss3-tools" and re-run the command

 [OK] The local Certificate Authority is installed and trusted
After you install it, the message will change as follows:
$ symfony server:ca:install
The local CA is now installed in the Firefox and/or Chrome/Chromium trust store (requires browser restart)!

 [OK] The local Certificate Authority is installed and trusted
Install Webpack Encore for the assets
To install Webpack encore, we need yarn. To get yarn, we need npm. So we need the following installation steps:
After these steps are successful, in the project folder, execute the following commands to allow the yarn to perform all necessary installations and then use encore to monitor the assets and rebuild its cache. The settings are depended on the file webpack.config.js.
yarn install;
yarn encore dev --watch;
Below, we present an example file of webpack.config.js.
var Encore = require('@symfony/webpack-encore');

// Manually configure the runtime environment if not already configured yet by the "encore" command.
// It's useful when you use tools that rely on webpack.config.js file.
if (!Encore.isRuntimeEnvironmentConfigured()) {
    Encore.configureRuntimeEnvironment(process.env.NODE_ENV || 'dev');
}

Encore
    // directory where compiled assets will be stored
    .setOutputPath('public/build/')
    // public path used by the web server to access the output path
    .setPublicPath('/build')
    // only needed for CDN's or sub-directory deploy
    //.setManifestKeyPrefix('build/')

    /*
     * ENTRY CONFIG
     *
     * Add 1 entry for each "page" of your app
     * (including one that's included on every page - e.g. "app")
     *
     * Each entry will result in one JavaScript file (e.g. app.js)
     * and one CSS file (e.g. app.css) if your JavaScript imports CSS.
     */
    .addEntry('app', './assets/js/app.js')
    //.addEntry('page1', './assets/js/page1.js')
    //.addEntry('page2', './assets/js/page2.js')

    // When enabled, Webpack "splits" your files into smaller pieces for greater optimization.
    .splitEntryChunks()

    // will require an extra script tag for runtime.js
    // but, you probably want this, unless you're building a single-page app
    .enableSingleRuntimeChunk()

    /*
     * FEATURE CONFIG
     *
     * Enable & configure other features below. For a full
     * list of features, see:
     * https://symfony.com/doc/current/frontend.html#adding-more-features
     */
    .cleanupOutputBeforeBuild()
    .enableBuildNotifications()
    .enableSourceMaps(!Encore.isProduction())
    // enables hashed filenames (e.g. app.abc123.css)
    .enableVersioning(Encore.isProduction())

    // enables @babel/preset-env polyfills
    .configureBabelPresetEnv((config) => {
        config.useBuiltIns = 'usage';
        config.corejs = 3;
    })

    // enables Sass/SCSS support
    //.enableSassLoader()

    // uncomment if you use TypeScript
    //.enableTypeScriptLoader()

    // uncomment to get integrity="..." attributes on your script & link tags
    // requires WebpackEncoreBundle 1.4 or higher
    //.enableIntegrityHashes(Encore.isProduction())

    // uncomment if you're having problems with a jQuery plugin
    //.autoProvidejQuery()

    // uncomment if you use API Platform Admin (composer req api-admin)
    //.enableReactPreset()
    //.addEntry('admin', './assets/js/admin.js')
;

module.exports = Encore.getWebpackConfig();
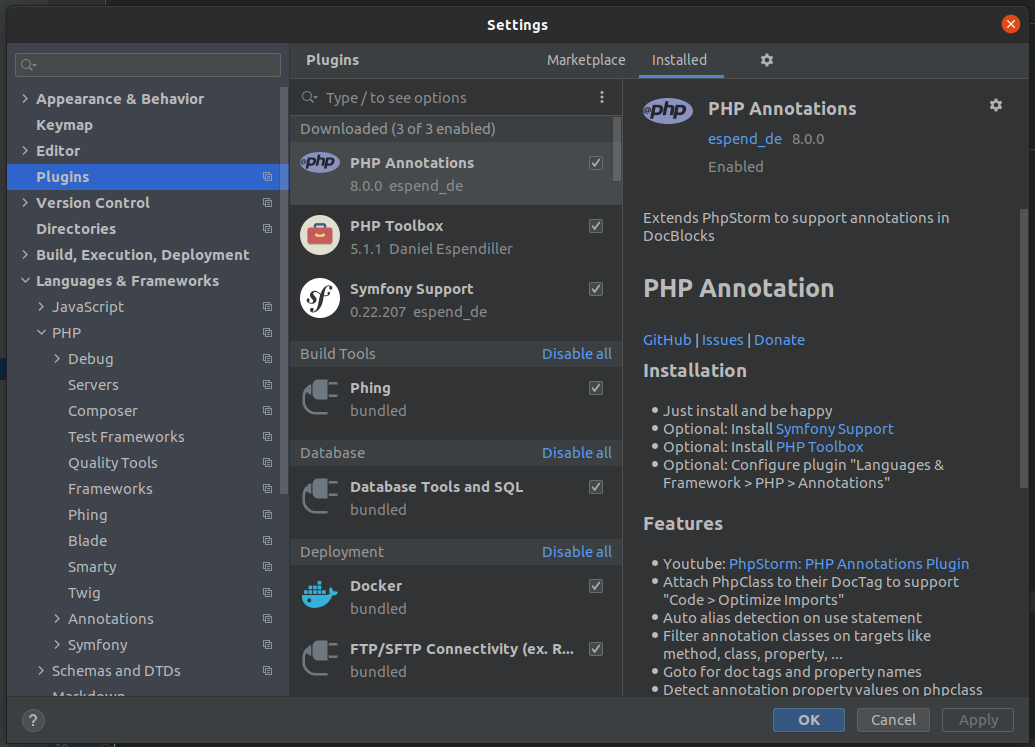
Some settings for PHPStorm by JetBrains
Since the IDE we are using for PHP development is PHPStorm, we installed the recommended plugins for Symfony to it. In the following image, we list the three plugins that we installed.
Specifically, we installed:
Symfony Support
PHP Annotations
PHP Toolbox
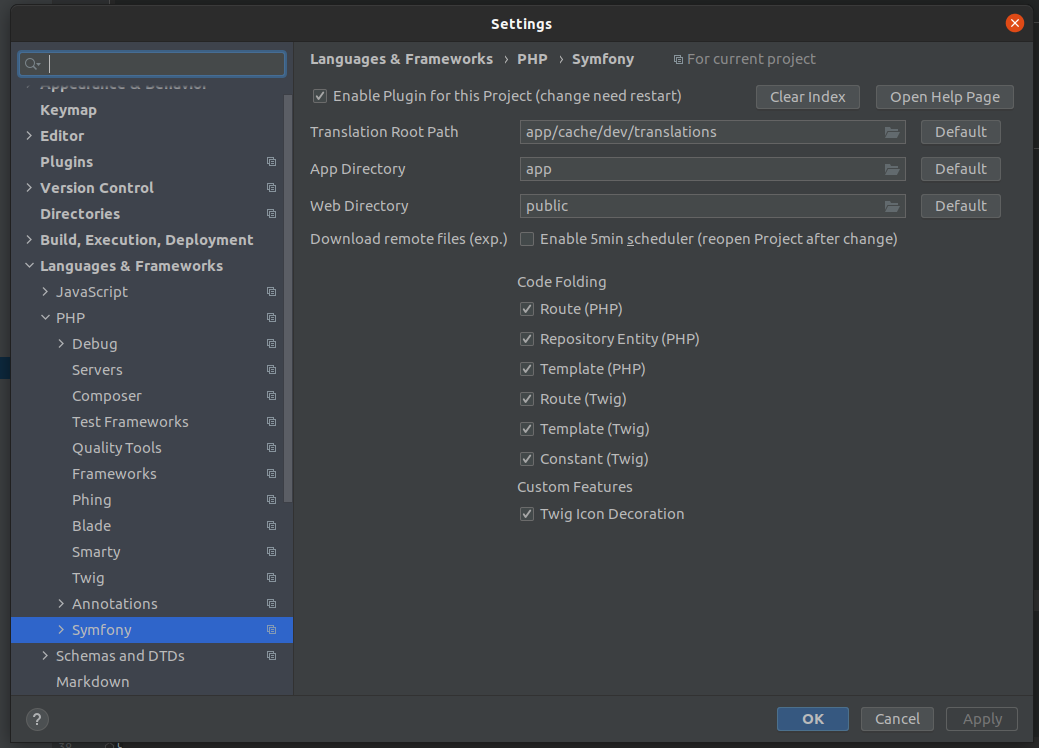
After installing the three plugins, we navigated to the Symfony Plugin settings (which you can find either using the search functionality or under the menu: Languages & Frameworks > PHP > Symfony).
From there, we clicked on the Enable Plugin for this Project and then changed the Web Directory from web to public.
We used this batch of notes to encrypt email communication between us and the https://www.offensive-security.com/ website contact. Precisely, we needed to encrypt some email attachments with sensitive data.
After receiving the plaintext version of the registrar.asc file, we were able to proceed with the encryption steps. The first thing we did was to import their key:
gpg --import registrar.asc;
$ gpg --import registrar.asc
gpg: key 6C12FFD0BFCBFAE2: 9 signatures not checked due to missing keys
gpg: key 6C12FFD0BFCBFAE2: public key "Offensive Security (Offensive Security Registrar) <[email protected]>" imported
gpg: Total number processed: 1
gpg:               imported: 1
gpg: marginals needed: 3  completes needed: 1  trust model: pgp
gpg: depth: 0  valid:   2  signed:   0  trust: 0-, 0q, 0n, 0m, 0f, 2u
gpg: next trustdb check due at 2023-12-13
Using the following command, we were able to encrypt the sensitive data and send them to via mail:
The PGP command automatically used the public key that we imported in the previous step to perform the encryption. PGP named the encrypted file sensitive.mp4.gpg. We only needed to send that file, and the corresponding party had all other information to decrypt it.
Bonus: Create our own public Key so that people can contact you with encryption
gpg --gen-key;
Executing the above command asked us to provide a name, an email, and a password to encrypt the data. Below is the sample output generated for us:
$ gpg --gen-key
gpg (GnuPG) 2.2.19; Copyright (C) 2019 Free Software Foundation, Inc.
This is free software: you are free to change and redistribute it.
There is NO WARRANTY, to the extent permitted by law.

Note: Use "gpg --full-generate-key" for a full featured key generation dialog.

GnuPG needs to construct a user ID to identify your key.

Real name: John Doe
Email address: [email protected]
You selected this USER-ID:
    "John Doe <[email protected]>"

Change (N)ame, (E)mail, or (O)kay/(Q)uit? O
We need to generate a lot of random bytes. It is a good idea to perform
some other action (type on the keyboard, move the mouse, utilize the
disks) during the prime generation; this gives the random number
generator a better chance to gain enough entropy.
We need to generate a lot of random bytes. It is a good idea to perform
some other action (type on the keyboard, move the mouse, utilize the
disks) during the prime generation; this gives the random number
generator a better chance to gain enough entropy.
gpg: key A53FEA7768D67D2A marked as ultimately trusted
gpg: revocation certificate stored as '/home/john/.gnupg/openpgp-revocs.d/D1660B83341AEF2852A2A4C6A53FEA7768D67D2A.rev'
public and secret key created and signed.

pub   rsa3072 2021-12-13 [SC] [expires: 2023-12-13]
      D1660B83341AEF2852A2A4C6A53FEA7768D67D2A
uid                      John Doe <[email protected]>
sub   rsa3072 2021-12-13 [E] [expires: 2023-12-13]
Then, we exported our public key using the command below.