Applications


MySQL copy the contents of one table into another

MySQL is a popular open-source relational database management system that allows users to store and retrieve data from a database. The INSERT INTO command is used to insert data into a MySQL database, while the SELECT statement is used to retrieve data from a database. In this blog post, we will explore the MySQL command INSERT INTO tableA SELECT DISTINCT * FROM tableB“.

Explanation:

The “INSERT INTO tableA SELECT DISTINCT * FROM tableB;” command is used to insert unique rows from tableB into tableA. Let’s break down this command to understand its components:

  1. INSERT INTO tableA: This component specifies the table that we want to insert data into. In this case, we are inserting data into tableA.
  2. SELECT DISTINCT : This component selects all the columns () from tableB and removes any duplicates using the DISTINCT keyword.
  3. FROM tableB: This component specifies the table from which we want to select data. In this case, we are selecting data from tableB.

Putting it all together, the command INSERT INTO tableA SELECT DISTINCT * FROM tableB; selects all the unique rows from tableB and inserts them into tableA.

Let’s look at an example to understand this command better. Suppose we have two tables, tableA and tableB, with the following data:

tableA:

idnameage
1John20
2Peter25

tableB:

idnameage
1John20
2Peter25
3Sarah30
4Rachel35

If we run the command INSERT INTO tableA SELECT DISTINCT * FROM tableB;, it will insert the unique rows from tableB into tableA. Since tableA already contains the rows for John and Peter, only the rows for Sarah and Rachel will be inserted into tableA. Therefore, the resulting tableA will look like:

tableA:

idnameage
1John20
2Peter25
3Sarah30
4Rachel35

Conclusion:

The MySQL command “INSERT INTO tableA SELECT DISTINCT * FROM tableB;” is a powerful tool for inserting unique rows from one table into another. It can be helpful when you have two tables with overlapping data and want to consolidate the data into a single table. Understanding how this command works allows you to manage your MySQL databases and optimize your data storage effectively.


Cloudflare API DNS Update

Cloudflare is a content delivery network (CDN) that provides a wide range of services, including domain name system (DNS) management. The Cloudflare API allows developers to programmatically manage DNS records, making it possible to automate updating DNS records. This blog post will explain how to use the Cloudflare API to update a DNS record.

Log in to Cloudflare and get your Global API Key

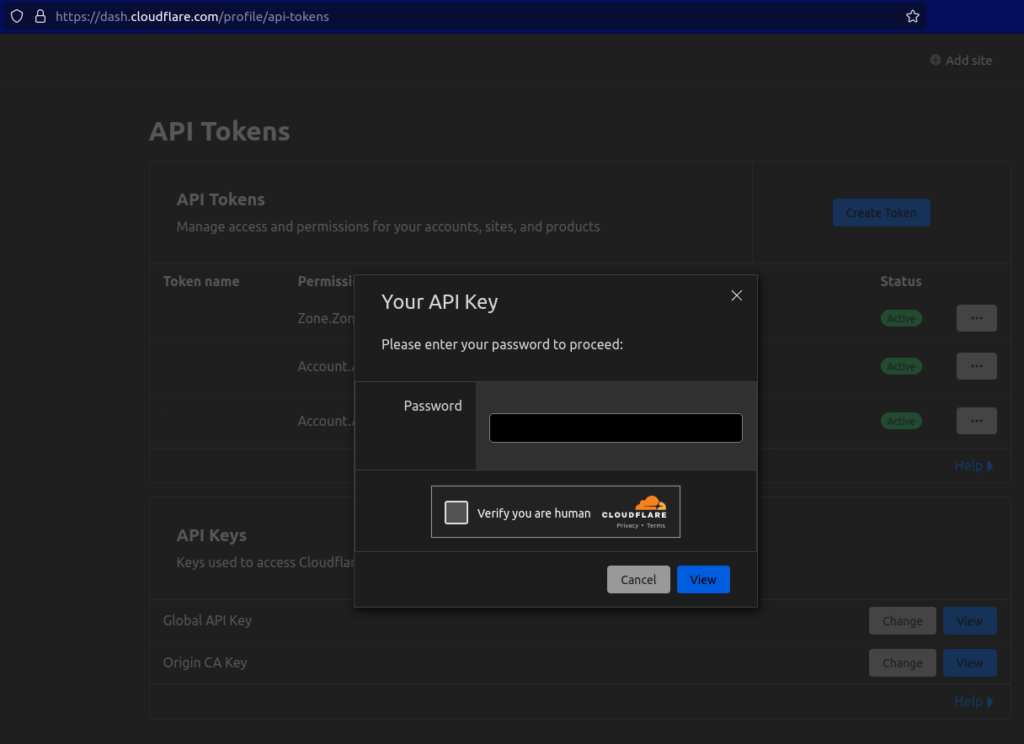
First, log in to your Cloudflare account and obtain your Global API Key. You can obtain your Global API Key by navigating to the URL: https://dash.cloudflare.com/profile/api-tokens. Once logged in, you should see a section called “API Tokens.” Click on the “View” button to see your Global API Key.

Find the Zone ID

The next step is to find the Zone ID of the domain you want to update. You can find the Zone ID by following the instructions provided in the Cloudflare documentation: https://developers.cloudflare.com/fundamentals/get-started/basic-tasks/find-account-and-zone-ids/.

  1. Click on the domain you want to manage.
  2. In the left-hand sidebar, click on “Overview.”
  3. Scroll to the “API” section and click “Get your API key.”
  4. Click on the “View” button next to the Global API Key.
  5. Copy the key and keep it somewhere safe.

Get the DNS Record Identifiers

Once you have obtained the Zone ID, you can use it to get the identifiers for the DNS records associated with that domain. You can do this by making a GET request to the Cloudflare API, specifying the Zone ID, and providing your email address and API key. The response will contain information about all of the DNS records associated with the domain, including their identifiers.

Here is an example command that you can use to get the DNS record identifiers:

1
2
3
4
5
curl --request GET \
  --url https://api.cloudflare.com/client/v4/zones/<zone_id>/dns_records \
  --header 'Content-Type: application/json' \
  --header 'X-Auth-Email: <email_address>' \
  --header 'X-Auth-Key: <api_key>'

Replace <zone_id>, <email_address>, and <api_key> with your actual values.

Update the DNS Record

Finally, you can use the DNS record identifier to update the DNS record. The following is an example bash script that you can use to update a DNS record:

1
2
3
4
5
6
7
8
9
10
11
12
13
14
15
16
17
18
19
20
21
22
#!/bin/bash
 
ip=`curl https://bytefreaks.net/what-is-my-ip | grep '<h1 style="text-align: center;"' | cut -d '>' -f 2 | cut -d '<' -f 1`;
 
ip=`echo $ip | cut -d, -f1`;
 
comment=`date +%Y-%m-%d\ %H:%M`;
 
curl --request PUT \
  --url https://api.cloudflare.com/client/v4/zones/<zone_id>/dns_records/<dns_record_id> \
  --header 'Content-Type: application/json' \
  --header 'X-Auth-Email: <email_address>' \
  --header 'X-Auth-Key: <api_key>' \
  --data '{
  "content": "'$ip'",
  "name": "www.bytefreaks.net",
  "proxied": true,
  "type": "A",
  "comment": "'"$comment"'",
  "tags": [],
  "ttl": 3600
}'

Replace <zone_id>, <dns_record_id>, <email_address>, and <api_key> with your actual values. You should also update the "name" field to match the name of the DNS record you want to update.

This script is used to update a DNS record using the Cloudflare API. It retrieves the current public IP address of the device running the script and then updates the specified DNS record on Cloudflare with the new IP address.

Here is a breakdown of each command in the script:

  • ip=curl https://bytefreaks.net/what-is-my-ip | grep ‘<h1 style=”text-align: center;”‘ | cut -d ‘>’ -f 2 | cut -d ‘<‘ -f 1“: This command uses the curl command to retrieve the public IP address of the device running the script from the website https://bytefreaks.net/what-is-my-ip. The output of this command is then piped through grep to find the line that contains the IP address. The cut command is then used to extract the IP address from the line.
  • ip=echo $ip | cut -d, -f1“: This command removes any commas from the IP address, which may be present if the IP address is in a format that includes additional information.
  • comment=date +%Y-%m-%d\ %H:%M“: This command generates a comment for the DNS record update. The comment includes the current date and time in the format YYYY-MM-DD HH:MM.
  • curl --request PUT \: This command sends an HTTP PUT request to update the specified DNS record.
  • --url https://api.cloudflare.com/client/v4/zones/<zone_id>/dns_records/<dns_record_id> \: This specifies the URL for the Cloudflare API endpoint for updating a DNS record. The <zone_id> and <dns_record_id> placeholders should be replaced with the actual zone ID and DNS record ID, respectively.
  • --header 'Content-Type: application/json' \: This specifies that the content type of the request is JSON.
  • --header 'X-Auth-Email: <email_address>' \: This specifies the Cloudflare account email address associated with the API key. The <email_address> placeholder should be replaced with the actual email address.
  • --header 'X-Auth-Key: <api_key>' \: This specifies the Cloudflare API key for the account. The <api_key> placeholder should be replaced with the actual API key.
  • --data '{ ... }': This specifies the JSON data to be sent in the request body. This includes the new IP address in the content field, the domain name in the name field, the record type in the type field, the comment in the comment field, and other optional parameters like the ttl. Note that the domain name at.put.cy is hardcoded in the script, and should be replaced with the actual domain name to be updated.

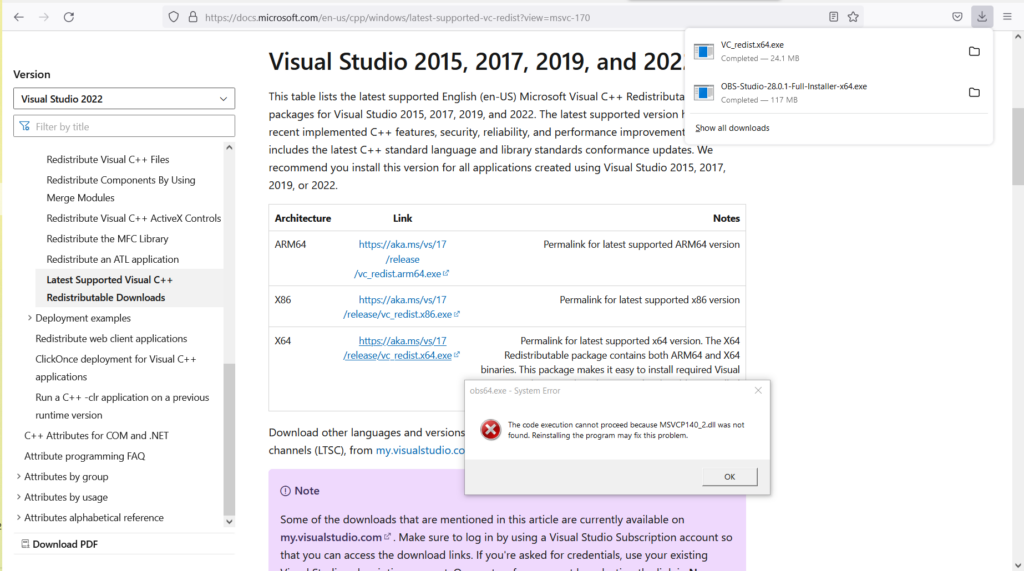
The code execution cannot proceed because MSVCP140_2.dll was not found. Reinstalling the program may fix this problem.

Introduction

Open Broadcaster Software (OBS) is a free and open-source streaming and recording software that is widely used by content creators. It allows users to record and stream high-quality videos and is compatible with various platforms. However, users may encounter issues while installing or using OBS on WIndows systems. One such issue is the missing MSVCP140_2.dll file error.

In this blog post, we will discuss this error in detail and provide a solution to fix it.

Error Description

When a user tries to install or launch OBS on their computer, they may encounter the following error message:

The code execution cannot proceed because MSVCP140_2.dll was not found. Reinstalling the program may fix this problem.

This error occurs because the system is missing the MSVCP140_2.dll file, which is a part of the Microsoft Visual C++ Redistributable package. OBS requires this package to function properly.

Solution

To fix the missing MSVCP140_2.dll error in OBS, follow the steps below:

Step 1: Download the Microsoft Visual C++ Redistributable Packages.

Visit the Microsoft website and download the following package:

Make sure to download the 64-bit version of each package that matches your system architecture.

Step 2: Install the Packages

After downloading the packages, install them on your computer by following the on-screen instructions.

Step 3: Restart OBS

After installing the packages, restart OBS and try launching it again. The missing MSVCP140_2.dll error should be resolved, and OBS should function properly.

Conclusion

In conclusion, the missing MSVCP140_2.dll error is a common issue while installing or using OBS. This error occurs because the system lacks the Microsoft Visual C++ Redistributable package. To fix this error, download and install the Microsoft Visual C++ Redistributable packages for Visual Studio 2015, 2017, 2019, and 2022 (64-bit version) from the Microsoft website. After installing these packages, restart OBS, and the error should be resolved.


Glaciator, an AI-Generated Pokemon

Name

Glaciator

Type

Ice/Dragon

Appearance

Glaciator is a quadrupedal dragon-like Pokemon with a body made entirely of ice. It has a long, thick tail and sharp, icy claws. Its head has two large, curved horns, and its eyes are a bright blue. Its breath is made of freezing mist.

Abilities

Glaciator has the ability “Frostbite,” which allows it to freeze its opponents and weaken them. Its ice attacks are also significantly stronger than those of other ice-type Pokemon. It also has a strong defense and a special defense stat.

Weaknesses

Glaciator is weak to fire and rock-type moves, as well as dragon-type moves. Its ice body makes it vulnerable to melting in hot temperatures.

Evolution

Glaciator evolves from a Pokemon called “Frostbite,” which is ice-type Pokemon.

Images