ssh


CloudFlare does not allow port 22 (usual SSH port) on domain 3

When you try to connect via ssh on a domain for which you are using CloudFlare as a HTTP proxy, you will get the following error:

$ ssh [email protected]
 ssh_exchange_identification: Connection closed by remote host

You have a few options to resolve for this issue:

  1. Either connect directly to the IP of the machine.
  2. Or, setup a CNAME record with no HTTP proxy for the SSH (so that you do not need to remember the IP).
    This solution does not offer any additional benefits than connecting directly to the IP of the server.
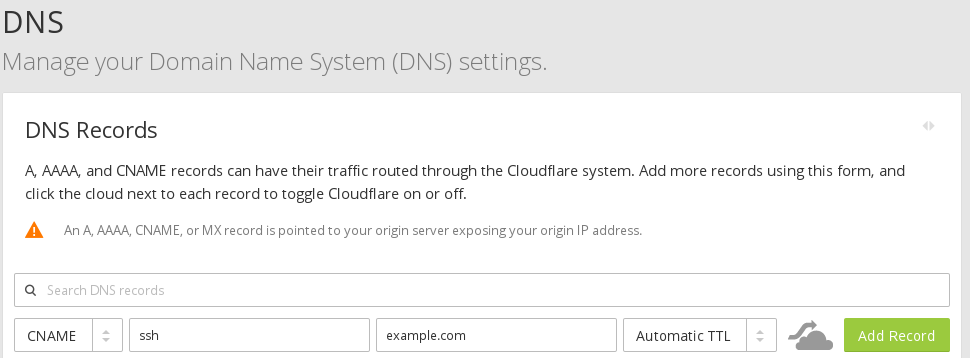
    To do that, you need to visit the configure DNS page for your site: e.g. https://www.cloudflare.com/a/dns/example.com,
    then create the CNAME named ssh, use as target your domain (e.g. example.com) and disable HTTP proxy by clicking on the orange cloud and making it gray before pressing the Add Record button.

    Then, you will be able to connect via ssh [email protected].
  3. Last solution but not least is configuring your server to listen for SSH on one of the ports of CloudFlare that are open.
    When this post was written, the following ports were available/open for any site in CloudFlare:
    For requests made via HTTP:

    80
    8080
    8880
    2052
    2082
    2086
    2095

    For requests made via HTTPS:

    443
    2053
    2083
    2087
    2096
    8443

    At the time, we were using an Ubuntu GNU/Linux server, to instruct Ubuntu SSHD to listen to multiple ports we edited the file /etc/ssh/sshd_config and right after the lines:

    # What ports, IPs and protocols we listen for
    Port 22

    we added another line with the new port we wanted to use:

    # What ports, IPs and protocols we listen for
    Port 22
    Port 2053

    After restarting the service
    service ssh restart;
    we were able to connect to our page as follows:
    ssh -p 2053 [email protected];


How to process tcpdump live data stream from a remote machine on a local WireShark 1

Recently we needed to process the results of a tcpdump command using the GUI version of WireShark on machine that did not have a window manager installed. That device was an embedded device, for which it did not make sense to even consider installing a window manager on it. So, in order to process the results of the tcpdump command we decided to use another machine that had a full working window manager installed and was able to operate the GUI version of WireShark.

For our solution to work some requirements were expected to be met by the embedded device (a.k.a. remote machine).

  1. tcpdump was installed on the remote machine
  2. ssh server was installed on the remote machine and allowed us to connect to it remotely
  3. there was a user that had remote ssh rights on the remote machine that also had the rights to execute tcpdump on the needed interfaces

Synopsis of our solution:

Just execute the following on the machine with the GUI (a.k.a. local machine)


mkfifo /tmp/board;
wireshark -k -i /tmp/board &
ssh [email protected] "tcpdump -s 0 -U -n -w - -i lo not port 22" > /tmp/board;

Explanation of our solution:

Following are the steps that we performed on the local machine to pipe the results of tcpdump on the remote machine on the wireshark on the local machine.

  1. First we created a named pipe as follows:
    mkfifo /tmp/board;
    You can name your pipe anyway you like and place it in any folder you wish. We used /tmp as our pipe is a temporary construct that we do not care to preserve across time/restarts.
  2. Then we started wireshark from a terminal so that we could pass as capture interface the named pipe we just created using the -i /tmp/board parameter. The -k parameter instructs wireshark to start the capture session immediately.
    wireshark -k -i /tmp/board &
    Since this operation was going to execute for a long time, we sent it to the background to release the terminal for further use by placing the & symbol at the end of the command.
  3. Finally, we started tcpdump over ssh on a board and redirected its output to our named pipe.
    ssh [email protected] "tcpdump -s 0 -U -n -w - -i lo not port 22" > /tmp/board;
    The parameters we used on tcpdump have the following effects:
    -s 0 instructs tcpdump to set the snapshot length of data from each packet to the default value of 262144 bytes.
    -U Since the -w option is not specified, make the printed packet output packet-buffered. Which means that it will print the description of the contents of each packet without waiting for the output buffer to get full.
    -n Does not convert host addresses to names. This can be used to avoid DNS lookups.
    -w - Write the raw packets to Standard Output rather than parsing them.
    -i lo Defines which interface to listen on. We wanted the loopback interface to listen to everything.
    not port 22 Since we used ssh to start this command, we do not want to listen to the data that we produce as well and flood the inputs.


CentOS 6: install / start and stop / enable and disable ssh server

Install

To install the openssh-server, you need to install the openssh-server package:

sudo yum install -y openssh-server;

Start

To start the sshd daemon (openssh-server) in the current session:

sudo service sshd start;

Stop

To stop the active (if any) sshd daemon in the current session:

sudo service sshd stop;

Enable

To configure the sshd daemon to start automatically at boot time:

sudo chkconfig sshd --add;
sudo chkconfig sshd on --level 2,3,4,5;

Disable

To configure the sshd daemon to stop automatic initialization at boot time:

sudo chkconfig sshd off;
sudo chkconfig sshd --del;

How to instruct SSH use only my password and ignore my (rsa) key

Recently, we wanted to connect to a machine via SSH without using the default RSA key that was available in the client’s profile (~/.ssh/id_rsa).

We needed to avoid using the public key authentication method for two reasons:

  1. The client did not want to share the passphrase with us
  2. We did not want to move the key, not even temporarily

So, to connect via SSH while ignoring the key completely we connected using the following command


ssh -o PreferredAuthentications=keyboard-interactive,password -o PubkeyAuthentication=no user@server;

Explanation of parameters:

  • -o Was used to give options in the format used in the configuration file (/etc/ssh/ssh_config). It is useful for specifying options for which there is no separate command-line flag available.
  • -o PreferredAuthentications can be used to change the default order of authentication and bypass the GSSAPI-based authentication, the host-based authentication, the public key authentication and the challenge-response authentication.
    -o PreferredAuthentications=keyboard-interactive,password instructs the server to perform the authentication through the keyboard-interactive method and if that method is not available to use the password method.
    The keyboard-interactive authentication method is a request for all different pieces of information needed for the authentication. The server can specify, which inputs need to be hidden when user types them and which are not.
    The password authentication is a request for a single password. There is no configuration sent by the server. So the client decides how to format the prompt.
  • -o PubkeyAuthentication=no Specifies whether to try public key authentication. By setting the value to no it disables it.