Firewall


Do SFP transceivers have a MAC address or does the address belongs to the SFP port?

SFP (Small Form-factor Pluggable) transceivers do not have a MAC address. The MAC address is assigned to the network interface controller (NIC) or network adapter, which is the hardware component responsible for connecting a device to a network.

The SFP transceiver is a hot-swappable input/output device that plugs into a port on a network switch, router, or other networking devices and allows the device to transmit and receive data over fiber optic or copper cables. The SFP port to which the SFP transceiver is connected is typically assigned a unique MAC address by the device manufacturer.

Therefore, the MAC address belongs to the device’s network interface using the SFP port, not the SFP transceiver itself.


Cloudflare API DNS Update

Cloudflare is a content delivery network (CDN) that provides a wide range of services, including domain name system (DNS) management. The Cloudflare API allows developers to programmatically manage DNS records, making it possible to automate updating DNS records. This blog post will explain how to use the Cloudflare API to update a DNS record.

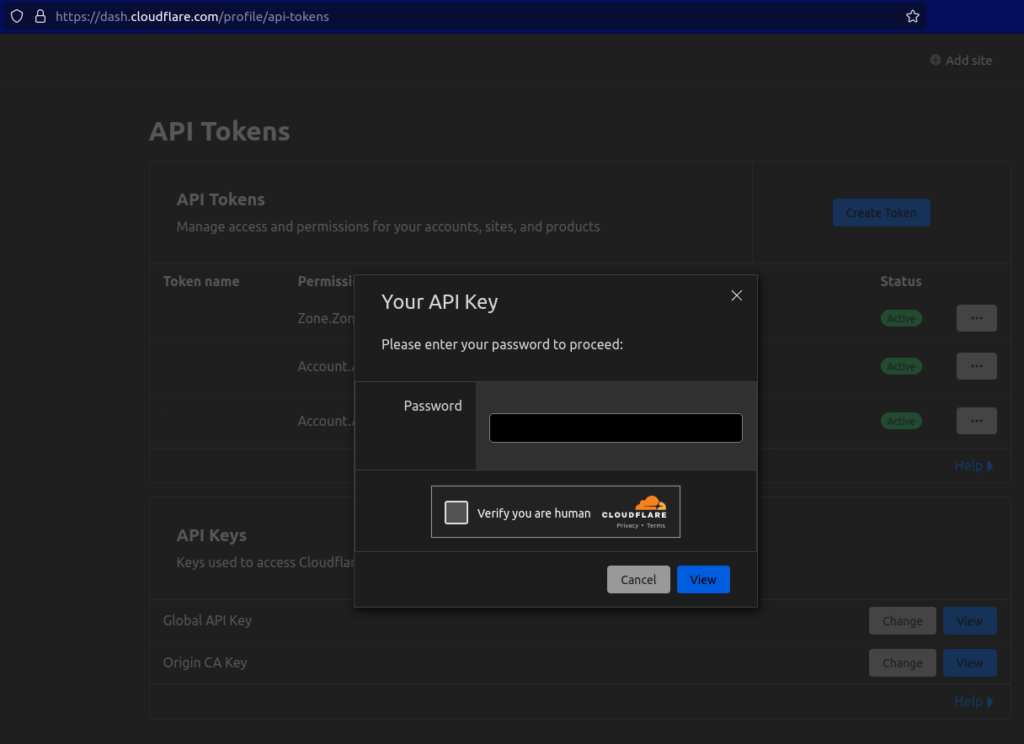
Log in to Cloudflare and get your Global API Key

First, log in to your Cloudflare account and obtain your Global API Key. You can obtain your Global API Key by navigating to the URL: https://dash.cloudflare.com/profile/api-tokens. Once logged in, you should see a section called “API Tokens.” Click on the “View” button to see your Global API Key.

Find the Zone ID

The next step is to find the Zone ID of the domain you want to update. You can find the Zone ID by following the instructions provided in the Cloudflare documentation: https://developers.cloudflare.com/fundamentals/get-started/basic-tasks/find-account-and-zone-ids/.

  1. Click on the domain you want to manage.
  2. In the left-hand sidebar, click on “Overview.”
  3. Scroll to the “API” section and click “Get your API key.”
  4. Click on the “View” button next to the Global API Key.
  5. Copy the key and keep it somewhere safe.

Get the DNS Record Identifiers

Once you have obtained the Zone ID, you can use it to get the identifiers for the DNS records associated with that domain. You can do this by making a GET request to the Cloudflare API, specifying the Zone ID, and providing your email address and API key. The response will contain information about all of the DNS records associated with the domain, including their identifiers.

Here is an example command that you can use to get the DNS record identifiers:

curl --request GET \
  --url https://api.cloudflare.com/client/v4/zones/<zone_id>/dns_records \
  --header 'Content-Type: application/json' \
  --header 'X-Auth-Email: <email_address>' \
  --header 'X-Auth-Key: <api_key>' 

Replace <zone_id>, <email_address>, and <api_key> with your actual values.

Update the DNS Record

Finally, you can use the DNS record identifier to update the DNS record. The following is an example bash script that you can use to update a DNS record:

#!/bin/bash

ip=`curl https://bytefreaks.net/what-is-my-ip | grep '<h1 style="text-align: center;"' | cut -d '>' -f 2 | cut -d '<' -f 1`;

ip=`echo $ip | cut -d, -f1`;

comment=`date +%Y-%m-%d\ %H:%M`;

curl --request PUT \
  --url https://api.cloudflare.com/client/v4/zones/<zone_id>/dns_records/<dns_record_id> \
  --header 'Content-Type: application/json' \
  --header 'X-Auth-Email: <email_address>' \
  --header 'X-Auth-Key: <api_key>' \
  --data '{
  "content": "'$ip'",
  "name": "www.bytefreaks.net",
  "proxied": true,
  "type": "A",
  "comment": "'"$comment"'",
  "tags": [],
  "ttl": 3600
}'

Replace <zone_id>, <dns_record_id>, <email_address>, and <api_key> with your actual values. You should also update the "name" field to match the name of the DNS record you want to update.

This script is used to update a DNS record using the Cloudflare API. It retrieves the current public IP address of the device running the script and then updates the specified DNS record on Cloudflare with the new IP address.

Here is a breakdown of each command in the script:

  • ip=curl https://bytefreaks.net/what-is-my-ip | grep ‘<h1 style=”text-align: center;”‘ | cut -d ‘>’ -f 2 | cut -d ‘<‘ -f 1“: This command uses the curl command to retrieve the public IP address of the device running the script from the website https://bytefreaks.net/what-is-my-ip. The output of this command is then piped through grep to find the line that contains the IP address. The cut command is then used to extract the IP address from the line.
  • ip=echo $ip | cut -d, -f1“: This command removes any commas from the IP address, which may be present if the IP address is in a format that includes additional information.
  • comment=date +%Y-%m-%d\ %H:%M“: This command generates a comment for the DNS record update. The comment includes the current date and time in the format YYYY-MM-DD HH:MM.
  • curl --request PUT \: This command sends an HTTP PUT request to update the specified DNS record.
  • --url https://api.cloudflare.com/client/v4/zones/<zone_id>/dns_records/<dns_record_id> \: This specifies the URL for the Cloudflare API endpoint for updating a DNS record. The <zone_id> and <dns_record_id> placeholders should be replaced with the actual zone ID and DNS record ID, respectively.
  • --header 'Content-Type: application/json' \: This specifies that the content type of the request is JSON.
  • --header 'X-Auth-Email: <email_address>' \: This specifies the Cloudflare account email address associated with the API key. The <email_address> placeholder should be replaced with the actual email address.
  • --header 'X-Auth-Key: <api_key>' \: This specifies the Cloudflare API key for the account. The <api_key> placeholder should be replaced with the actual API key.
  • --data '{ ... }': This specifies the JSON data to be sent in the request body. This includes the new IP address in the content field, the domain name in the name field, the record type in the type field, the comment in the comment field, and other optional parameters like the ttl. Note that the domain name at.put.cy is hardcoded in the script, and should be replaced with the actual domain name to be updated.

Create a PKCS#12 file that contains both the certificate and the private key

In today’s world, security is a significant concern for everyone. Securing sensitive information such as passwords, certificates, and private keys is important. OpenSSL is a widely used tool for encrypting, decrypting, and managing digital certificates and keys. In this blog, we will explain the following command:

openssl pkcs12 -export -out certificate.p12 -in certificate.pem -inkey key.pem -passin pass:bytefreaks -passout pass:bytefreaks;

This command creates a PKCS#12 file containing the certificate and the private key. PKCS#12 (Public-Key Cryptography Standards #12) is a file format that stores cryptographic objects such as private keys, certificates, and intermediate certificates.

Let’s break down this command and explain what each option does:

openssl pkcs12

This is the OpenSSL command for PKCS#12.

-export

This option tells OpenSSL to export the certificate and private key.

-out certificate.p12

This option specifies the output file name and format. In this case, the output file will be named certificate.p12.

-in certificate.pem

This option specifies the input file name and format. In this case, the input file is the certificate file named certificate.pem.

-inkey key.pem

This option specifies the private key file name and format. In this case, the private key file is named key.pem.

-passin pass:bytefreaks

This option specifies the password to decrypt the private key. In this case, the password is “bytefreaks”.

-passout pass:bytefreaks

This option specifies the password to encrypt the PKCS#12 file. In this case, the password is “bytefreaks”

;

This symbol indicates the end of the command.

When you run this command, OpenSSL will prompt you to enter the password for the private key. Once you enter the correct password, OpenSSL will create a PKCS#12 file named certificate.p12 that contains both the certificate and the private key encrypted with the password “bytefreaks”.

In conclusion, the openssl pkcs12 -export -out certificate.p12 -in certificate.pem -inkey key.pem -passin pass:bytefreaks -passout pass:bytefreaks; command is used to create a PKCS#12 file that contains both the certificate and the private key. This file is encrypted with the password “bytefreaks” to ensure security.

Using Mikrotik – RouterOS to create an address list with multiple IP ranges

This video presents instructions on compiling a list of multiple IP addresses and IP ranges for use in a network access controller (NAT) or a firewall (or wherever lists are allowed).

The solution to this problem was to use the same name for each entry on the address list. In this manner, the RouterOS “knows” that the two lists should be merged into a single one.