Yearly Archives: 2021
Gravity Forms: How to Restrict a DatePicker Date Range and Datepicker 1 becomes minDate for datepicker 2
Create an html block in your form and add the following code:
<script type="text/javascript">
gform.addFilter( 'gform_datepicker_options_pre_init', function( optionsObj, formId, fieldId ) {
    if ( formId == 10 && (fieldId == 30 || fieldId == 32) ) {
        var ranges = [
            { start: new Date('10/01/2021'), end: new Date('10/11/2021') }
        ];
        optionsObj.beforeShowDay = function(date) {
            for ( var i=0; i<ranges.length; i++ ) {
                if ( date >= ranges[i].start && date <= ranges[i].end ) return [true, ''];
            }
            return [false, ''];
        };
        optionsObj.minDate = ranges[0].start;
        optionsObj.maxDate = ranges[ranges.length -1].end;
    }
    if ( formId == 10 && fieldId == 30 ) {
        optionsObj.onClose = function (dateText, inst) {
            jQuery('#input_10_32').datepicker('option', 'minDate', dateText).datepicker('setDate', dateText);
        };
    }
    return optionsObj;
});
</script>
Be sure to change the dates, the form ID and field ID for the two fields.
Using scp to copy a folder on a custom port
while true;
do
date;
scp -rp -P 2222 $SOURCE_DIRECTORY $REMOTE_USER@$REMOTE_SERVER:$DESTINATION_DIRECTORY;
sleep 60;
done;
The above code was used to copy the contents of a local folder to a remote one every one minute. We did not want to lose the metadata of the files (including the modification date of the files) so we used the -p parameter to preserve that information.
The -P 2222 parameter instructs scp to use a different port rather the default.
The -r is used to instruct the copy to get all contents of the folder and its sub-folders.
The above code as a one-liner is:
while true; do date; scp -rp -P 2222 $SOURCE_DIRECTORY $REMOTE_USER@$REMOTE_SERVER:$DESTINATION_DIRECTORY; sleep 60; done;
Download Large Jupyter Workspace files
Recently, we were working on a Jupyter Workspace at anyscale-training.com/jupyter/lab. As there was no option to download all files of the workspace nor there was a way to create an archive from the GUI, we followed the procedure below (that we also use on Coursera.org and works like a charm):

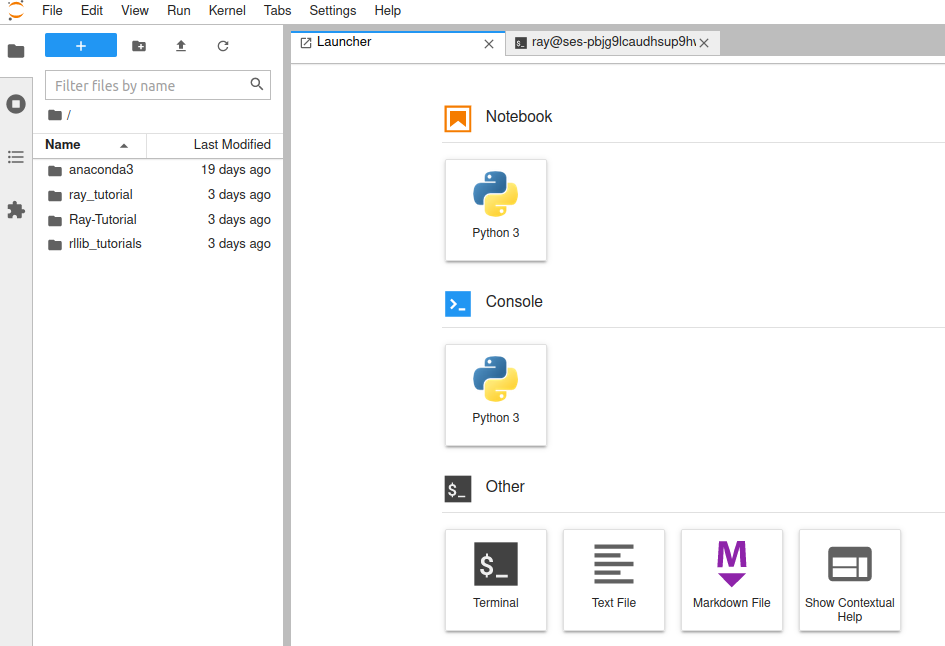
First, we clicked on the blue button with the + sign in it.
That opened the Launcher tab that is visible on the image above.
From there, we clicked on the Terminal button under the Other category.
In the terminal, we executed the following command to create a compressed archive of all the files we needed to download:
tar -czf Ray-RLLib-Tutorials.tar.gz ray_tutorial/ Ray-Tutorial/ rllib_tutorials/;
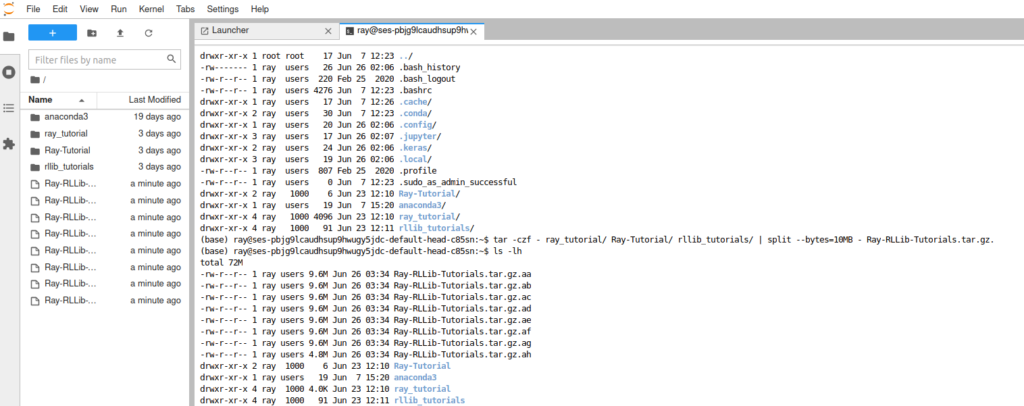
After the command completed its execution, we could see our archive on the left list of files. By right-clicking it we we are able to initiate its download. Unfortunately, after the first 20MB the download would always crash! To fix this issue, we split the archive to multiple archives of 10MB each, then downloaded them individually and finally merged them back together on our PC. The command to split the compressed archive to multiple smaller archives of fixed size was the following:
tar -czf - ray_tutorial/ Ray-Tutorial/ rllib_tutorials/ | split --bytes=10MB - Ray-RLLib-Tutorials.tar.gz.;

After downloading those files one by one by right-clicking on them and then selecting the Download option we recreated the original structure on our PC using the following command:
cat Ray-RLLib-Tutorials.tar.gz.* | tar xzvf -;
To clean up both the remote Server and our Local PC, we issued the following command:
rm Ray-RLLib-Tutorials.tar.gz.*;
This is a guide on how to download a very big
Jupyterworkspace by splitting it to multiple smaller files using the console.


