while true;
do
date;
scp -rp -P 2222 $SOURCE_DIRECTORY $REMOTE_USER@$REMOTE_SERVER:$DESTINATION_DIRECTORY;
sleep 60;
done;
The above code was used to copy the contents of a local folder to a remote one every one minute. We did not want to lose the metadata of the files (including the modification date of the files) so we used the -p parameter to preserve that information.
The -P 2222 parameter instructs scp to use a different port rather the default.
The -r is used to instruct the copy to get all contents of the folder and its sub-folders.
The above code as a one-liner is:
while true; do date; scp -rp -P 2222 $SOURCE_DIRECTORY $REMOTE_USER@$REMOTE_SERVER:$DESTINATION_DIRECTORY; sleep 60; done;
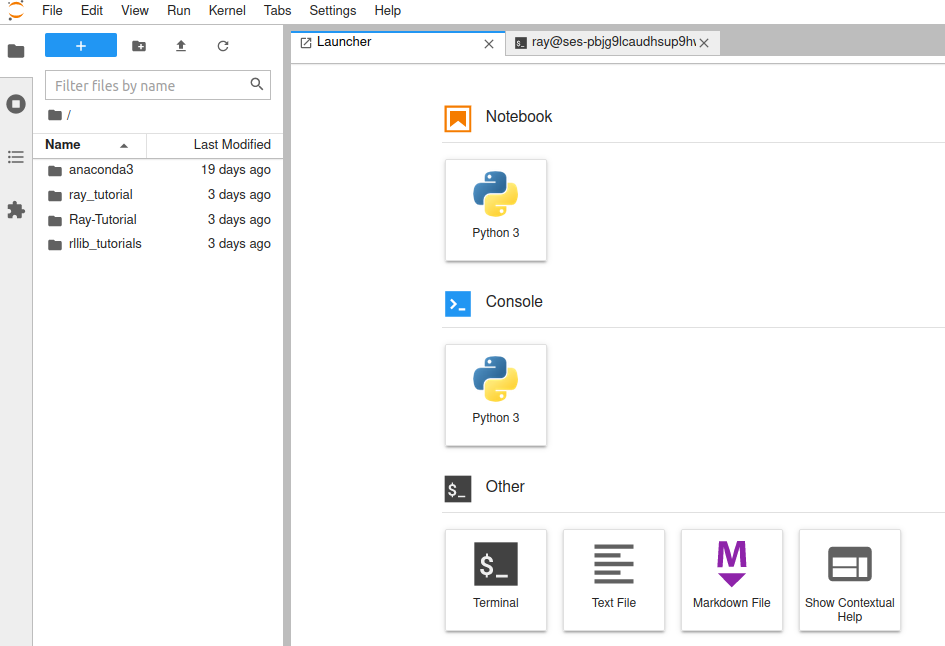
Recently, we were working on a Jupyter Workspace at anyscale-training.com/jupyter/lab. As there was no option to download all files of the workspace nor there was a way to create an archive from the GUI, we followed the procedure below (that we also use on Coursera.org and works like a charm):
First, we clicked on the blue button with the + sign in it. That opened the Launcher tab that is visible on the image above. From there, we clicked on the Terminal button under the Other category.
In the terminal, we executed the following command to create a compressed archive of all the files we needed to download:
tar -czf Ray-RLLib-Tutorials.tar.gz ray_tutorial/ Ray-Tutorial/ rllib_tutorials/;
After the command completed its execution, we could see our archive on the left list of files. By right-clicking it we we are able to initiate its download. Unfortunately, after the first 20MB the download would always crash! To fix this issue, we split the archive to multiple archives of 10MB each, then downloaded them individually and finally merged them back together on our PC. The command to split the compressed archive to multiple smaller archives of fixed size was the following:
After downloading those files one by one by right-clicking on them and then selecting the Download option we recreated the original structure on our PC using the following command:
cat Ray-RLLib-Tutorials.tar.gz.* | tar xzvf -;
To clean up both the remote Server and our Local PC, we issued the following command:
rm Ray-RLLib-Tutorials.tar.gz.*;
This is a guide on how to download a very big Jupyter workspace by splitting it to multiple smaller files using the console.
Just a bunch of snippets that we used to deploy a local Ray cluster. We couldn’t get the second node to connect to the cluster even though no error was given.
From https://www.anaconda.com/products/individual-b
 wget https://repo.anaconda.com/archive/Anaconda3-2021.05-Linux-x86_64.sh
 bash ./Anaconda3-2021.05-Linux-x86_64.sh
 source ~/anaconda3/bin/activate
 conda create --name ray.3.7 python=3.7.10;
 conda activate ray.3.7;
 conda install --name ray.3.7 pip;
 pip install ray==1.1.0
 pip install gym pandas torch ray ray[default] ray[rllib] ray[serve] ray[tune];

 ON WORKERS:
 From https://docs.docker.com/engine/install/ubuntu/
 sudo apt-get remove docker docker-engine docker.io containerd runc;
 sudo apt-get update;
 sudo apt-get install apt-transport-https ca-certificates curl gnupg lsb-release;
 curl -fsSL https://download.docker.com/linux/ubuntu/gpg | sudo gpg --dearmor -o /usr/share/keyrings/docker-archive-keyring.gpg
 echo "deb [arch=amd64 signed-by=/usr/share/keyrings/docker-archive-keyring.gpg] https://download.docker.com/linux/ubuntu $(lsb_release -cs) stable" | sudo tee /etc/apt/sources.list.d/docker.list > /dev/null
 sudo apt-get update
 sudo apt-get install docker-ce docker-ce-cli containerd.io
 sudo addgroup --system docker
 sudo adduser $USER docker
 newgrp docker
 sudo systemctl restart docker

 Uninstall Docker Engine
 Uninstall the Docker Engine, CLI, and Containerd packages:
 sudo apt-get purge docker-ce docker-ce-cli containerd.io
 Images, containers, volumes, or customized configuration files on your host are not automatically removed. To delete all images, containers, and volumes:
 sudo rm -rf /var/lib/docker
  sudo rm -rf /var/lib/containerd
 You must delete any edited configuration files manually.


 2021-06-09 03:56:34,453    WARNING services.py:1740 -- WARNING: The object store is using /tmp instead of /dev/shm because /dev/shm has only 7963275264 bytes available. This will harm performance! You may be able to free up space by deleting files in /dev/shm. If you are inside a Docker container, you can increase /dev/shm size by passing '--shm-size=10.24gb' to 'docker run' (or add it to the run_options list in a Ray cluster config). Make sure to set this to more than 30% of available RAM.

 ON MASTER:
 ray up office.yaml
 ray up -vvvvvv office.yaml
 ray exec office.yaml 'ray status'
The yaml file that we used was the following
# A unique identifier for the head node and workers of this cluster.
cluster_name: default

# This executes all commands on all nodes in the docker container,
# and opens all the necessary ports to support the Ray cluster.
# Empty string means disabled. Assumes Docker is installed.
docker:
    image: "rayproject/ray-ml:1.1.0" # You can change this to latest-cpu if you don't need GPU support and want a faster startup
    # image: rayproject/ray:latest-gpu   # use this one if you don't need ML dependencies, it's faster to pull
    container_name: "ray_container"
    # If true, pulls latest version of image. Otherwise, `docker run` will only pull the image
    # if no cached version is present.
    pull_before_run: True
    run_options: ["--shm-size=10.24gb"]  # Extra options to pass into "docker run"

provider:
    type: local
    head_ip: 192.168.1.14
    ## head_ip: YOUR_HEAD_NODE_HOSTNAME
    # You may need to supply a public ip for the head node if you need
    # to run `ray up` from outside of the Ray cluster's network
    # (e.g. the cluster is in an AWS VPC and you're starting ray from your laptop)
    # This is useful when debugging the local node provider with cloud VMs.
    # external_head_ip: YOUR_HEAD_PUBLIC_IP
    worker_ips: [192.168.1.70]
    ## worker_ips: [WORKER_NODE_1_HOSTNAME, WORKER_NODE_2_HOSTNAME, ... ]
    # Optional when running automatic cluster management on prem. If you use a coordinator server,
    # then you can launch multiple autoscaling clusters on the same set of machines, and the coordinator
    # will assign individual nodes to clusters as needed.
    #    coordinator_address: "<host>:<port>"
    # cache_stopped_nodes: False

# How Ray will authenticate with newly launched nodes.
auth:
    ssh_user: tux
    #ssh_user: YOUR_USERNAME
    # Optional if an ssh private key is necessary to ssh to the cluster.
    ssh_private_key: ~/.ssh/id_rsa

# The minimum number of workers nodes to launch in addition to the head
# node. This number should be >= 0.
# Typically, min_workers == max_workers == len(worker_ips).
min_workers: 20

# The maximum number of workers nodes to launch in addition to the head node.
# This takes precedence over min_workers.
# Typically, min_workers == max_workers == len(worker_ips).
max_workers: 20
# The default behavior for manually managed clusters is
# min_workers == max_workers == len(worker_ips),
# meaning that Ray is started on all available nodes of the cluster.
# For automatically managed clusters, max_workers is required and min_workers defaults to 0.

initial_workers: 20

# The autoscaler will scale up the cluster faster with higher upscaling speed.
# E.g., if the task requires adding more nodes then autoscaler will gradually
# scale up the cluster in chunks of upscaling_speed*currently_running_nodes.
# This number should be > 0.
upscaling_speed: 1.0

idle_timeout_minutes: 5

# Files or directories to copy to the head and worker nodes. The format is a
# dictionary from REMOTE_PATH: LOCAL_PATH, e.g.
file_mounts: {
#    "/path1/on/remote/machine": "/path1/on/local/machine",
#    "/path2/on/remote/machine": "/path2/on/local/machine",
}

# Files or directories to copy from the head node to the worker nodes. The format is a
# list of paths. The same path on the head node will be copied to the worker node.
# This behavior is a subset of the file_mounts behavior. In the vast majority of cases
# you should just use file_mounts. Only use this if you know what you're doing!
cluster_synced_files: []

# Whether changes to directories in file_mounts or cluster_synced_files in the head node
# should sync to the worker node continuously
file_mounts_sync_continuously: False

# Patterns for files to exclude when running rsync up or rsync down
rsync_exclude:
    - "**/.git"
    - "**/.git/**"

# Pattern files to use for filtering out files when running rsync up or rsync down. The file is searched for
# in the source directory and recursively through all subdirectories. For example, if .gitignore is provided
# as a value, the behavior will match git's behavior for finding and using .gitignore files.
rsync_filter:
    - ".gitignore"

# List of commands that will be run before `setup_commands`. If docker is
# enabled, these commands will run outside the container and before docker
# is setup.
initialization_commands: []

# List of shell commands to run to set up each nodes.
setup_commands: []
    # Note: if you're developing Ray, you probably want to create a Docker image that
    # has your Ray repo pre-cloned. Then, you can replace the pip installs
    # below with a git checkout <your_sha> (and possibly a recompile).
    # To run the nightly version of ray (as opposed to the latest), either use a rayproject docker image
    # that has the "nightly" (e.g. "rayproject/ray-ml:nightly-gpu") or uncomment the following line:
    # - pip install -U "ray[default] @ https://s3-us-west-2.amazonaws.com/ray-wheels/latest/ray-2.0.0.dev0-cp37-cp37m-manylinux2014_x86_64.whl"

# Custom commands that will be run on the head node after common setup.
head_setup_commands: []

# Custom commands that will be run on worker nodes after common setup.
worker_setup_commands: []

# Command to start ray on the head node. You don't need to change this.
head_start_ray_commands:
    - ray stop
    - ulimit -c unlimited && ray start --head --port=6379 --autoscaling-config=~/ray_bootstrap_config.yaml

# Command to start ray on worker nodes. You don't need to change this.
worker_start_ray_commands:
    - ray stop
    - ray start --address=$RAY_HEAD_IP:6379