Recently, we were trying to setup the email configuration of a Hikvision DVR which even though it was updated to the latest firmware we would get the message Testing Failed when trying to send an email over GMail.
In the GUI of the DVR there was an option to Enable SSL but no option to enable TLS/STARTTLS. So after consulting the GMail official documentation on how to configure an email client for GMail, we set the SMTP Port to 465 and enabled the SSL option. Then we created an application password for the DVR and tried to test the settings. To our disappointment we got the Testing Failed message.
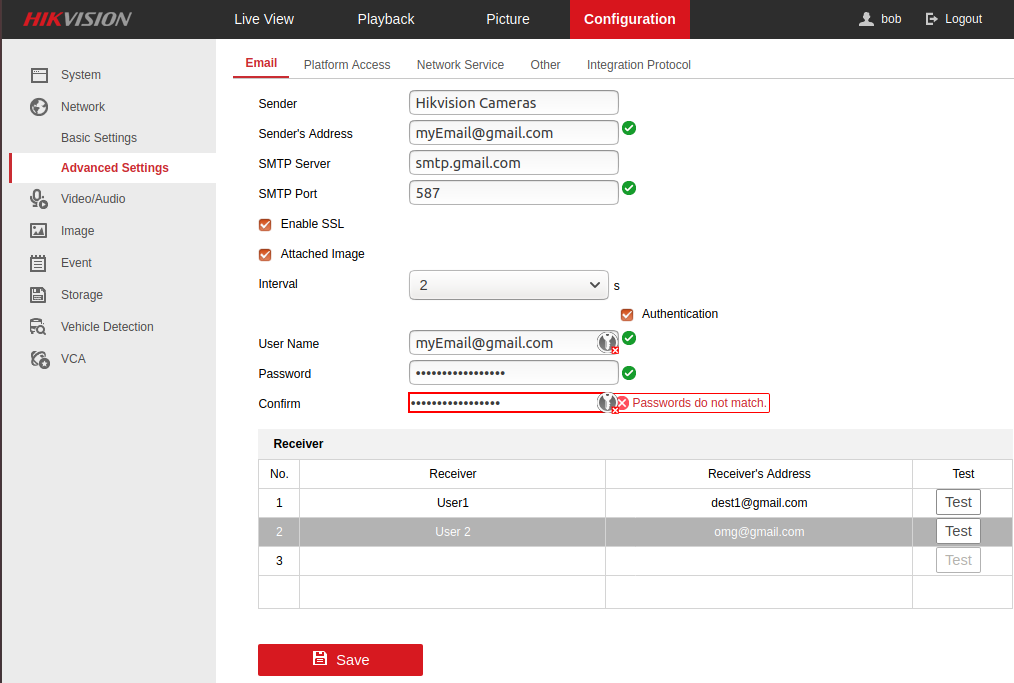
After reading the latest user manual of the DVR, it mentioned an option to Enable SSL/TLS but not Enable SSL which got us curious. It raised the following question to us: “What if they enabled the TLS functionality but they forgot to update the GUI to match it?”. So we changed the port to 587 and hit Test again.
Guess what ?
It worked!!
It appears that Hikvision enabled the TLS/STARTTLS functionality but forgot to make their GUI reflect the change!
Using the settings depicted in this photo, we were able to send test messages from our Hikvision DVR over GMail using TLS/STARTTLS on port 587 of smpt.gmail.com!
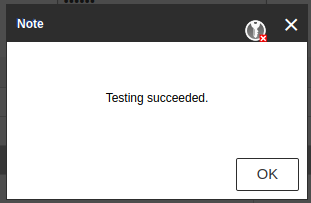
The confirmation of the successful email sending operation. “TESTING SUCCEEDED.”
A very important note
In the password field, we did not use the password of the Gmail account! We used an Application Password! It is crucial that you activate 2-factor authentication and then create an application password, or else you will not succeed in logging in on your Gmail through your HikVision DVR/NVR.
This is a Mythic boss encounter. You should not take unnecessary damage so the healers — our doctors and nurses — can preserve mana for unavoidable damage spikes. If you mess up a mechanic the entire raid will wipe. Stay home when possible. Be safe.
Recently we decided to give it a go with SymfonyPHP framework on an Ubuntu 18.04 LTS. Below you will find the commands we executed to install the skeleton project of symfony with some comments.
Composer
To install symfony, you need composer which is a dependency manager for PHP. The version of composer that was available in apt when this post was written was “very” old. Specifically, it had version Composer 1.6.3 2018-01-31 16:28:17. For this reason we decided to go with the version that is available in the official website of composer. The steps we followed were the ones below:
# Update our system
sudo apt update -y;
sudo apt upgrade -y;
# Install dependencies
sudo apt install curl php-cli php-mbstring git unzip php-xml -y;
# Get composer installer from the official site
curl -sS https://getcomposer.org/installer -o composer-setup.php;
# Verify the the download was not corrupt by checking the sha384 sum of the installer file
HASH=`curl https://composer.github.io/installer.sha384sum | cut -d' ' -f 1`;
# If this step fails, go back to the curl command and try again, it would mean that there was a problem when downloading the installer from the net
php -r "if (hash_file('SHA384', 'composer-setup.php') === '$HASH') { echo 'Installer verified'; } else { echo 'Installer corrupt'; unlink('composer-setup.php'); } echo PHP_EOL;"
# Upon successfully validating the install, we can proceed to the actual installation.
sudo php composer-setup.php --install-dir=/usr/local/bin --filename=composer;
source ~/.bashrc;
Symfony Skeleton Project
After the above steps are completed, we were able to proceed with the final step, which would be to create the symfony skeleton project via the composer with the following command in the folder named sandbox:
To verify the installation of the skeleton project we started a web server with PHP in the installation folder of the project and thus verify it through the browser:
cd sandbox;
# We did not use the port 80 as it would require root access to start
php -S 127.0.0.1:8000 -t public;
From a browser visiting http://127.0.0.1:8000/ we got to see: