Some notes on how to record audio from a terminal in Ubuntu 20.04LTS

Recently, we were trying to record the audio that was played on the system speakers using an Ubuntu 20.04LTS desktop. In the installation, there was no dedicated audio recorder installed and we did not want to install any. To record, we used the following command to get the list of all audio sources available to the system:

pactl list short sources;

The pactl command produced results like so:

3	alsa_output.pci-0000_00_1f.3.analog-stereo.monitor	module-alsa-card.c	s16le 2ch 44100Hz	SUSPENDED
4	alsa_input.pci-0000_00_1f.3.analog-stereo	module-alsa-card.c	s16le 2ch 44100Hz	SUSPENDED
10	alsa_input.usb-Dell_DELL_PROFESSIONAL_SOUND_BAR_AE515-00.iec958-stereo	module-alsa-card.c	s16le 2ch 44100Hz	SUSPENDED
12	alsa_output.usb-Dell_DELL_PROFESSIONAL_SOUND_BAR_AE515-00.analog-stereo.monitor	module-alsa-card.c	s16le 2ch 44100Hz	IDLE

We knew that the system was using the Dell soundbar in analog mode to play the music (as we could see in the Settings under the Sound category, which is depicted below), so we copied the following name from the line that starts with the number 12:

alsa_output.usb-Dell_DELL_PROFESSIONAL_SOUND_BAR_AE515-00.analog-stereo.monitor

Then we used that monitor name as an input device for FFmpeg like so:

ffmpeg -f pulse -i alsa_output.usb-Dell_DELL_PROFESSIONAL_SOUND_BAR_AE515-00.analog-stereo.monitor test.mp3;

When we were done recording, we pressed CTRL+C to stop the recording.


Hikvision web UI cannot change admin password

Note / Disclaimer / Caution / Warning:
We are not sure if the same commands will work on your device!
Following these instructions has some risk as not everything is well documented and could damage your device and make it unable to be repaired or used!
We are posting about our experiences as it might help someone else but we cannot guarantee positive results to other people.
We got lucky, we cannot be sure if this works for everyone...

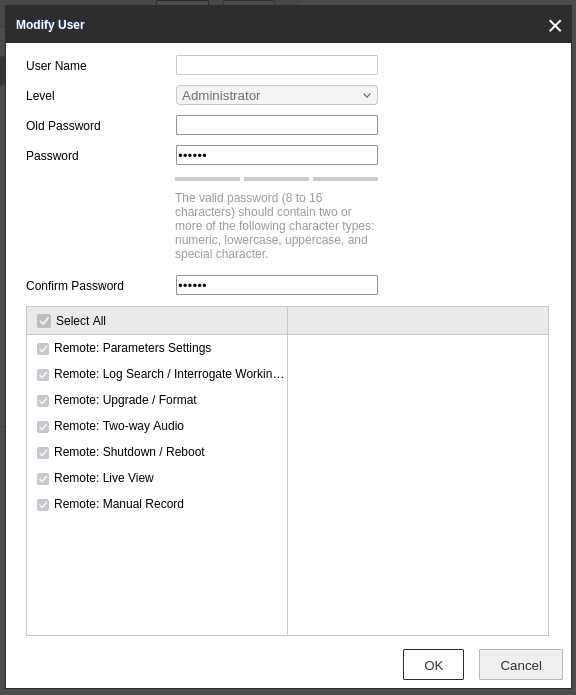
Recently, we were performing maintenance on a Hikvision DS-KB8112-IM Vandal-Resistant Door Station. When we tried to change the password for the default administrator (called admin) we noticed that we could not edit the user. There was a bug in the list of users which was not showing the username of the admin.

That bug caused the Modify functionality to fail as well. It would leave the User Name field as blank which would trigger an error after pressing the OK button. The system complained that the User Name field is empty while it is required making the change of password to fail.

We could not figure out a way to fix it through the menus of Hikvision nor could we flash or update the device firmware, so after some search, we found the documentation of some API (which we are not sure if is actively maintained) that allowed us to get the settings of the device and update them.

Specifically, using the following command, we got the list of users on the Hikvision device:

curl -k 'https://admin:[email protected]/ISAPI/Security/users';

The GET of ISAPI/Security/users gave us the list of all users like so:

<?xml version="1.0" encoding="UTF-8" ?>
<UserList version="2.0" xmlns="http://www.isapi.org/ver20/XMLSchema">
<User version="2.0" xmlns="http://www.isapi.org/ver20/XMLSchema">
<id>1</id>
<userName>admin</userName>
<bondIpAddressList>
<bondIpAddress>
<id>1</id>
<ipAddress>0.0.0.0</ipAddress>
</bondIpAddress>
</bondIpAddressList>
<bondMacAddressList>
<bondMacAddress>
<id>1</id>
<macAddress>00:00:00:00:00:00</macAddress>
</bondMacAddress>
</bondMacAddressList>
<userLevel>Administrator</userLevel>
<attribute>
<inherent>true</inherent>
</attribute>
</User>
</UserList>

Then, for fun, we issued the command that returns the information for the admin user (that has the ID = 1):

curl -k 'https://admin:[email protected]/ISAPI/Security/users/1';
<?xml version="1.0" encoding="UTF-8" ?>
<User version="2.0" xmlns="http://www.isapi.org/ver20/XMLSchema">
<id>1</id>
<userName>admin</userName>
<userLevel>Administrator</userLevel>
<attribute>
<inherent>true</inherent>
</attribute>
</User>

Then we went for the risky part, to issue a command that would edit the settings of the device with great risk!

curl -k 'https://admin:[email protected]/ISAPI/Security/users/1' -X PUT --data-raw $'<User version="2.0" xmlns="http://www.isapi.org/ver20/XMLSchema">\n<id>1</id><userName>admin</userName><password>4321</password></User>';

The PUT command for ISAPI/Security/users/1 loaded the following XML to the device:

<User version="2.0" xmlns="http://www.isapi.org/ver20/XMLSchema">
<id>1</id>
<userName>admin</userName>
<password>4321</password>
</User>

To our pleasant surprise, it worked! After executing the above command, we were able to log in to the device using the new password. To an even more pleasant surprise, the list of users bug disappeared and we were able to use the web GUI to make changes to the administrator user!


Quick notes on optimizing a mysql/mariadb database in a docker container

First, to avoid opening the network of the container to another network, you need to open a shell to the docker container itself. To do so, use the following command:

docker exec -it website_db /bin/bash;

After executing the exec command, you will get a shell to the docker container. Use the following command to optimize all databases and their tables:

mysqlcheck -p -o --all-databases;

The -p parameter instructs the command to ask for a password (which probably and hopefully have set).

To exit the console and close the connection just type exit; after you are done with the above command.

Note: Where we used the word website_db you need to use the name of your container. If you are not sure of the name of the container, you can list all of the containers with their names using the following command:

docker container ls;

Cannot remove the ‘sticky’ option from a post

Recently, we were trying to remove the sticky flag from a post on a self-hosted installation. We were removing the sticky option both from the posts menu and the post editor and after a page refresh, it would reappear as active.

After some troubleshooting, it appeared that the problem was with the WPML plugin. After we disabled that one, we could change the option for the sticky status. Unfortunately, when we activated the plugin again, the option returned to its previous state.

The “fix” that worked was the following:

  1. We visited the WPML plugin settings page: https://example.com/wp-admin/admin.php?page=sitepress-multilingual-cms%2Fmenu%2Ftranslation-options.php
  2. Then in the category Posts and pages synchronization, we removed the tick from the option Synchronize sticky flag and the clicked the Save button.
  1. Following that, we edited our post again and removed the sticky option.
  2. Afterwards, we checked the homepage that the post had been removed and then we went back to the settings page of WPML https://example.com/wp-admin/admin.php?page=sitepress-multilingual-cms%2Fmenu%2Ftranslation-options.php
  3. From there, we enabled again the Synchronize sticky flag option, pressed the Save button to revert the change to the settings hoping the problem will be fixed eventually.

Technical Info

  • WPML Multilingual CMS version 4.2.6
  • WordPress version 5.8.1