GNU/Linux


papouch: TMU – USB thermometer

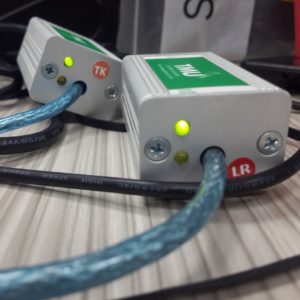
Today, we found in stock some USB thermometers by papouch, which we decided to put to use.
We wanted to create a small bash script that would take the measurements from the thermometers and log them along with the system date/time.
After doing some minor research we got to the product website, where it had a lot of useful information about the device, device drivers and source code which can utilize the device on a Windows machine.

Unfortunately for us, there was no source code for a simple bash script on Linux.

Before we continue, lets fill our heads with some information on the device:

TMU is a simple thermometer with a USB interface. The thermometer uses the USB interface for communication and also as a power source. It measures temperatures from –55 °C to +125 °C (with 0.1 °C resolution). The communication utilizes a simple ASCII protocol. Temperature values are transmitted in degrees Celsius; no numerical conversion is necessary.

–From https://www.papouch.com/en/shop/product/tmu-usb-thermometer/

The operating system on our machine was GNU/Linux CentOS 7, after plugging in the devices, we issued the command lsusb from which we saw that the OS had recognized the devices.
From the manual we read that the interface for communication of the device with the computer is implemented via a serial port.
The configuration parameters of the serial port that the device creates were the following:

COMMUNICATION PROTOCOL
TMU cannot receive instructions, it can only send out the temperature values in regular time intervals (approx. 10 seconds).
The temperature is send in a format that is compatible with the Spinel protocol.
The thermometer’s serial line parameters are:

Speed : 9,600 Baud
Number of data bits : 8
Parity : none
Number of stop-bits : 1

— From https://www.papouch.com/en/shop/product/tmu-usb-thermometer/tmu_en.pdf/_downloadFile.php

Since the newly attached devices were USB-to-Serial devices, we knew that they would create ttyUSBx devices in the /dev folder.
Indeed, after checking into the /dev folder, there were two newly created devices ttyUSB0 and ttyUSB1, one for each device.

We tried to connect to the devices using various methods and attempted to redirect the output so that we could parse it.
To our surprise, the data would ‘disappear’ from the pipe…
We could see the data on the screen when we had no pipes following and we could even replace the \r character with \n so that each new information block would appear in a new line. But, whenever we tried to do additional formatting, e.g. remove all characters that are not part of the temperature description, the whole data would vanish..

Our solution

For us process substitution did the trick!
Process substitution feeds the output of a process into the stdin of another process.
We redirected the stdout that was being generated while reading the data from the serial port to another process from where we were able to normally process them.

The following example, reads the data from the serial port, from each line it discards all characters except for characters at the positions 6 until 11 where the temperature information is presented according to the documentation.

1
sudo sh -c "cat < /dev/ttyUSB0" 1> >(while read line; do echo $line | cut -c6-11; done);

The above command would turn data of this format:

*B1E1+026.0
*B1E1+026.1

To this format:

+026.0
+026.1

And so we could start the development of our script.

Our script

The following script will prepend the current date and time on each line (right before the temperature reading).

1
sudo sh -c "cat < /dev/ttyUSB0" 1> >(while read line; do echo $line | cut -c6-11 | xargs -L 1 echo `date`; done);

Another solution, using miniterm.py

It has come to our attention that some times the thermometers do no work as expected using the cat command.
So, we propose an alternative using miniterm.py.
miniterm.py is a very simple serial terminal and is part of pySerial.

1
miniterm.py --echo --eol CR --quiet /dev/ttyUSB0 1> >(while read line; do echo $line | cut -c6-11 | xargs -L 1 echo `date`; done);

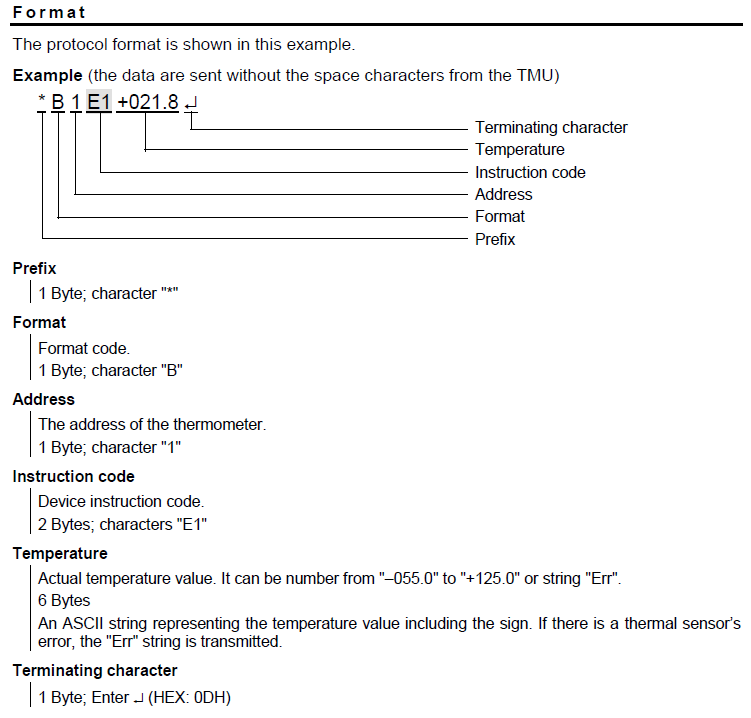
Some details on the format from the manual:

The protocol format is shown in this example.
Example (the data are sent without the space characters from the TMU)

*B1E1+026.1
  • 1 Byte; Prefix: the character *
  • 1 Byte; Format code: the character B
  • 1 Byte; The address of the thermometer: the character 1
  • 2 Bytes; Device instruction code: the characters E1
  • 6 Bytes; Actual temperature value. It can be number from –055.0 to +125.0 or string Err.
    An ASCII string representing the temperature value including the sign. If there is a thermal sensor’s error, the Err string is transmitted.
  • 1 Byte; Terminating character: Carriage Return (Decimal: 13, Hex: 0Dh, Binary: 00001101, Character \r)


Find files that were created, modified or accessed in the last N minutes

Find all files in $my_folder that their status changed in the last 60 minutes

1
find $my_folder -cmin -60

Find all files in $my_folder that their data were modified in the last 60 minutes

1
find $my_folder -mmin -60

Find all files in $my_folder that they were accessed in the last 60 minutes

1
find $my_folder -amin -60

Please remember to use negative values for the minutes. e.g. use -60 and not 60.

More examples

Find all files in $my_folder that their status changed in the last 60 minutes AND they were accessed in the last 10 minutes

1
find $my_folder -cmin -60 -amin -10

Find all files in $my_folder that their status changed in the last 60 minutes OR they were accessed in the last 10 minutes

1
find $my_folder \( -cmin -60 -o -amin -10 \)

Notes on find command

  • -cmin n Matches files which their status was last changed n minutes ago.
  • -mmin n Matches files which which data was last modified n minutes ago.
  • -amin n Matches files which they were last accessed n minutes ago.
  • -o is the logical Or operator. The second expression  is not evaluated if the first expression is true.

How to Start/Stop or Enable/Disable firewalld on CentOS 7 2

firewalld (Dynamic Firewall Manager) tool provides a dynamically managed firewall. The tool enables network/firewall zones to define the trust level of network connections and/or interfaces. It has support both for IPv4 and IPv6 firewall settings. Also, it supports Ethernet bridges and allow you to separate between runtime and permanent configuration options. Finally, it supports an interface for services or applications to add firewall rules directly.

Disable firewalld

To disable firewalld, execute the following command as root or using sudo:

systemctl disable firewalld

Enable firewalld

To enable firewalld, execute the following command as root or using sudo:

systemctl enable firewalld

Stop firewalld

To stop (or deactivate) firewalld,execute the following command as root or using sudo:

systemctl stop firewalld

Start firewalld

To start (or activate) firewalld, execute the following command as root or using sudo:

systemctl start firewalld

Status of firewalld

To check the status of firewalld, execute the following command as root or using sudo:

systemctl status firewalld

CONCEPTS

systemd provides a dependency system between various entities called “units” of 12 different types. Units encapsulate various objects that are relevant for system boot-up and maintenance. The majority of units are configured in unit configuration files, whose syntax and basic set of options is described in systemd.unit(5), however some are created automatically from other configuration, dynamically from system state or programmatically at runtime. Units may be “active” (meaning started, bound, plugged in, …, depending on the unit type, see below), or “inactive” (meaning stopped, unbound, unplugged, …), as well as in the process of being activated or deactivated, i.e. between the two states (these states are called “activating”, “deactivating”). A special “failed” state is available as well, which is very similar to “inactive” and is entered when the service failed in some way (process returned error code on exit, or crashed, or an operation timed out). If this state is entered, the cause will be logged, for later reference. Note that the various unit types may have a number of additional substates, which are mapped to the five generalized unit states described here.
— From man systemd

The above, in a nutshell:

  • enabled is a service that is configured to start when the system boots
  • disabled is a service that is configured to not start when the system boots
  • active is a service that is currently running
  • inactive is a service that is currently stopped and may be disabled, but it can be started and become active

How to search for specific filenames in .tar archives

The following commands will search in the .tar archives found in the specified folder and print on screen all files that their paths or filenames match our search token. We provide multiple solutions, each one for a different type of .tar archive depending on the compression used.

For .tar archives

1
find /media/repository/packages/ -type f -iname "*.tar" -exec tar -t -f '{}' \; | grep "configurations/arm-cortexa9";

For .tar.bz2 archives

1
find /media/repository/packages/ -type f -iname "*.tar.bz2" -exec tar -t -j -f '{}' \; | grep "configurations/arm-cortexa9";

For .tar.xz archives

1
find /media/repository/packages/ -type f -iname "*.tar.xz" -exec tar -t -J -f '{}' \; | grep "configurations/arm-cortexa9";

For .tar.gz and .tgz archives

Please note that this commands uses the -o (which is the logical or) parameter on find to search for multiple filename extensions.

1
find /media/repository/packages/ -type f \( -iname "*.tar.gz" -o -iname "*.tgz" \) -exec tar -t -z -f '{}' \; | grep "configurations/arm-cortexa9";

find Parameters Legend

  • -type f filters out any result which is not a regular file
  • -exec command '{}' \; runs the specified command on the results of find. The string '{}' is replaced by the current file name being processed.
  • -o is the logical Or operator. The second expression  is not evaluated if the first expression is true.

tar Parameters Legend

  • -z or --gzip instructs tar to filter the archive through gzip
  • -j or --bzip2 filters the archive through bzip2
  • -J or --xz filters the archive through xz
  • -t or --list lists the contents of an archive
  • -f or --file=INPUT uses the archive file or device named INPUT