First of all, we installed and activated anaconda on an Ubuntu 20.04LTS desktop. To do so, we installed the following dependencies from the repositories:
Following the previous step, we used the commands below to create a virtual environment for our code. We needed python version 3.7 (even though anaconda highlights version 3.9 here https://www.anaconda.com/products/individual#linux) and OpenCV for python.
source ~/anaconda3/bin/activate;
# We need python 3.7 at max to support TensorFlow version 1
conda create --yes --name Style python=3.7;
conda activate Style;
# Version 1 of TensorFlow is needed for the project that we will clone, version 1.15 is the latest and greatest version of TensorFlow 1.
pip install tensorflow==1.15 tensorflow-gpu==1.15 scipy numpy opencv-python;
Cloning the project and all necessary files
git clone https://github.com/cysmith/neural-style-tf.git;
cd neural-style-tf/;
wget http://www.vlfeat.org/matconvnet/models/imagenet-vgg-verydeep-19.mat;
#After everything is complete, it is time to create our first 'artistic' image.
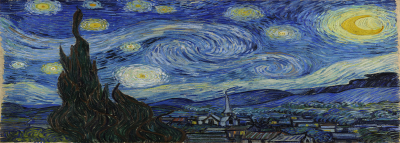
python neural_style.py --content_img "/home/bob/Pictures/Aphrodite Hills Golf Course - Paphos, Cyprus.jpg" --style_imgs "/home/bob/Pictures/Van_Gogh_-_Starry_Night_-_Google_Art_Project.jpg" --max_size 400 --max_iterations 500 --device /cpu:0 --verbose;
Results
Result
Original Content
Adapted Style Input
Problems that you might get
If you get the following error:
ImportError: libGL.so.1: cannot open shared object file: No such file or directory
You will need to install some additional dependencies for OpenCV as your Ubuntu installation might have been minimal. To fix this issue, install the following package from the repositories:
Recently, we decided to test a few free text to speech engines (TtS) on GNU/Linux. We were curious on what the current capabilities that are available as we wanted to create a few videos. To play a bit, we tested espeak, festival and pico. For this reason, we created a text file (called text.txt) and added the following content to it:
I triple E has a lot of scholarships, awards, and opportunities, but it doesn't have a centralized site where members can quickly identify the right ones.
Many problems arise as a result of the lack of this platform.
One crucial issue is that many people are unaware of specific opportunities until it is too late. Many projects are squandered each year because there is insufficient knowledge about these opportunities, resulting in low participation.
Another critical difficulty is having to start over with each application. Many people find it frustrating, and it prevents them from doing so.
The lack of real-time support to answer issues while an applicant is applying is critical, leading to discouragement and abandonment of the application process.
Providing references is a topic that many individuals are uncomfortable with. They are embarrassed to seek references that need to learn new systems and maybe answer the same questions posed in other ways.

Our solution is utilizing the Collabratec platform and storing all of these opportunities there:
Collabratec already has numerous key capabilities in place, lowering development costs.
Each application may have its own community or working group where an applicant can seek special clarifications or support. Collabratec will save money on development by repurposing existing technology. It will also give such features a new purpose.
Through those working groups, experienced members can share their knowledge and potentially coach applicants during their application process. Many members would be willing to help others attain their objectives, especially after they've gone through the process and understand the frustrations others are experiencing. We could utilize badges to reward individuals who aid others and those who apply for these possibilities, which is a frequent practice in Collabratec to make certain members stand out. This approach will assist members in getting to know one another and expanding their network outside their geographic zones, resulting in a genuinely global I triple E experience.
People who create opportunities can utilize the I triple E profile of a user to pre-populate elements of their application. As a result, the applicants' effort will be reduced because they will only fill in the questions related to that particular opportunity.
Without any additional work, the system may reuse earlier references. Assume that a reference has to be updated or validated to ensure that it is still valid. In that situation, the system may send an automatic notification to that person, asking them to approve, alter, or delete their earlier contribution.
Because users can readily share each application form and the corresponding working group information, Collabratec's capabilities as a social network will significantly enhance each opportunity's reach and all related documents, public comments, and discussions.
espeak
We started off with espeak and we used the following commands to test it:
# Command to install espeak;
sudo apt install espeak;
# Command that reads the text.txt file creates an audio file from its content.
espeak -f text.txt -w espeak.wav;
The result from espeak is below:
espeak definitely does not sound human-like. It is a fun tool if you need to create an audio file that sounds robotic! In our case, it was not a solution as we wanted to use a long text, listening to a robotic voice for a lot of time can be tiring.
festival
After that, we tested the text2wave tool of festival as follows:
The results of pico2wave were pretty good! Not perfect but still good! The voice is nearly human-like and fairly smooth. Below is the result of our test:
From the three utilities, pico was the most human-like and it fit our needs more. With this tool, we will be able to create certain videos with narration without being too annoying.
Other information
To create the videos, we used ffmpeg. As in the following commands, we combined the audio wave files with static images that were looped forever.
#!/bin/bash

charset=({a..z} {A..Z} {0..9});

permute(){
  (($1 == 0)) && { return; }
  for char in "${charset[@]}"; do
    if echo "$2$char" | sudo -S true; then
      echo "Correct password";
      echo "$2$char" >> "$USER".password.txt;
    fi;
    permute "$((${1} - 1 ))" "$2$char";
  done;
}

permute "$1";
The above code will generate all possible permutations of the alphanumeric characters ({a..z} {A..Z} {0..9}) and then using sudo it will test if the password is the password of the current user. When (and if ever) it finds the password, it will store it in a file in the same folder.
This script is useless because whenever sudo fails to authenticate, it creates some artificial delay. That delay makes testing to be less than one password per second. For this reason, cracking any good password with this method is pretty much pointless.
We posted this code
for the fun it,
to show the code that creates all permutations of a group of characters,
to demostrate the use of the parameter -S in sudo that allows us to pass the password via a pipe ,
to show a recursive function bash.
To execute this code, save it to a file and call it with one line parameter, which must be the length of the permutations you want to create.
Source code for the implementation that created this video will be uploaded soon.
A first attempt at using a pre-trained implementation of Mask R-CNN on Python 3, Keras, and TensorFlow. The model generates bounding boxes and segmentation masks for each instance of an object in each frame. It’s based on Feature Pyramid Network (FPN) and a ResNet101 backbone.
Setup
Conda / Anaconda
First of all, we installed and activated anaconda on an Ubuntu 20.04LTS desktop. To do so, we installed the following dependencies from the repositories:
Following the previous step, we used the commands below to create a virtual environment for our code. We needed python version 3.9 (as highlighted here https://www.anaconda.com/products/individual#linux) and OpenCV for python.
When we tried to execute our code in the virtual environment:
python3 main.py --video="/home/bob/Videos/Live @ Santa Claus Village 2021-11-13 12_12.mp4";
We got the following error:
Traceback (most recent call last):
  File "/home/bob/MaskRCNN/main.py", line 6, in <module>
    from cv2 import cv2
  File "/home/bob/anaconda3/envs/MaskRNN/lib/python3.9/site-packages/cv2/__init__.py", line 180, in <module>
    bootstrap()
  File "/home/bob/anaconda3/envs/MaskRNN/lib/python3.9/site-packages/cv2/__init__.py", line 152, in bootstrap
    native_module = importlib.import_module("cv2")
  File "/home/bob/anaconda3/envs/MaskRNN/lib/python3.9/importlib/__init__.py", line 127, in import_module
    return _bootstrap._gcd_import(name[level:], package, level)
ImportError: libGL.so.1: cannot open shared object file: No such file or directory
We realized that we were missing some additional dependencies for OpenCV as our Ubuntu installation was minimal. To fix this issue, we installed the following package from the repositories: