Ετήσια αρχεία: 2016


cecho – a function to print using different colors in bash

The following script can be used to print colored text in bash.
You can use it in any script without copy pasting everything in it by executing the following command source cecho.sh.
Doing so, it will load to your script the functions that are defined in cecho.sh, making them available for you to use (something like including code in C, with some caveats).

[download id=”2113″]

#!/bin/bash

# The following function prints a text using custom color
# -c or --color define the color for the print. See the array colors for the available options.
# -n or --noline directs the system not to print a new line after the content.
# Last argument is the message to be printed.
cecho () {

    declare -A colors;
    colors=(\
        ['black']='\E[0;47m'\
        ['red']='\E[0;31m'\
        ['green']='\E[0;32m'\
        ['yellow']='\E[0;33m'\
        ['blue']='\E[0;34m'\
        ['magenta']='\E[0;35m'\
        ['cyan']='\E[0;36m'\
        ['white']='\E[0;37m'\
    );

    local defaultMSG="No message passed.";
    local defaultColor="black";
    local defaultNewLine=true;

    while [[ $# -gt 1 ]];
    do
    key="$1";

    case $key in
        -c|--color)
            color="$2";
            shift;
        ;;
        -n|--noline)
            newLine=false;
        ;;
        *)
            # unknown option
        ;;
    esac
    shift;
    done

    message=${1:-$defaultMSG};   # Defaults to default message.
    color=${color:-$defaultColor};   # Defaults to default color, if not specified.
    newLine=${newLine:-$defaultNewLine};

    echo -en "${colors[$color]}";
    echo -en "$message";
    if [ "$newLine" = true ] ; then
        echo;
    fi
    tput sgr0; #  Reset text attributes to normal without clearing screen.

    return;
}

warning () {

    cecho -c 'yellow' "$@";
}

error () {

    cecho -c 'red' "$@";
}

information () {

    cecho -c 'blue' "$@";
}


Usage

Function cecho accepts the options to set the color and to control if a new line should be print.
Parameter -c or --color define the color for the print. See the array colors for the available options.
Parameter -n or --noline directs the system not to print a new line after the content.
The last parameter is the string message to be printed.
Functions warning, error and information are using cecho to print in color.
These three functions always print a new line and they have hardcoded one color set for each.

Example


#Get the name of the script currently being executed

scriptName=$(basename $(test -L "$0" && readlink "$0" || echo "$0"));

#Get the directory where the script currently being executed resides

scriptDirDIR=$(cd $(dirname "$0") && pwd);

#Print in blue color with no new line

cecho -n -c 'blue' "$scriptDir";

#Print in red color with a new line following the message

cecho -c 'red' "$scriptName";

#Using the information() function to print in blue followed by a new line

information ‘End of script’;


Activate a wireless hotspot on Windows 10 1

Requirements

  • You must be an administrator of the machine to complete this guide.
  • You need to have at least two network devices.
  • One of them needs to have access to the internet and the other one needs to be a WiFi adapter which has Hosted Network support.

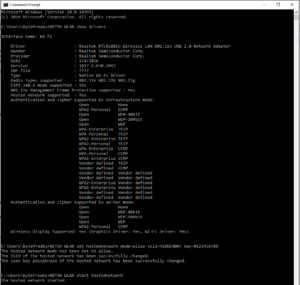
To check if your wireless adapter supports the functionality for Hosted Network, open a Command Prompt and type NETSH WLAN show drivers.

To open the Command Prompt, press the buttons Windows+R on your keyboard.
A new run command prompt will appear.
Type in the input box cmd and hit the Enter button.

In the new Command Prompt type NETSH WLAN show drivers, the results should be similar to below.

C:\Users\bytefreaks>NETSH WLAN show drivers
 
Interface name: Wi-Fi
 
    Driver                    : Realtek RTL8188CU Wireless LAN 802.11n USB 2.0 Network Adapter
    Vendor                    : Realtek Semiconductor Corp.
    Provider                  : Realtek Semiconductor Corp.
    Date                      : 3/4/2016
    Version                   : 1027.4.630.2015
    INF file                  : ????
    Type                      : Native Wi-Fi Driver
    Radio types supported     : 802.11n 802.11b 802.11g
    FIPS 140-2 mode supported : Yes
    802.11w Management Frame Protection supported : Yes
    Hosted network supported  : Yes
    Authentication and cipher supported in infrastructure mode:
                                Open            None
                                WPA2-Personal   CCMP
                                Open            WEP-40bit
                                Open            WEP-104bit
                                Open            WEP
                                WPA-Enterprise  TKIP
                                WPA-Personal    TKIP
                                WPA2-Enterprise TKIP
                                WPA2-Personal   TKIP
                                WPA-Enterprise  CCMP
                                WPA-Personal    CCMP
                                WPA2-Enterprise CCMP
                                Vendor defined  TKIP
                                Vendor defined  CCMP
                                Vendor defined  Vendor defined
                                Vendor defined  Vendor defined
                                WPA2-Enterprise Vendor defined
                                WPA2-Enterprise Vendor defined
                                Vendor defined  Vendor defined
                                Vendor defined  Vendor defined
    Authentication and cipher supported in ad-hoc mode:
                                Open            None
                                Open            WEP-40bit
                                Open            WEP-104bit
                                Open            WEP
                                WPA2-Personal   CCMP
    Wireless Display Supported: Yes (Graphics Driver: Yes, Wi-Fi Driver: Yes)

In the results you need to find the line Hosted network supported and verify that the value is set to Yes, if it is not, then you cannot proceed with this wireless network adapter.

In case you got a permission error on the above command, try to open a new Command Prompt with admin rights.

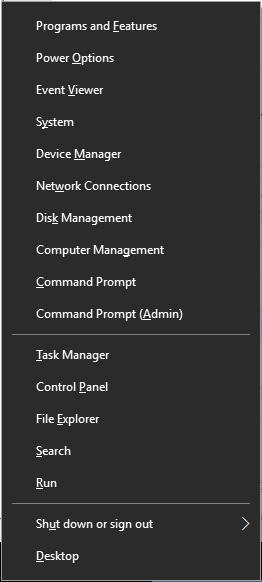
Press the keys Windows+X, in the pop-up menu select Command Prompt (Admin). If your account has enough access rights, a new run command prompt will appear. In the new Command Prompt (Admin) type NETSH WLAN show drivers, the results should be similar to above.

If this failed as well, you cannot proceed with the current account, you either need to sign in with another account or ask your system administrator to perform this task for you.

How to setup the hotspot

In the Command Prompt enter the following command:

NETSH WLAN set hostednetwork mode=allow ssid=BYTEFREAKS key=0123456789

Update ssid=BYTEFREAKS with the name that you want to give your network. e.g. ssid=MY_NETWORK.

Update key=0123456789 with the password that you want to give your network. e.g. ssid=y0m2ZSQ3ng.

The new network will use WPA/WPA2 PSK security policy so your password needs to be at least 8 characters long.

The results will be similar to the following block.

C:\Users\bytefreaks>NETSH WLAN set hostednetwork mode=allow ssid=HIDDEN007 key=0123456789
The hosted network mode has been set to allow.
The SSID of the hosted network has been successfully changed.
The user key passphrase of the hosted network has been successfully changed.

How to activate the hotspot

Once the Hosted Network is created, enter the following command as is to activate it

NETSH WLAN start hostednetwork

C:\Users\bytefreaks>NETSH WLAN start hostednetwork
The hosted network started.

After this step, your network will be visible to connect to but it will not provide its users with internet access.

Please note that due to the lack of commands in the documentation (https://msdn.microsoft.com/en-us/library/windows/desktop/dd815243(v=vs.85).aspx) it is not possible to prevent your hotspot from broadcasting its SSID to everyone. In other words, it is not possible to hide your network from other users, so use a strong password!

hotspot-creation-commands

How to share internet connection with the hotspot

Press on the keyboard Windows+X to open the Power User menu, and select Network Connections.

power-user-menu

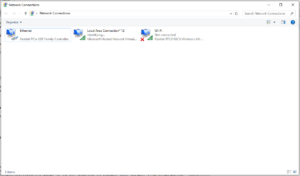
You will notice that a there is a new device in this list. The name of this device will be something line Local Area Connection* 12. That device is the new virtual device you created in the previous step to create the hotspot.

network-configuration-before-sharing

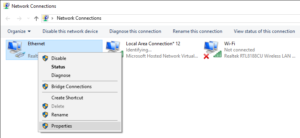
Right-click the other network adapter, that has an active internet connection and select Properties.

network-configuration-right-click-device

Click on the Sharing tab.

network-configuration-share-settings

Enable the Allow other network users to connect through this computer's Internet connection option.

From the Home networking connection drop-down menu select the virtual device that we created.

Click OK to close the configuration and apply the changes.

By completing this step, all devices connected to your Hotspot will have access to the internet via the connection of the second network device.


Install terminator in CentOS 6.5 (64bit)

We installed CentOS 6.5 (64bit) using this ISO, which we downloaded from http://vault.centos.org/6.5/isos/x86_64/

Once we got the OS started, we executed yum update -y to update all installed packages that were older than the versions in the repositories.
After the update process was complete, we then tried to install terminator using yum.

Executing yum install -y terminator resulted in an error:

Loaded plugins: fastestmirror, refresh-packagekit, security
Setting up Install Process
Loading mirror speeds from cached hostfile
* base: mirror.us.leaseweb.net
* extras: mirror.us.leaseweb.net
* updates: mirror.us.leaseweb.net
No package terminator available.
Error: Nothing to do

To solve the problem we needed to install the Extra Packages for Enterprise Linux (EPEL) repository using yum install -y epel-release.

After the installation was done, we executed yum install -y terminator once more and the installation of terminator succeeded.


Downgrade texinfo on CentOS 7.0 (64bit) to version 4.13

Recently we had to download texinfo from version 5.1 to any version less than version 5 series.
We used texinfo version 4.13 which is the latest in the version 4 series.

We were trying to compile some tools using an older version of gcc. Instead of using 4.8.5, we used 4.8.2 to achieve our goal and that caused a problem with some .texi files.

Methodology


#Making sure we are not missing any 32bit libraries since we are on a 64bit machine
yum install glibc.i686 ncurses-libs.i686;
#Download the source code
wget http://ftp.gnu.org/gnu/texinfo/texinfo-4.13.tar.gz;
#Extract the files
tar -zxf texinfo-4.13.tar.gz;
#Navigate to the folder
cd texinfo-4.13;
#Configure the installation and make all necessary checks
./configure;
#Build
make;
#Install
sudo make install;