papouch: TMU – USB thermometer
Today, we found in stock some USB thermometers by papouch, which we decided to put to use.
We wanted to create a small bash script that would take the measurements from the thermometers and log them along with the system date/time.
After doing some minor research we got to the product website, where it had a lot of useful information about the device, device drivers and source code which can utilize the device on a Windows machine.
Unfortunately for us, there was no source code for a simple bash script on Linux.
Before we continue, lets fill our heads with some information on the device:
TMU is a simple thermometer with a USB interface. The thermometer uses the USB interface for communication and also as a power source. It measures temperatures from –55 °C to +125 °C (with 0.1 °C resolution). The communication utilizes a simple ASCII protocol. Temperature values are transmitted in degrees Celsius; no numerical conversion is necessary.
–From https://www.papouch.com/en/shop/product/tmu-usb-thermometer/
The operating system on our machine was GNU/Linux CentOS 7, after plugging in the devices, we issued the command lsusb from which we saw that the OS had recognized the devices.
From the manual we read that the interface for communication of the device with the computer is implemented via a serial port.
The configuration parameters of the serial port that the device creates were the following:
COMMUNICATION PROTOCOL
TMU cannot receive instructions, it can only send out the temperature values in regular time intervals (approx. 10 seconds).
The temperature is send in a format that is compatible with the Spinel protocol.
The thermometer’s serial line parameters are:Speed : 9,600 Baud Number of data bits : 8 Parity : none Number of stop-bits : 1— From https://www.papouch.com/en/shop/product/tmu-usb-thermometer/tmu_en.pdf/_downloadFile.php
Since the newly attached devices were USB-to-Serial devices, we knew that they would create ttyUSBx devices in the /dev folder.
Indeed, after checking into the /dev folder, there were two newly created devices ttyUSB0 and ttyUSB1, one for each device.
We tried to connect to the devices using various methods and attempted to redirect the output so that we could parse it.
To our surprise, the data would ‘disappear’ from the pipe…
We could see the data on the screen when we had no pipes following and we could even replace the \r character with \n so that each new information block would appear in a new line. But, whenever we tried to do additional formatting, e.g. remove all characters that are not part of the temperature description, the whole data would vanish..
Our solution
For us process substitution did the trick!
Process substitution feeds the output of a process into the stdin of another process.
We redirected the stdout that was being generated while reading the data from the serial port to another process from where we were able to normally process them.
The following example, reads the data from the serial port, from each line it discards all characters except for characters at the positions 6 until 11 where the temperature information is presented according to the documentation.
sudo sh -c "cat < /dev/ttyUSB0" 1> >(while read line; do echo $line | cut -c6-11; done);
The above command would turn data of this format:
*B1E1+026.0
*B1E1+026.1
To this format:
+026.0
+026.1
And so we could start the development of our script.
Our script
The following script will prepend the current date and time on each line (right before the temperature reading).
sudo sh -c "cat < /dev/ttyUSB0" 1> >(while read line; do echo $line | cut -c6-11 | xargs -L 1 echo `date`; done);
Another solution, using miniterm.py
It has come to our attention that some times the thermometers do no work as expected using the cat command.
So, we propose an alternative using miniterm.py.
miniterm.py is a very simple serial terminal and is part of pySerial.
miniterm.py --echo --eol CR --quiet /dev/ttyUSB0 1> >(while read line; do echo $line | cut -c6-11 | xargs -L 1 echo `date`; done);
—
Some details on the format from the manual:
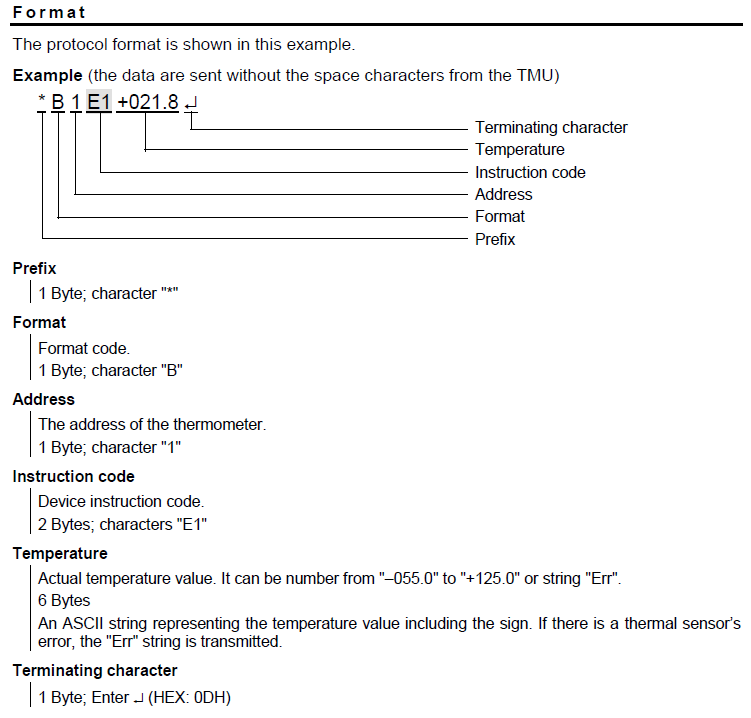
The protocol format is shown in this example.
Example (the data are sent without the space characters from the TMU)
*B1E1+026.1
- 1 Byte; Prefix: the character
* - 1 Byte; Format code: the character
B - 1 Byte; The address of the thermometer: the character
1 - 2 Bytes; Device instruction code: the characters
E1 - 6 Bytes; Actual temperature value. It can be number from
–055.0to+125.0or stringErr.
An ASCII string representing the temperature value including the sign. If there is a thermal sensor’s error, theErrstring is transmitted. - 1 Byte; Terminating character: Carriage Return (Decimal:
13, Hex:0Dh, Binary:00001101, Character\r)