How to see the isc2.org Webex Online Instructor-Led courses using your browser only

Recently, we registered for some online instructor-led courses in isc2.org.
We were using a Ubuntu GNU/Linux machine with the latest Firefox / Chromium and even Chrome versions.
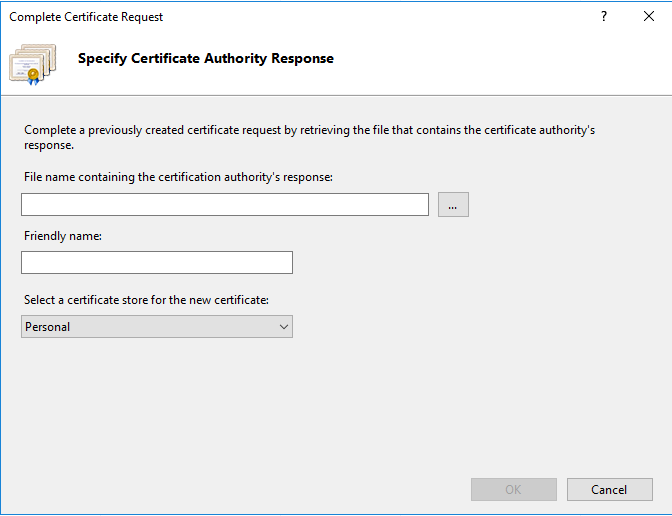
There was something wrong with the meeting. When clicking on the Join button, instead of loading, it was trying to download a java applet configuration (CiscoWebExServlet).
After reading about those files and a lot of work, which included setting up a 32-bit version of Firefox with a 32-bit version of the Oracle JRE and installing IcedTea, we managed to connect to the meeting, but we had no audio.

When trying to connect to the meeting via phone, we got no voice.

When trying the mobile application, it required a password, which was never supplied.

So, we had to find another way in!

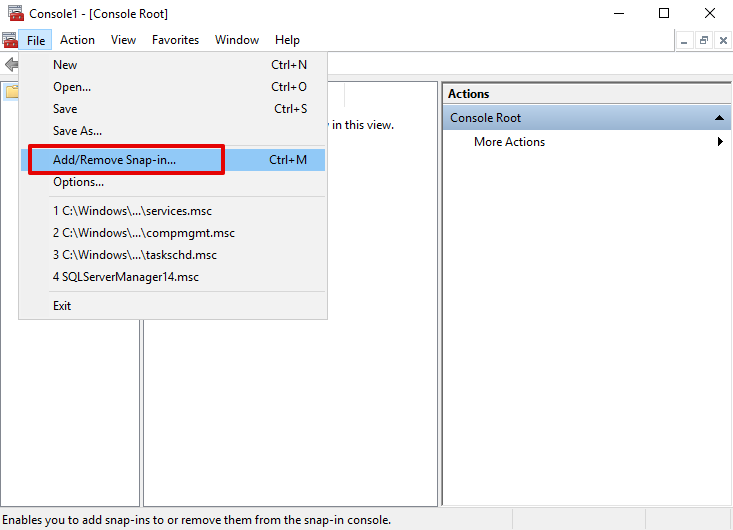
Using the Network tab of the Inspect Element menu, we clicked on the gear in the upper right corner and enabled the Persist Log option. Then we clicked on the Join button and logged all redirects with their parameters.

In isc2.org virtual class, the Join button has a custom link to https://www.cirqlive.com/, which is used to join the meetings.
Once you click on that button, the browser follows several redirects between webex.com and cirqlive.com, and it ends up on this page https://isc2training.webex.com/tc3300/webcomponents/docshow/meetingframe.do?siteurl=isc2training asking to download the servlet.

From the logged redirects of the above link, we got the request to https://isc2training.webex.com/tc3300/m.do where we got the meeting ID and password in the POST parameters.
Then went to https://signin.webex.com/join added the meeting ID, which led us to this page https://isc2training.webex.com/isc2training/e.php?AT=SI&From=GPS&MK=XXXXXXXX (using fake meeting ID)
We filled in the Session Password and clicked on Join by browser, and we could join as expected.


Programming Course Series [01 – Introductory course to python]

Computer programming is important today because so much of our world is automated. Humans need to be able to control the interaction between people and machines. Since computers and machines are able to do things so efficiently and accurately, we use computer programming to harness that computing power.

This is the first of hopefully many programming courses that can introduce technically inclined people to Python programming.


  Date and Time

Location

Information on our VPN service (instructions for iOS devices) will be provided to the registrants that cannot join us along with instructions on our BigBlueButton platform.

Hosts

Registration


  Speakers

George Michael

Topic:

Everybody can write a computer program (An introduction using Python)


Agenda

Introduction to programming and reasons to write programs?

These are the course-wide materials as well as Introductions’ first section where we discuss what writing programs mean. In the third part of the class, we will finish the Introduction and have the quiz and first task.

Installing and Using Python

We’re going to set up stuff so that you can write Python programs.

Introduction to programming and reasons to write programs? (continued)

We try to cover the “big picture” of programming so that you get a “table of contents” from what to expect to learn. Don’t worry if, the first time you hear it, not everything makes perfect sense. This part is very broad.

Variables and Expressions

We will explain how a program uses the memory of the machine to store, retrieve and process information in this section.

Conditional Code

We will move from sequential code in this section that simply runs one line of code after another to conditional code where some steps are skipped. It is a very basic idea – but it is how “choices” are made by computer software.

Functions

We are going to learn about what functions are and how we can use them. Functions will be an essential way for us to make sense of our code, as we move into more and more complicated programs.

Loops and Iteration

Our four fundamental programming patterns are completed by loops and iteration. Loops are the way we say Python over and over to do something. Loops are the manner in which we create programs that remain with a problem until the problem is solved.


Using Nomenclature in TeXstudio

Recently, we were compiling a Latex document that was using the nomencl package to create a nomenclature list. The tool that we were using was TeXstudio. We noticed that the nomenclature was not in the final document and no error was generated to indicate so.

To fix the issue, we had to manually execute the makeindex command which would create the necessary meta-files. To avoid using a terminal each time we wanted to update the nomenclature, we defined a custom command in TeXstudio which would make the process a bit more easy for us.

In the following video you will see the following steps:

  1. Going to Options menu.
  2. From there selecting the Configure TeXstudio option.
  3. From the popup window, we switched to the Build tab by clicking on the appropriate button on the left side column.
  4. In the group User Commands we clicke on the + Add button which created a new entry for us.
  5. In the new entry we filled:
    1. The menu name of the command: user0: Make Nomenclature
    2. The actual command to build the files needed for the nomenclature: makeindex -s nomencl.ist -t %.nlg -o %.nls %.nlo
  6. Then we clicked on the OK button to close that window.
  7. To test that the command works as expected, we went to the Tools menu.
  8. From there to the sub-menu named User, where we found our new command listed as 1: Make Nomenclature.
    This command produced all files necessary for the makenomenclature command to work.
  9. Finally, we clicked on the Build & View button to verify that everything is OK.

Cloudflare Origin Server Certificate for IIS 10 Server on Windows Server 2016 to allow Full (strict) mode SSL/TLS encryption mode 8

Create a Certificate Request from your Windows Server

  1. Open Internet Information Services (IIS) Manager from the Windows Server 2016 through Control Panel -> Administrative Tools
  2. Select your server from the Connections and open Server Certificates
  1. From the Server Certificates Actions select Create Certificate Request
  1. Fill in the following form with your details:
Common name: [your domain]
Organization: [your organization name]
etc.
  1. Set the settings for the Cryptographic service provider of the certificate, the bigger the length of the certificate the better the security but it makes the server slower.
  1. Specify the filename of the txt file where you will save the certificate request

Create the certificate from Cloudflare using your own certificate request that you created from your Windows Server

  1. Open your Cloudflare account, select your domain, open SSL/TLS tab and click on Origin Server in order to create the certificate
  1. Select the option ‘I have my own private key and CSR’ where you will Copy-Paste the certificate you saved on the txt file from your Windows Server, fill in the hostnames, select the expiration years and press Next
  1. Copy-Paste in PEM key format the certificate in a text file and save the file

Add the public certificate from Cloudflare at your Windows Server

  1. Copy the file with the PEM certificate from Cloudflare at your Windows Server
  2. Select ‘Complete Certificate Request’ from the IIS Manager Server Certificates Actions
  1. Select the PEM certificate you copied at the server and add a friendly name (e.g. the domain it covers and the expiration date of it):
  1. The certificate will appear at the list of the Server Certificates with the Friendly name you added at the form before

Import Cloudflare Origin CA root certificate at your Windows server

  1. Copy the Cloudflare Origin CA — RSA Root certificate from Cloudflare website, save to a file and transfer it to your Windows Server
  2. Open the Certificates Microsoft Management Console (MMC) snap-in by typing mmc.exe at the command prompt (or at the run dialog that you can open by pressing the buttons Win+R)
  3. On the File menu, select Add/Remove Snap-in
  1. In the Add or Remove Snap-ins dialog box, select Certificates snap-in in the Available snap-ins list, click Add, and then select OK
  1. In the Certificates snap-in dialog-box, select Computer account, and then select Next
  1. In the Select computer dialog box, click on Finish
  1. In the Add or Remove Snap-ins dialog box, select OK
  1. In the Certificates MMC snap-in, expand Certificates, right-click Intermediate Certification Authorities, point to All Tasks, and then select Import
  1. In the Certificate Import Wizard, select Next
  1. In the File to Import page, select the file with the Cloudflare origin CA root certificate you saved before, and then select Next
  1. Select Next at the Certificate Import Wizard
  1. Select Finish at the Certificate Import Wizard
  1. The certificate will appear at the Certificates list

Use the newly created server origin certificate from Cloudflare for your website

  1. Select Bindings from the IIS Manager Web Site Actions
  1. Select the https binding and click Edit. If you do not have an https binding, press Add... to create one like in the second screen down
  1. At the SSL certificate dropdown list Select the new certificate and press OK

Force your website domain to pass through Cloudflare

  1. Open your Cloudflare account, select your domain, go to DNS option and change the Proxy status for your website from DNS only to Proxied by click it
  1. Enable Cloudflare full (strict) SSL TLS encryption mode in the SSL/TLS tab