neural-style-tf


Revisiting neural-style-tf in 2021

We decided to revisit this post (https://bytefreaks.net/applications/neural-style-tf-another-open-source-alternative-to-prisma-for-advanced-users) in 2021 and provide the installation manual for Ubuntu 20.04LTS.

Setup

Conda / Anaconda

First of all, we installed and activated anaconda on an Ubuntu 20.04LTS desktop. To do so, we installed the following dependencies from the repositories:

sudo apt-get install libgl1-mesa-glx libegl1-mesa libxrandr2 libxrandr2 libxss1 libxcursor1 libxcomposite1 libasound2 libxi6 libxtst6;

Then, we downloaded the 64-Bit (x86) Installer from (https://www.anaconda.com/products/individual#linux).

Using a terminal, we followed the instructions here (https://docs.anaconda.com/anaconda/install/linux/) and performed the installation.

Python environment and OpenCV for Python

Following the previous step, we used the commands below to create a virtual environment for our code. We needed python version 3.7 (even though anaconda highlights version 3.9 here https://www.anaconda.com/products/individual#linux) and OpenCV for python.

source ~/anaconda3/bin/activate;
# We need python 3.7 at max to support TensorFlow version 1
conda create --yes --name Style python=3.7;
conda activate Style;
# Version 1 of TensorFlow is needed for the project that we will clone, version 1.15 is the latest and greatest version of TensorFlow 1.
pip install tensorflow==1.15 tensorflow-gpu==1.15 scipy numpy opencv-python;

Cloning the project and all necessary files

git clone https://github.com/cysmith/neural-style-tf.git;
cd neural-style-tf/;
wget http://www.vlfeat.org/matconvnet/models/imagenet-vgg-verydeep-19.mat;
#After everything is complete, it is time to create our first 'artistic' image.
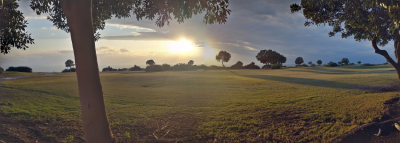
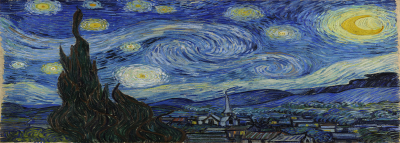
python neural_style.py --content_img "/home/bob/Pictures/Aphrodite Hills Golf Course - Paphos, Cyprus.jpg" --style_imgs "/home/bob/Pictures/Van_Gogh_-_Starry_Night_-_Google_Art_Project.jpg" --max_size 400 --max_iterations 500 --device /cpu:0 --verbose;

Results

Result
Original Content
Adapted Style Input

Problems that you might get

If you get the following error:

ImportError: libGL.so.1: cannot open shared object file: No such file or directory

You will need to install some additional dependencies for OpenCV as your Ubuntu installation might have been minimal. To fix this issue, install the following package from the repositories:

sudo apt-get update;
sudo apt-get install -y python3-opencv;


neural-style-tf: Another open source alternative to Prisma (for advanced users) 1

Recently we stumbled upon another very interesting project, it is called neural-style-tf which is a TensorFlow implementation of an artificial system based on Convolutional neural networks and attempts to separate and combine the content of one image with the style of another.

According to the authors, this tool is based on the following papers

What this tool does is ‘simple’, it takes as input two images, the style image and the content image and using the style image, it tries to recreate the content image in such way that the content image looks like it was created using the same technique as the style image.
Following, is an example of a photograph that was recreated using the style of The Starry Night.

This tool offers a ton of possibilities and options, which we still did not play through yet.
Overall, we are very happy with the initial results we got. The final renderings look really nice and the fact that you get to choose your own style images it gives this tool a very nice advantage.

What we did not like though, is that it takes a lot of time and memory to complete the rendering of a single image (especially if you do not use a GPU to speed up the process).
This issue with the resources is normal and expected, unfortunately though it limits the fun out of the system. Each experiment you make is blocking you for some time and you cannot fiddle with the results in real time.

We installed this tool on an Ubuntu GNU/Linux with success.
Following are the exact commands we used to install it on Ubuntu and convert our first image (the one above).

cd ~;
sudo apt-get install python-pip python-dev;
pip install tensorflow;
pip install tensorflow-gpu;
pip install scipy;
git clone https://github.com/opencv/opencv.git;
cd ~/opencv;
mkdir release;
cd release;
cmake -D CMAKE_BUILD_TYPE=RELEASE -D CMAKE_INSTALL_PREFIX=/usr/local ..;
make;
sudo make install;
cd ~;
git clone https://github.com/cysmith/neural-style-tf.git;
cd neural-style-tf/;
wget http://www.vlfeat.org/matconvnet/models/imagenet-vgg-verydeep-19.mat;
#After everything is complete, it is time to create our first 'artistic' image.
python neural_style.py --content_img "/home/bytefreaks/Pictures/Aphrodite Hills Golf Course - Paphos, Cyprus.jpg" --style_imgs "/home/bytefreaks/Pictures/Van_Gogh_-_Starry_Night_-_Google_Art_Project.jpg" --max_size 1250 --max_iterations 1500 --device /cpu:0 --verbose;

Following are the exact commands we used to install it on CentOS 7 (64bit) and convert our first image (the one above).


cd ~;
sudo yum install python-pip cmake;
sudo pip install --upgrade pip;
sudo pip install tensorflow scipy numpy;
git clone https://github.com/opencv/opencv.git;
cd ~/opencv;
mkdir release;
cd release;
cmake -D CMAKE_BUILD_TYPE=RELEASE -D CMAKE_INSTALL_PREFIX=/usr/local ..;
make;
sudo make install;
cd ~;
git clone https://github.com/cysmith/neural-style-tf.git;
cd neural-style-tf/;
wget http://www.vlfeat.org/matconvnet/models/imagenet-vgg-verydeep-19.mat;
export PYTHONPATH=$PYTHONPATH:/usr/local/lib/python2.7/site-packages
python neural_style.py --content_img "/home/bytefreaks/Pictures/Aphrodite Hills Golf Course - Paphos, Cyprus.jpg" --style_imgs "/home/bytefreaks/Pictures/Van_Gogh_-_Starry_Night_-_Google_Art_Project.jpg" --max_size 1250 --max_iterations 1500 --device /cpu:0 --verbose;

Our input images were the following:

Content Image

Style Image

Useful links