How to upgrade all Python packages with pip
Below is the command that we use to update all outdated packages in pip.
pip list --outdated --format=freeze | grep -v '^\-e' | cut -d = -f 1 | xargs -n1 pip install -U;

Below is the command that we use to update all outdated packages in pip.
pip list --outdated --format=freeze | grep -v '^\-e' | cut -d = -f 1 | xargs -n1 pip install -U;
Recently we decided to give it a go with Symfony PHP framework on an Ubuntu 18.04 LTS. Below you will find the commands we executed to install the skeleton project of symfony with some comments.
To install symfony, you need composer which is a dependency manager for PHP. The version of composer that was available in apt when this post was written was “very” old. Specifically, it had version Composer 1.6.3 2018-01-31 16:28:17. For this reason we decided to go with the version that is available in the official website of composer. The steps we followed were the ones below:
# Update our system
sudo apt update -y;
sudo apt upgrade -y;
# Install dependencies
sudo apt install curl php-cli php-mbstring git unzip php-xml -y;
# Get composer installer from the official site
curl -sS https://getcomposer.org/installer -o composer-setup.php;
# Verify the the download was not corrupt by checking the sha384 sum of the installer file
HASH=`curl https://composer.github.io/installer.sha384sum | cut -d' ' -f 1`;
# If this step fails, go back to the curl command and try again, it would mean that there was a problem when downloading the installer from the net
php -r "if (hash_file('SHA384', 'composer-setup.php') === '$HASH') { echo 'Installer verified'; } else { echo 'Installer corrupt'; unlink('composer-setup.php'); } echo PHP_EOL;"
# Upon successfully validating the install, we can proceed to the actual installation.
sudo php composer-setup.php --install-dir=/usr/local/bin --filename=composer;
source ~/.bashrc;
After the above steps are completed, we were able to proceed with the final step, which would be to create the symfony skeleton project via the composer with the following command in the folder named sandbox:
composer create-project symfony/skeleton sandbox '4.4.*';
To verify the installation of the skeleton project we started a web server with PHP in the installation folder of the project and thus verify it through the browser:
cd sandbox;
# We did not use the port 80 as it would require root access to start
php -S 127.0.0.1:8000 -t public;
From a browser visiting http://127.0.0.1:8000/ we got to see:

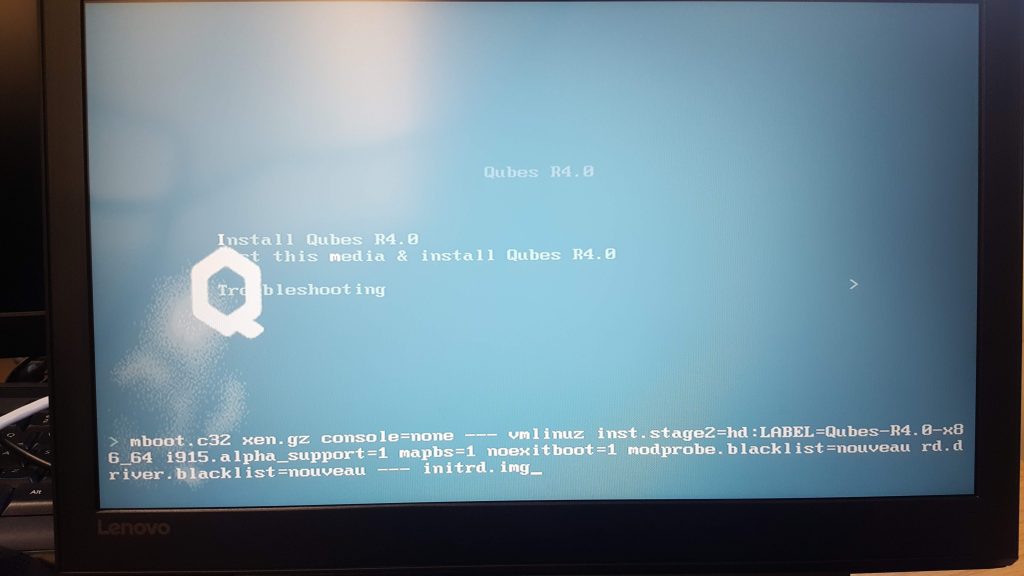
Secure Boot from BIOSboot order, select Legacy Devices first, again from BIOSe button to edit the boot arguments, disabling the graphics card driver. For us what worked is the following:mboot.c32 xen.gz console=none --- vmlinuz inst.stage2=hd:LABEL=Qubes-R4.0-x86_64 i915.alpha_support=1 mapbs=1 noexitboot=1 modprobe.blacklist=nouveau rd.driver.blacklist=nouveau -- initrd.imgRecently, we were trying to install Qubes GNU/Linux version 4.0 on a Lenovo Legion Y520 that has NVIDIA® GeForce® GTX 1050 Ti installed. After disabling secure boot from the BIOS and then setting the default boot to be on Legacy Devices, we were able to boot the anaconda installer.
We proceeded into configuring the installation (set the timezone, the keyboard layout, created the administrator user and selected the disk for the installation) and we waited for the system to install. After some serious amount of time, we realized that the installer had crashed completely while installing qubes-mgmt-salt-base-topd.noarch. We restarted the process and tried again, this time the installed did not crash but it would get stuck at the same step. Following, we gave it a few more tries just in case it would work but unfortunately it would always result either crashing or getting infinitely stuck.
Following the guide at https://www.qubes-os.org/doc/uefi-troubleshooting/ and https://www.qubes-os.org/doc/nvidia-troubleshooting/ we modified the boot parameters of the installer to add mabps and noexitboot, then disable the nouveau driver for the graphics card and it worked like a charm.
OpenSSH is a freely available version of the Secure Shell (SSH) protocol family of tools for remotely controlling, or transferring files between, computers.
To install the openssh-server on an Ubuntu, you need execute the following command as root or using sudo:
apt-get install openssh-server -y;
To disable the ssh service, execute the following command as root or using sudo:
systemctl disable ssh;
To enable the ssh service, execute the following command as root or using sudo:
systemctl enable ssh;
To stop (or deactivate) the ssh service, execute the following command as root or using sudo:
systemctl stop ssh;
To start (or activate) the ssh service, execute the following command as root or using sudo:
systemctl start ssh;
To check the status of the ssh service, execute the following command as root or using sudo:
systemctl status ssh;
In a nutshell:
enabled is a service that is configured to start when the system bootsdisabled is a service that is configured to not start when the system bootsactive is a service that is currently runninginactive is a service that is currently stopped and may be disabled, but it can be started and become activeIn much more detail:
systemd provides a dependency system between various entities called “units” of 12 different types. Units encapsulate various objects that are relevant for system boot-up and maintenance. The majority of units are configured in unit configuration files, whose syntax and basic set of options is described in systemd.unit(5), however some are created automatically from other configuration, dynamically from system state or programmatically at runtime. Units may be “active” (meaning started, bound, plugged in, …, depending on the unit type, see below), or “inactive” (meaning stopped, unbound, unplugged, …), as well as in the process of being activated or deactivated, i.e. between the two states (these states are called “activating”, “deactivating”). A special “failed” state is available as well, which is very similar to “inactive” and is entered when the service failed in some way (process returned error code on exit, or crashed, or an operation timed out). If this state is entered, the cause will be logged, for later reference. Note that the various unit types may have a number of additional substates, which are mapped to the five generalized unit states described here.
— From man systemd

